Computer Graphics (MS
advertisement
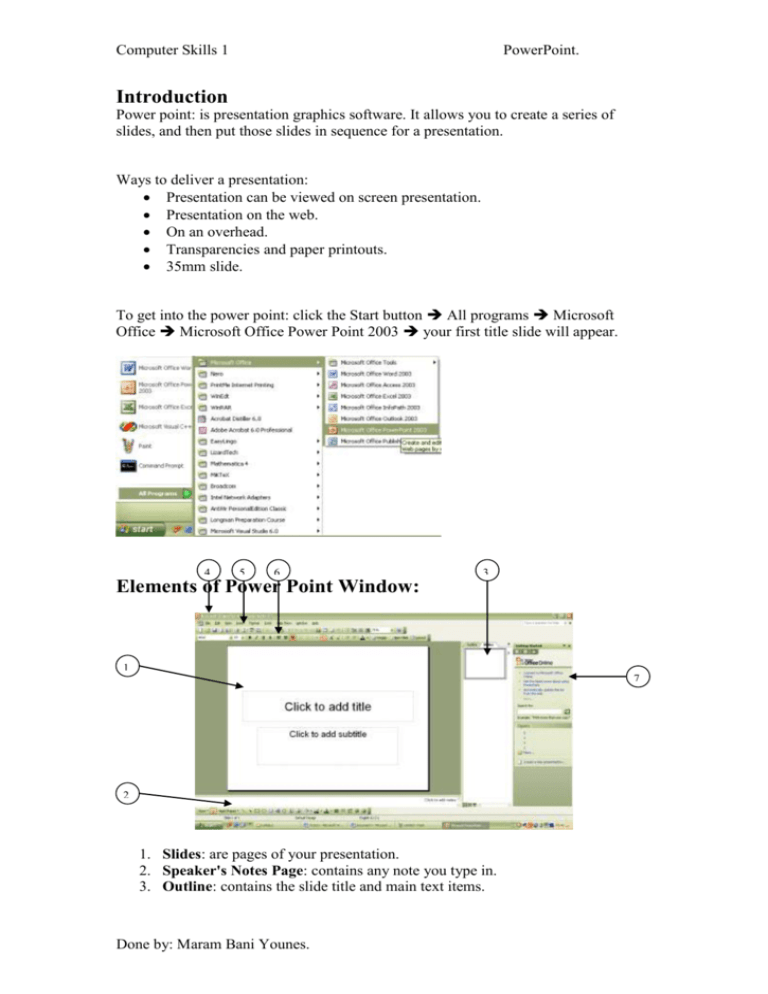
Computer Skills 1 PowerPoint. Introduction Power point: is presentation graphics software. It allows you to create a series of slides, and then put those slides in sequence for a presentation. Ways to deliver a presentation: Presentation can be viewed on screen presentation. Presentation on the web. On an overhead. Transparencies and paper printouts. 35mm slide. To get into the power point: click the Start button All programs Microsoft Office Microsoft Office Power Point 2003 your first title slide will appear. 4 5 6 3 Elements of Power Point Window: 1 7 2 1. Slides: are pages of your presentation. 2. Speaker's Notes Page: contains any note you type in. 3. Outline: contains the slide title and main text items. Done by: Maram Bani Younes. Computer Skills 1 4. 5. 6. 7. PowerPoint. The Title Bar: shows the name of the presentation. The Menu Bar: provides access to the commands on the menus. The Tools Bar: provides access to assorted commands. The Task Pane: appears on the right side within an office application. Presentation Creating a new presentation: There are three ways to create a new presentation: 1. On the file menu Click New, the new presentation task pane will appear as in the following figure. This task pane gives you ways with which to start creating a presentation. These include: a. Blank presentation: start with slides that have minimal design and no color applied to them. b. From AutoContent wizard: use the wizard to apply a design template that includes suggestions for text on your slides. c. From design template: base your presentation on a PowerPoint template that already has a design concept, fonts, and color scheme. d. From existing presentation: this command creates a copy of an existing presentation so you can make the design or content changes you want for the new presentation. 2. Click New on the standard tool bar. 3. Directly from the task pane choose new presentation and follow the steps in the first way. Done by: Maram Bani Younes. Computer Skills 1 PowerPoint. Saving a presentation: once you have set up your presentation, you must save it if you want to keep it. If you do not save it, it will be lost when you switch off your computer. 1. choose File then Select Save as, or click the save icon on the standard tool bar. 2. specify the drive and folder into which you wish to save your presentation. 3. give your presentation a filename. if you want you can save your presentation in another format, the file formats for saving presentation is: Save As type Presentation Windows Metafile Graphics Interchange format Joint photographic Experts Group Outline/RTF Extension .ppt .wmf Use to save A typical PowerPoint presentation A slide as a graphic .gif A slide as a graphic for use on Web pages. .jpg A slide as a graphic for use on web pages. .rtf Design template Power Point Show Web Page . pot .pps A presentation outline as an outline document. You lose the graphical content of your presentation. A presentation as a template. A presentation that will always open as a slide show presentation A web pages as a folder with an .htm file and all supporting files. .html .htm 4. Click Save. Opening a presentation: to retrieve a presentation you saved for revision and printing do the following: 1. Click File menu select Open. The Open dialog box will appear as illustrated in the following figure. Done by: Maram Bani Younes. Computer Skills 1 PowerPoint. 2. Change the directories and drives boxes to the directory and drive where you saved your document. 3. Click the file you want to open. 4. Click the Open button. Closing a presentation: to close the current presentation Choose file close. Page setup: to change slide setup, slide orientation to portrait or landscape. Change paper size of your presentation: Choose File menu click Page Setup. The Page Setup dialog box appears as shown in the following figure. On slide sized for box, select the appropriate output format for slide presentation such as overhead, handouts,35mm slides, on-screen show. Type in the new width and height. To change slide orientation choose portrait (taller than it is wide) or landscape (wider than it is tall). Under umber slides from, enter the number you want the slides to start with. Print preview: to preview your slides before printing, do the following: On the file menu, click Print Preview Click to preview the slides in your presentation to make adjustments before printing. Print A Presentation: Choose File Print, the print dialog box will appear as shown in the following figure. Done by: Maram Bani Younes. Computer Skills 1 PowerPoint. Choose ALL in order to print all of the slides. Choose Current in order to print only the slide in your presentation currently containing the insertion point. Select Selection to print the select text. To point a range of slides: Type the first and last page number in the pages box with hyphens. To print a specific individual page, list them separately by commas. To specify more than one copy of what ever you want to print: Type a number in the Number of Copies box in the print dialog box. In the print what you can choose: Slides: this will print each slide in one page. Handouts: this will determine how many slides will be appeared in a single page. Notes Pages: this will print the slide and any note about it in a single page, the slide will take a half of a page. Outline view: print all slides in steps and very small size. Working with slides Insert a New Slide: as your presentation develops you may need to add more slides to it: view the slide that will be above your new slide click New Slide from Insert menu or click from the standard tool bar click the slide layout from your new slide from the Slide Layout task pane. Done by: Maram Bani Younes. Computer Skills 1 PowerPoint. Slide Layouts: PowerPoint 2003 includes several slides layouts appear in slide layout task pane. To display Slide Layout task pane, do the following: On the Format menu, click Slide Layout. Text Layouts: enable you to create the following slides: 1. 2. 3. 4. Contents Layouts: 1. 2. 3. 4. 5. 6. 7. Title Slide. Title Only. Title and Text. Title and 2- Column Text. Blank. Content. Title and Content. Title and 2-Content. Title, Content and 2-Content. Title, 2-Content and Content. Title and 4-Content. Text and Contents Layouts: 1. 2. 3. 4. 5. 6. 7. Title, Text and Content. Title, Content and Text. Title, Text and 2-Content. Title, 2-Content and Text. Title and Text over Content. Title and Content over Text. Title, 2-Content over Text. Other Layouts: 1. Title, Text and Clip Art. 2. Title, Clip Art and Text. 3. Title, Text and Chart. 4. Title, Chart and Text. 5. Title, Text media Clip. 6. Title, Media Clip and Text. 7. Title and Table. 8. Title and Diagram or Organization Chart. 9. Title and Chart. Note: to change the layout of a slide, do the following: Done by: Maram Bani Younes. Computer Skills 1 PowerPoint. View the slide whose layout you wish to change On the Format menu, click Slide Layout Click on the new layout you want to use. PowerPoint View: PowerPoint has three main views: 1- Normal View: Is the main editing view, which you use to write and design your presentation. The view has three working areas: On the left, outline tab and slides tab. Outline tab: showing your slide text in outline form, you can start writing your content, plan how you want to present them, and move slides and text around. When the pane becomes narrow the outline and slides tabs change to display an icons as illustrated in the following figure. Slides tab: this tab enables you to see the slides in your presentation as thumbnailsized images while you edit. The thumbnail_make it easy for you to navigate through your presentation and to see the effects of your design changes. You can also rearrange, add, or delete slides. You can close the tabs with a close box in the right corner. Slide pane: you can add text, insert pictures, tables, charts, drawing objects, text boxes, and animations. Note pane: add notes that relates to each side's contents. 2- Slide Sorter View: display a small version of all slides in a presentation in as thumbnail. Slides Sorter view is an exclusive view of your slide in thumbnail form, making it easy to reorder, add, or delete slides and preview your transition and animation effects. 3- Slide Show View: to view slides in the same fashion as the presentation, gives you a preview of presentation. You see your presentation the way your audience will. Duplicate Slide: To duplicate a slide: Select the slide or slides you want to duplicate. Done by: Maram Bani Younes. Computer Skills 1 PowerPoint. Choose Insert Menu. Click Duplicate Slide. Deleting a Slide: View the slide you want to delete On Edit menu, Select Delete Slide. OR 1. On the Outline tab or Slide tab in normal view, select the slide you want to delete. 2. Press DELET. Moving through Slides: In normal View, you see one slide at a time on your screen. To Move through slides to view them: Drag the elevator up or down the scroll bar Stop at the desired slide. Or use Outline tab or Slides tab. Animated Presentation: Animation Effects: To add special visual or sound effect to text or to an object, you can have your bullets points fly from the right. If you want to apply animation to all the items in your slide, do the following: Select the slide you want to add animation to. 1. On the Slide Show menu, click Animation Schemes. 2. The Slide Design task pane will appear as shown in the following figure. Done by: Maram Bani Younes. Computer Skills 1 PowerPoint. 3. click an animation scheme in the list. 4. if you want to apply the scheme to all slides, click the Apply to All Slides button. 5. Select the AutoPreview check box to preview all animated effects on the slide. 6. To preview animations for a slide, display the slide you want to preview, and then click Play. To apply the animation effect to a specific object in the slide, do the following: 1. Display the slide in which you want to change an animation. 2. Click Custom Animation on the Slide Show menu. The Custom Animation task pane will appear as shown in the following figure. Done by: Maram Bani Younes. Computer Skills 1 3. click PowerPoint. and do one or more of the following: If you want to insert text or object into the slide show presentation with an effect, point to Entrance and then click the effect. If you want to add an effect to text or an object that is on the slide, point to Emphasis, and then click an effect. If you want to add an effect that makes text or an object to leave the slide, point Exit and then click an effect. If you want to add an effect that makes an object move in a specified pattern, point to Motion Paths and then click an effect. To remove an effect, select the animation item in and then click Transitions Effects: You may set a variety of special effects to improve the Transition from one slide o another. 1. Select the slide you want to add a transition to it. 2. Choose Slide Show menu Click Slide Transition. The Slide Transition task pane will appear as shown in the following figure. 3. Choose Effects in order to produce a variety of Slide Transition options including: box out; box in; cover left; cover right and many others select the one you want. 4. Also you can select the speed, and when to advance from one side to the next, in addition, you can variety of sound effects for the transition. Done by: Maram Bani Younes. Computer Skills 1 PowerPoint. Start a Slide Show Power point provides you with a tool enables you clarify the slide while you presenting it on slide show. 1. Open the presentation you want to view as a slide show. 2. Click Slide Show at the lower left of the PowerPoint window. 3. Slide Show toolbar will appear at the lower left of the slide. Arrows: helps you moving to the previous or next slide. Use Ballpoint Pen or Felt Tip Pen to write anything into the slide during slide show. Use Highlighter so as to highlight anything on the slide. You can change the color of pen by clicking the pointer arrow, and then click the arrow next to Ink Color click or tab the color you want to use. Use Slide Show toolbar to move between slides during presentation. Press ESC to exit Slide Show window. If you write into your slide or highlighted some items and want to exit the slide show window, a message will appear asking you if you want to keep these changes for future review or to discard them. Done by: Maram Bani Younes.
