Using a Bunsen Burner Introduction: The Bunsen burner is the most
advertisement
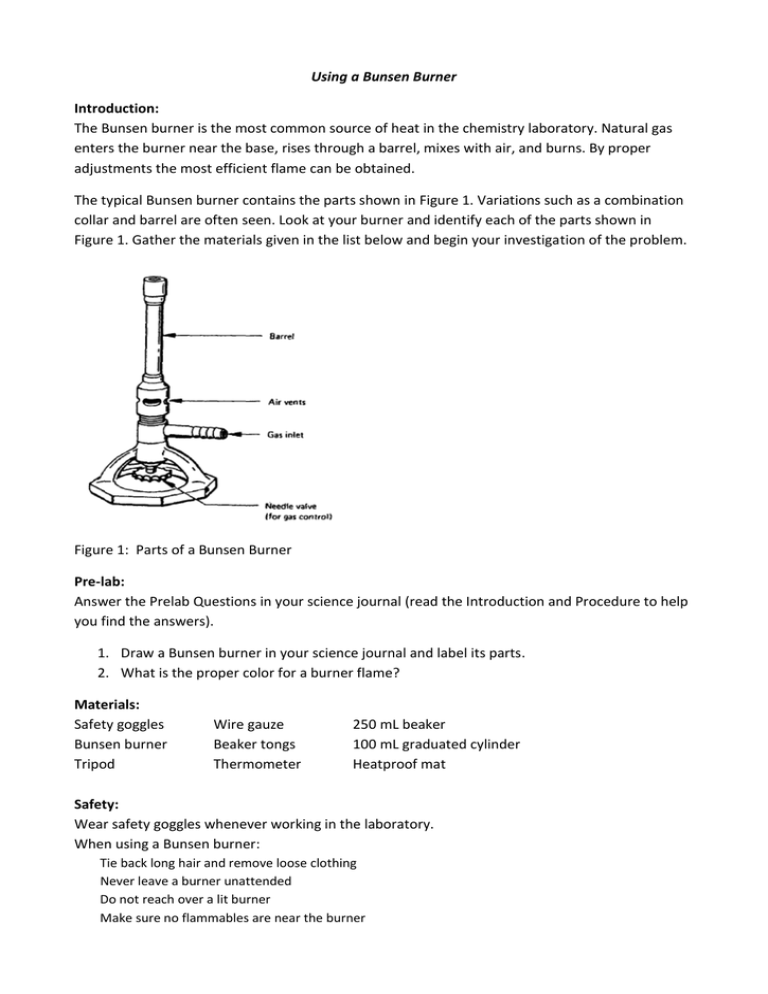
Using a Bunsen Burner Introduction: The Bunsen burner is the most common source of heat in the chemistry laboratory. Natural gas enters the burner near the base, rises through a barrel, mixes with air, and burns. By proper adjustments the most efficient flame can be obtained. The typical Bunsen burner contains the parts shown in Figure 1. Variations such as a combination collar and barrel are often seen. Look at your burner and identify each of the parts shown in Figure 1. Gather the materials given in the list below and begin your investigation of the problem. Figure 1: Parts of a Bunsen Burner Pre-lab: Answer the Prelab Questions in your science journal (read the Introduction and Procedure to help you find the answers). 1. Draw a Bunsen burner in your science journal and label its parts. 2. What is the proper color for a burner flame? Materials: Safety goggles Bunsen burner Tripod Wire gauze Beaker tongs Thermometer 250 mL beaker 100 mL graduated cylinder Heatproof mat Safety: Wear safety goggles whenever working in the laboratory. When using a Bunsen burner: Tie back long hair and remove loose clothing Never leave a burner unattended Do not reach over a lit burner Make sure no flammables are near the burner Procedure Part 1: Use of the Burner Setting the flame 1. Be sure the hose is securely fastened to both the burner and the gas outlet. 2. Light your match, then turn on the gas to the maximum open position. Light the burner with the match by holding the match just off to the side of the top of the barrel. 3. The flame height can be adjusted by turning the needle valve. 4. The flame color can be adjusted by turning the barrel (or opening the air vents). 5. If the flame is a yellow color, it is not getting enough air. Use the barrel and air ports to adjust it until it is completely blue and shows an inner cone as illustrated in the picture shown to you by your teacher. Too much air will cause the flame to be noisy and possibly blow out. 6. If the flame is blue without an inner cone, adjust the barrel or air ports until an inner cone is visible. Heating a liquid To heat large amounts of water use the set-up shown in figure 2 below. Assemble this apparatus now (without the beaker) for use in the next part of your investigation. Figure 2: Tripod setup Part 2: Efficiency of the Bunsen Burner Make a Data Table for this section in your science journal with the headings shown below: Location of Beaker in the Bunsen Burner Flame Trial 1: Top of flame heats bottom of beaker Trial 2: Top of inner blue cone heats bottom of beaker Initial temp. of water (˚C) Temp. of water (˚C) at 1 min. 2 minutes 3 minutes 4 minutes 5 minutes 6 minutes 7 minutes 1. Light the burner and adjust the flame properly. 2. For each trial measure 80.0 mL of water using a graduated cylinder and pour it into the beaker. 3. Take the initial temperature of the water and record in your data table. 4. Place the burner under the beaker and heat the water for 7 minutes taking the temperature of the water every minute. a. NOTE: For each temperature reading the temperature will change very rapidly when the thermometer is first placed in the water. Wait to record the temperature until the rate of change is slow. After recording your data, remove the thermometer and carefully place it on the table. 5. After the last temperature reading remove the burner from under the beaker. Remember not to turn it off! 6. Carefully remove the beaker (use tongs) from the stand and set it on the lab bench to cool. 7. Record the initial temperature of the water in your second beaker and it onto the tripod. Place the burner below, and adjust the height of the flame so that the bottom of the beaker is heated by the inner cone. 8. Repeat steps 3 - 5 for trial 2. Be sure to record the data after each measurement. Cleaning Up: If your glassware has cooled sufficiently, pour the water down the sink and dry your beakers. Leave the lab station just as you found it! Analysis: 1. Make a graph of temperature versus time on a separate sheet of graph paper (this will be turned in for a grade). Plot time on the x- axis (horizontal) and the water temperature for each flame location on the y-axis (vertical). Draw a line of best fit for each set of data. 2. Which line shows the most efficient heating of the water? Explain why you chose this line. 3. Where is the hottest part of the blue flame? Check your answer using the diagram below. 4. What are the advantages of using a blue flame instead of a yellow one for heating objects in the laboratory? 5. When heating a substance over a Bunsen burner where should the object be placed for most efficient heating? Why? 6. How does graphing the data help to determine the most efficient height for heating a liquid in a beaker?
