LEXUS GS350/GS450h 2013
advertisement
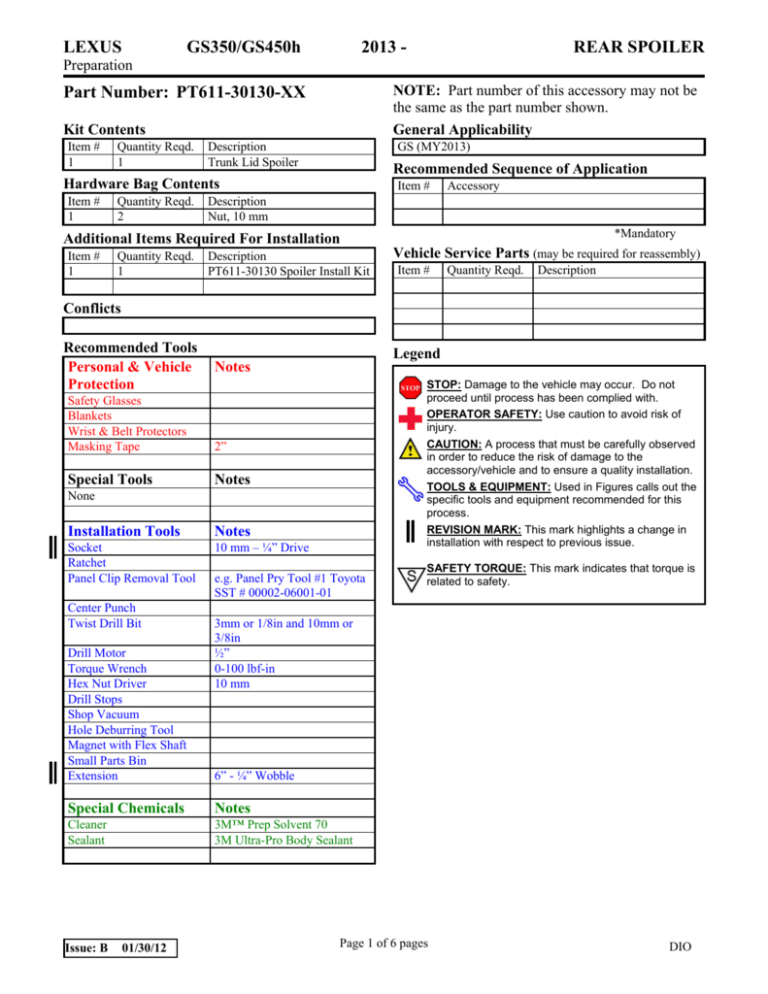
LEXUS GS350/GS450h 2013 - REAR SPOILER Preparation NOTE: Part number of this accessory may not be the same as the part number shown. General Applicability Part Number: PT611-30130-XX Kit Contents Item # 1 Quantity Reqd. 1 Description Trunk Lid Spoiler GS (MY2013) Recommended Sequence of Application Hardware Bag Contents Item # 1 Quantity Reqd. 2 Item # Accessory Description Nut, 10 mm *Mandatory Additional Items Required For Installation Item # 1 Quantity Reqd. 1 Description PT611-30130 Spoiler Install Kit Vehicle Service Parts (may be required for reassembly) Item # Quantity Reqd. Description Conflicts Recommended Tools Personal & Vehicle Protection Legend Notes Safety Glasses Blankets Wrist & Belt Protectors Masking Tape 2” Special Tools Notes STOP: Damage to the vehicle may occur. Do not proceed until process has been complied with. OPERATOR SAFETY: Use caution to avoid risk of injury. CAUTION: A process that must be carefully observed in order to reduce the risk of damage to the accessory/vehicle and to ensure a quality installation. TOOLS & EQUIPMENT: Used in Figures calls out the specific tools and equipment recommended for this process. REVISION MARK: This mark highlights a change in installation with respect to previous issue. None Installation Tools Notes Socket Ratchet Panel Clip Removal Tool 10 mm – ¼” Drive Center Punch Twist Drill Bit Drill Motor Torque Wrench Hex Nut Driver Drill Stops Shop Vacuum Hole Deburring Tool Magnet with Flex Shaft Small Parts Bin Extension e.g. Panel Pry Tool #1 Toyota SST # 00002-06001-01 3mm or 1/8in and 10mm or 3/8in ½” 0-100 lbf-in 10 mm 6” - ¼” Wobble Special Chemicals Notes Cleaner Sealant 3M™ Prep Solvent 70 3M Ultra-Pro Body Sealant Issue: B 01/30/12 SAFETY TORQUE: This mark indicates that torque is related to safety. Page 1 of 6 pages DIO LEXUS GS350/GS450h 2013 - REAR SPOILER Procedure Care must be taken when installing this accessory to ensure damage does not occur to the vehicle. The installation of this accessory should follow approved guidelines to ensure a quality installation. These guidelines can be found in the "Accessory Installation Practices" document. This document covers such items as: Vehicle Protection (use of covers and blankets, cleaning chemicals, etc.). Safety (eye protection, rechecking torque procedure, etc.). Vehicle Disassembly/Reassembly (panel removal, part storage, etc.). Electrical Component Disassembly/Reassembly (battery disconnection, connector removal, etc.). Please see your LEXUS dealer for a copy of this document. 1. Vehicle Preparation. Masking tape Blanket (a) Installation of the Deck Lid Spoiler should not take place until the following have been met: (1) Car wash completed. (2) Vehicle and Parts are at least 60 degrees Fahrenheit. Use a heat strip to warm body if necessary. Fig 1-1 Masking tape (b) Open the trunk lid and place blankets inside the trunk and around the trunk opening. Apply masking tape to the trunk lid surface in the area of the emblems and tail light gaps. (Fig 1-1, 1-2) (c) Remove the emergency release handle cover by unsnapping it and pulling it forward in the direction of the handle. (Fig 1-3) Fig 1-2 Panel Clip Removal Tool Power Trunk Trunk lid liner Clip location (d) Using Panel Clip Removal Tool, remove the fifteen (15) exposed push pins that attach the trunk lid liner. (Fig 1-3) (e) Carefully remove the trunk liner. The trunk liner and push pins will be saved for reinstallation. x15 Fig 1-3 Issue: B 01/30/12 Page 2 of 6 pages DIO LEXUS GS350/GS450h 2013 - REAR SPOILER Procedure 2. Using the Drill Template Center Punch (a) Eye protection must be worn during all hole drilling. (b) Place the Drill Template onto the trunk lid of the vehicle and mark the two (2) hole center with a center punch . (Fig 2-1) RH side drill template is symmetrical to LH side by flipping it over Fig 2-1 Note: Confirm the template is flat, smooth and properly aligned with the edges of the trunk lid and tape as indicated on the template. Template is designed to align to the right edge of the trunk lid. Flip the template over to locate left drill location. (Figs 2-1 & 2-2) Fig 2-2 CAUTION: Be careful not to cut or damage the wire harness which pass through the trunk lid. Drill bit sizes (c) Set the drill bit depths as shown. (Fig 2-3) 3mm or 1/8in (d) Using the 3mm or 1/8in bit, drill a pilot hole at the two (2) locations. (Fig 2-4) 10mm or 3/8in (e) Using the 10mm or 3/8in bit, drill the same two (2) locations to the final hole size. ½” Fig 2-3 (f) Carefully vacuum the trunk surface and the surrounding area of drilling debris. Use a magnet with a flexible shaft to remove any remaining chips. 3mm or 1/8in then 10mm or 3/8in Fig 2-4 Issue: B 01/30/12 Page 3 of 6 pages DIO LEXUS GS350/GS450h 2013 - REAR SPOILER Procedure (g) Debur all previously drilled holes. (h) Grab the trunk lid and with an up and down motion, vigorously shake the trunk lid to dislodge any metal chips remaining from the drilling process. Use a magnet with a flexible shaft to remove any remaining chips. (i) Vacuum any drill shavings from the trunk lid and remove the blankets and masking tape. (j) The trunk lid where the spoiler attaches must be cleaned with 3M™ Prep Solvent 70 and a lint free cloth. NOTE: When cleaning with 3M™ Prep Solvent 70 follow manufactures directions. Do not allow cleaner to air dry. (k) After cleaning, carefully apply 3M™ UltraPro Body Sealant to all drilled hole edges. 3. Deck Lid Spoiler Installation. (a) Affix spoiler onto trunk lid by applying masking tape on the edges of the spoiler ensuring that the upper and lower gaps are even as shown. (Fig 3-1) (b) Using your fingers, center the spoiler side to side on the trunk lid. Issue: B 01/30/12 Page 4 of 6 pages DIO LEXUS GS350/GS450h 2013 - REAR SPOILER Procedure (c) Loosely hand tighten the two (2) 10mm nuts on to the studs from the inside of the trunk lid. (Fig 3-2) (d) Ensuring that the upper and lower gaps are even and the spoiler is centered on the trunk lid. Remove masking tape and affix spoiler by pulling on the pull tabs in the directions shown. (Fig 3-3) Hand tighten 2 nuts (1) Pre-pull each of the nine (9) pull tab liners and lightly rest them back over the tape prior to installing the spoiler to facilitate the removal of the tape liners in the following step. Fig 3-2 ② ⑥ ⑨ ⑧ ⑦ ① ⑤ (2) Remove the pull tab/liners in the sequence shown in figure 3-3, starting ④③ with “①” through “⑨” pulling the tabs in the directions indicated by the arrows. (3) Do not apply pressure to the spoiler as the tape liners are removed so the tape liners do not get trapped between the spoiler the trunk. If needed, slightly lift on the spoiler to free the tape liner and remove it. Fig 3-3 CAUTION: Take care when pulling the tape liner from the spoiler edges to prevent tearing of the tape liner. (4) Once all tape liners have been removed, press down on the spoiler to fully adhere the tape to the trunk lid surface. (e) Open the trunk lid and torque nuts in Fig 3-2 to 70 lbf-in (7.9 Nm). (f) Re-install trunk liner back into position and re-install the fifteen (15) push pins. (g) Clean off remaining fingerprints on the spoiler and the trunk lid. Issue: B 01/30/12 Page 5 of 6 pages DIO LEXUS GS350/GS450h 2013 - REAR SPOILER Checklist - these points MUST be checked to ensure a quality installation. Check: Look For: Accessory Function Checks Check for full tape adhesion. Full adhesion with no gaps. Verify spoiler side to side alignment. +/- 2mm with respect to left and right side. Vehicle Function Checks Verify Emergency Trunk Release Handle Emergency Trunk Release Handle operates correctly. (With the trunk lid in the open operation. position, trip the trunk lock closed using a nylon pry tool. Pull the emergency trunk release handle and verify the trunk lock has opened.) Issue: B 01/30/12 Page 6 of 6 pages DIO
