Defender EAP Agent
Installation and Configuration Guide
Introduction
A VPN is an extension of a private network that encompasses links across shared or public networks like the
Internet. VPN connections leverage the IP connectivity of the Internet using a combination of tunneling and
encryption to securely connect two remote points, such as a remote worker and their office base.
Extensible Authentication Protocol (EAP) is a general protocol for authentication that also supports multiple
authentication methods, such as token cards, Kerberos, one-time passwords, certificates, public key
authentication and smart cards.
Defender utilizes the EAP protocol to integrate its two-factor authentication into the existing user authentication
process.
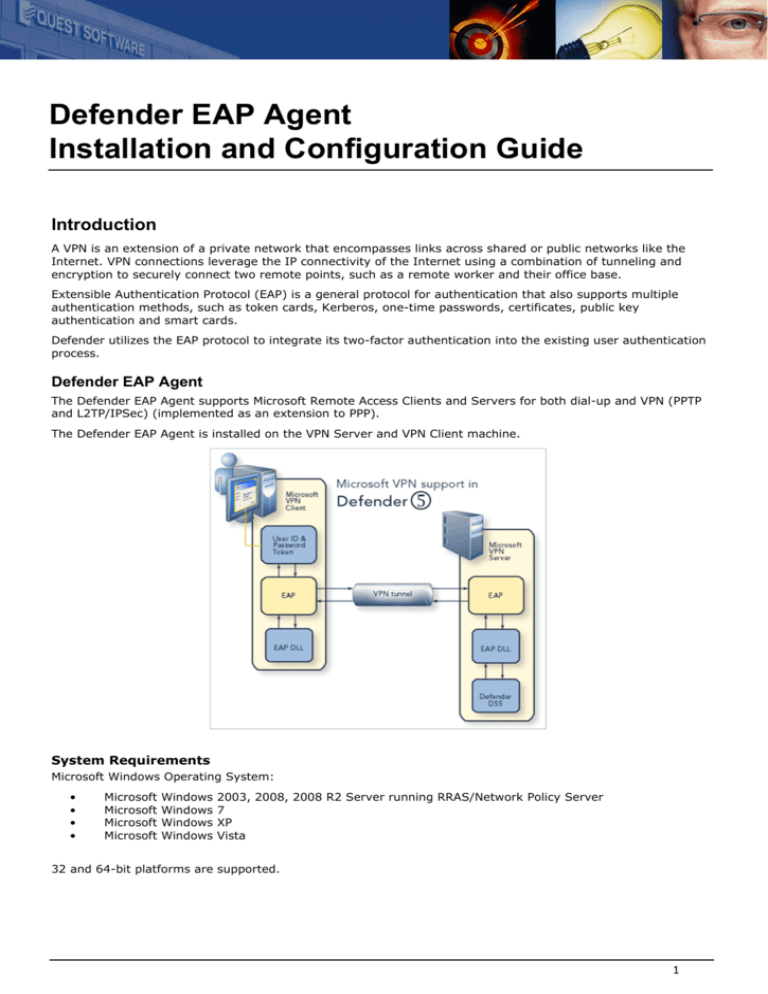
Defender EAP Agent
The Defender EAP Agent supports Microsoft Remote Access Clients and Servers for both dial-up and VPN (PPTP
and L2TP/IPSec) (implemented as an extension to PPP).
The Defender EAP Agent is installed on the VPN Server and VPN Client machine.
System Requirements
Microsoft Windows Operating System:
•
•
•
•
Microsoft
Microsoft
Microsoft
Microsoft
Windows
Windows
Windows
Windows
2003, 2008, 2008 R2 Server running RRAS/Network Policy Server
7
XP
Vista
32 and 64-bit platforms are supported.
1
Defender EAP Agent Installation and Configuration Guide
Installing on the RRAS Server or Network Policy Server (VPN Server)
1.
To install the Defender EAP Agent on the Windows Server, select Defender EAP Agent from the
Components tab of the Defender Autroun or run Defender5_EAP_Install.exe You must restart your
machine to complete the installation.
2.
Select Next. The License Agreement dialog is displayed.
3.
Accept the License Agreement before continuing. Select Next to display the Install Location dialog.
2
Defender EAP Agent Installation and Configuration Guide
4.
Either accept the default location or use the Browse button to select a different location. Select Next to
continue.
5.
The installation will continue, the Installation Complete dialog is displayed on completion.
6.
Ensure that Create a VPN connection with Defender is not selected. Select Finish.
7.
Restart the server to complete the installation.
3
Defender EAP Agent Installation and Configuration Guide
Installing on the Windows Client
1.
To install the Defender EAP Agent on your Windows client, select Defender EAP Agent from the
Components tab of the Defender Autroun or run Defender5_EAP_Install.exe. You must restart your
machine to complete the installation.
2.
Select Next. The License Agreement dialog is displayed.
3.
Accept the License Agreement before continuing. Select Next to display the Install Location dialog.
4
Defender EAP Agent Installation and Configuration Guide
4.
Either accept the default location or use the Browse button to select a different location. Select Next to
continue.
5.
The Installation will continue and the Installation Complete dialog is displayed on completion.
6.
To create a VPN connection that will be automatically configured to use Defender EAP ensure that Create
a VPN connection with Defender now is selected.
7.
Select Finish to run the VPN Connection wizard or Cancel if you wish to create the connection at a
later date.
5
Defender EAP Agent Installation and Configuration Guide
8.
Select Next to continue.
9.
Enter a display name for this connection and select Next to continue.
10. Enter the IP Address or Name of the server that you will be connecting to, then select Next.
11. The VPN Connection wizard is now complete, select Finish.
12. Restart the workstation to complete the installation.
6
Defender EAP Agent Installation and Configuration Guide
Configuring the RRAS Server or Network Policy
The following examples describe the configuration settings required for Defender EAP. A network policy must be
configured allowing VPN access to your network.
Windows Server running RRAS only
To configure the RRAS Server, follow the instructions below. The configuration instructions for RRAS Server 2008
may differ slightly from the instructions provided below.
Server Configuration - Stage 1
1.
From Administrative Tools, select the Routing and Remote Access Administration option. The
Routing and Remote Access page is displayed:
2.
Right click the required server name, then select Properties.
3.
Select the Security tab.
4.
Select Authentication Methods….
5.
Select EAP Methods….
6.
Select Defender 5.x.
7.
Select OK to return to the Routing and Remote Access page.
7
Defender EAP Agent Installation and Configuration Guide
Server Configuration - Stage 2
1.
From the Routing and Remote Access page:
2.
Select Remote Access Policies.
3.
From the right hand window pane, right click the required policy and select Properties.
4.
Select Edit Profile, then select the Authentication tab.
5.
Select EAP Methods, then select Add.
6.
Select Defender 5 from the list and select OK.
7.
Click Edit.
8.
In the IP Address field, type the IP Address of the server hosting your Defender Security Server.
9.
In the Port field, type the port number that is defined on your Access Node.
10. In the Shared Secret field, specify the shared secret defined on your Access Node.
11. Select OK.
12. Restart the RRAS service.
The RRAS server configuration is now complete.
8
Defender EAP Agent Installation and Configuration Guide
Windows Server running Network Policy Server
To configure a server such as Windows 2008 where Network Policy server is running, please follow the
instructions below.
1.
Select the network policy that will be used by your users and view the Properties dialog.
2.
Select the Constraints tab and then Authentication Methods.
3.
Select Add.
4.
From the Add EAP dialog select Defender 5.
5.
Select OK.
6.
Highlight Defender 5 within the EAP Types table and select Edit.
7.
Enter the address of the DSS that will be used to authenticate your users, together with the Port and
Shared Secret that correspond to the access node that will be used.
9
Defender EAP Agent Installation and Configuration Guide
Configuring the VPN Client
This section describes how to configure the Microsoft VPN Client. This procedure must be performed on the
connection object, not a short-cut to the connection.
1.
Access the Properties pages for your VPN Connection, then select the Security tab.
2.
Select Advanced (custom settings).
3.
Select Settings. The Advanced Security Settings dialog is displayed:
10
Defender EAP Agent Installation and Configuration Guide
4.
In the Logon Security section, click Use Extensible Authentication Protocol (EAP).
5.
Select Defender 5 from the list of providers.
6.
Select OK to close any open dialog boxes.
Your VPN Client configuration is now complete.
Authenticating
When you attempt to access information via your VPN, the Defender authentication dialog box is displayed:
In the Response field, type the response displayed on your token. Select OK.
If authentication is successful, you are allowed access to the network.
©2014
Dell Inc.
ALL RIGHTS RESERVED.
Quest, Quest Software, the Quest Software logo and Defender are trademarks of Quest Software, Inc., and its subsidiaries.
See http://www.quest.com/legal/trademarks.aspx for a complete list of Quest Software's trademarks. Other trademarks are
property of their respective owners.
11


