Printing Scanning Saving
advertisement
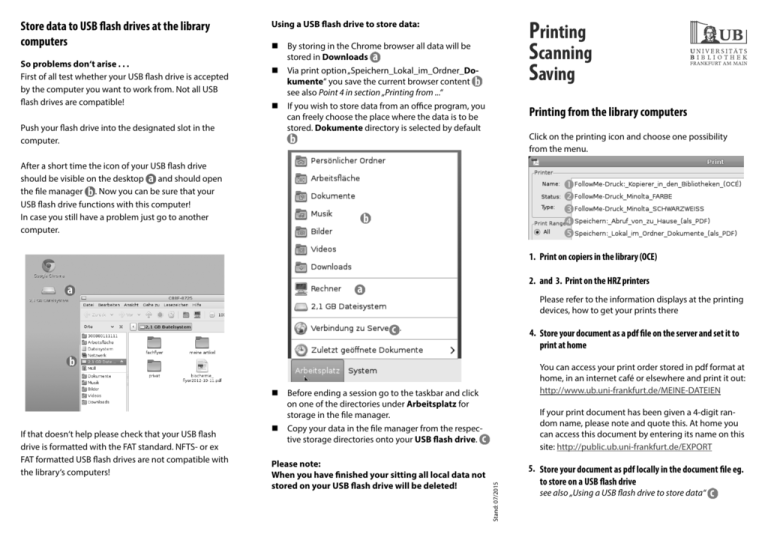
Store data to USB flash drives at the library computers So problems don‘t arise . . . First of all test whether your USB flash drive is accepted by the computer you want to work from. Not all USB flash drives are compatible! Push your flash drive into the designated slot in the computer. Printing Scanning Saving Using a USB flash drive to store data: By storing in the Chrome browser all data will be stored in Downloads Via print option „Speichern_Lokal_im_Ordner_Dokumente“ you save the current browser content see also Point 4 in section „Printing from ...“ If you wish to store data from an office program, you can freely choose the place where the data is to be stored. Dokumente directory is selected by default Printing from the library computers Click on the printing icon and choose one possibility from the menu. After a short time the icon of your USB flash drive should be visible on the desktop and should open the file manager . Now you can be sure that your USB flash drive functions with this computer! In case you still have a problem just go to another computer. 1. Print on copiers in the library (OCE) 2. and 3. Print on the HRZ printers Please refer to the information displays at the printing devices, how to get your prints there 4. Store your document as a pdf file on the server and set it to print at home You can access your print order stored in pdf format at home, in an internet café or elsewhere and print it out: http://www.ub.uni-frankfurt.de/MEINE-DATEIEN Before ending a session go to the taskbar and click on one of the directories under Arbeitsplatz for storage in the file manager. Copy your data in the file manager from the respective storage directories onto your USB flash drive. Please note: When you have finished your sitting all local data not stored on your USB flash drive will be deleted! Stand: 07/2015 If that doesn‘t help please check that your USB flash drive is formatted with the FAT standard. NFTS- or ex FAT formatted USB flash drives are not compatible with the library‘s computers! If your print document has been given a 4-digit random name, please note and quote this. At home you can access this document by entering its name on this site: http://public.ub.uni-frankfurt.de/EXPORT 5. Store your document as pdf locally in the document file eg. to store on a USB flash drive see also „Using a USB flash drive to store data“ If you want to print out an office document from your USB flash drive call up the document first of all at one of the HRZ or library computers and activate the print order from there. At first always connect the USB flash drive to the library computers (as described on the other page ì ). On clicking your office document it will be opened in Libre Office. To print out pdf documents directly from the USB flash drive What can I print directly from USB flash drive? Data in pdf or tiff formats can be directly printed from the copier. Depending on the copier: insert coins or a chip card into the slot Each A4 side costs 5 cent Connect USB flash drive With the left key select the function „Drucken“ With the upper key above the display select the option „USB-Stick“ Use the wheel on the right to select the data to be printed, alternatively select all! Press the green copy button to start printing. To finish the printing process: Select the copy function Remove USB flash drive Remove card (press END) Scan to the USB flash drive at the copiers So problems don‘t arise… Your USB flash drive should already have at least one data file stored on it. The copier does not recognize a new or empty stick. a) Scan single page Depending on the copier: insert coins or a chip card into the slot Each A4 side costs 5 cent Connect USB flash drive With the left key select the scan function "Scannen" With the upper key above the display select the option „USB-Stick“ Press the green copy button to start the scan Important: Whilst scanning is in progress never remove the USB flash drive! With the upper key above the display select the option „USB-Stick“ Press the green copy button to start the scan Insert a new master copy, select the option „hinzufügen“ and press the green copy button again to start the scan (you might need to do this step again) Important: Whilst scanning is in progress never remove the USB flash drive! To finish the scanning process: After the last page press the green button Select the copy function Remove USB flash drive Remove card (press END) Sending a scan to a mailaddress is not possible. To finish the scanning process: Select the copy function Remove USB flash drive Remove card (press END) b) Scan multiple pages in one file Depending on the copier: insert coins or a chip card into the slot Each A4 side costs 5 cent Connect USB flash drive With the left key select the scan function „Assistenten“ With the lower keys below the display select the option „kombinierter Scan-Auftrag“ and choose „hinzufügen“ START Printing office documents from the USB flash drive

