PT Activity 7.5.1: Packet Tracer Skills Integration Challenge
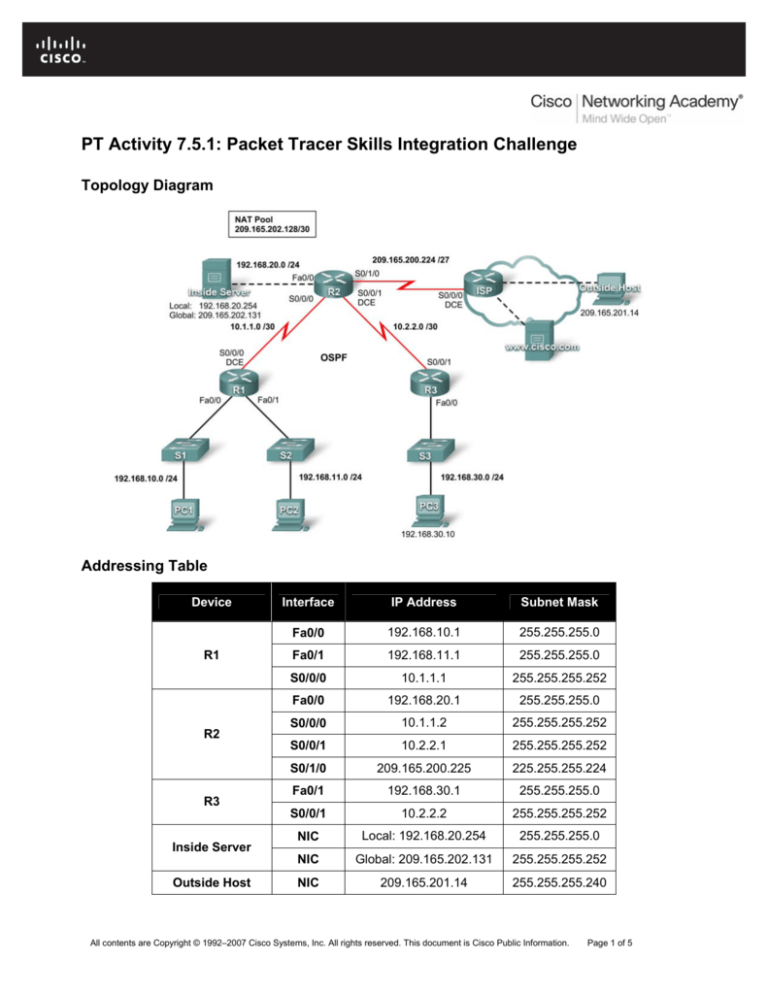
Topology Diagram
Addressing Table
Device
R1
R2
R3
Inside Server
Outside Host
Interface
IP Address
Subnet Mask
Fa0/0
192.168.10.1
255.255.255.0
Fa0/1
192.168.11.1
255.255.255.0
S0/0/0
10.1.1.1
255.255.255.252
Fa0/0
192.168.20.1
255.255.255.0
S0/0/0
10.1.1.2
255.255.255.252
S0/0/1
10.2.2.1
255.255.255.252
S0/1/0
209.165.200.225
225.255.255.224
Fa0/1
192.168.30.1
255.255.255.0
S0/0/1
10.2.2.2
255.255.255.252
NIC
Local: 192.168.20.254
255.255.255.0
NIC
Global: 209.165.202.131
255.255.255.252
NIC
209.165.201.14
255.255.255.240
All contents are Copyright © 1992–2007 Cisco Systems, Inc. All rights reserved. This document is Cisco Public Information.
Page 1 of 5
CCNA Exploration
Accessing the WAN: IP Addressing Services
PT Activity 7.5.1: Packet Tracer Skills Integration Challenge
Learning Objectives
•
Apply basic configurations
•
Configure PPP encapsulation with CHAP
•
Configure dynamic and default routing
•
Configure routers with Easy IP
•
Verify PCs are automatically configured with addressing details
•
Configure a DNS server with DNS entries
•
Configure an ACL to permit NAT
•
Configure static NAT
•
Configure dynamic NAT with overload
•
Configure the ISP router with a static route
•
Test connectivity
Introduction
In this culminating activity, you will configure PPP, OSPF, DHCP, NAT and default routing to ISP. You will
then verify your configuration.
Task 1: Apply Basic Configurations
Step 1. Configure R1, R2, and R3 with the basic global configuration.
•
Hostname as listed in the addressing table
•
Console line for login with password cisco
•
vtys 0–4 for login with password cisco
•
Secret password class
• Banner of “AUTHORIZED ACCESS ONLY!”
Only the hostname and banner are graded.
Step 2. Configure the interfaces on R1, R2, and R3.
Use the addressing table to determine the interface addresses. Use the topology diagram to determine
which interfaces are DCE interfaces. Configure the DCE interfaces for a clock rate of 64000.
Step 3. Check results.
Your completion percentage should be 38%. If not, click Check Results to see which required
components are not yet completed.
Task 2: Configure PPP Encapsulation with CHAP
Step 1. Configure the link between R1 and R2 to use PPP encapsulation with CHAP authentication.
The password for CHAP authentication is cisco123.
Step 2. Configure the link between R2 and R3 to use PPP encapsulation with CHAP authentication.
The password for CHAP authentication is cisco123.
All contents are Copyright © 1992–2007 Cisco Systems, Inc. All rights reserved. This document is Cisco Public Information.
Page 2 of 5
CCNA Exploration
Accessing the WAN: IP Addressing Services
PT Activity 7.5.1: Packet Tracer Skills Integration Challenge
Step 3. Verify that connectivity is restored between the routers.
R2 should be able to ping both R1 and R3. The interfaces may take a few minutes to come back up. You
can switch back and forth between Realtime and Simulation modes to speed up the process. Another
possible workaround to this Packet Tracer behavior is to use the shutdown and no shutdown
commands on the interfaces.
Note: The interfaces may go down at random points during the activity because of a Packet Tracer bug.
The interface normally comes back up on its own if you wait a few seconds.
Step 4. Check results.
Your completion percentage should be 51%. If not, click Check Results to see which required
components are not yet completed.
Task 3: Configure Dynamic and Default Routing
Step 1. Configure R1, R2, and R3 to use the OSPF routing protocol.
•
Use a process ID of 1 when configuring OSPF on the routers.
•
Advertise all networks connected to R1 and R3, but do not send routing updates out the LAN
interfaces.
•
On R2, do not advertise the 209.165.200.224 network, and do not send routing updates out the
Fa0/0 or the Serial0/1/0 interfaces.
Step 2. Configure a default route on R2.
Configure a default route to ISP, specifying the outgoing interface on R2 as the next-hop address.
Step 3. Configure OSPF to advertise the default route.
On R2, enter the command to advertise the default route to R1 and R3 via OSPF.
Step 4. Check results.
Your completion percentage should be 66%. If not, click Check Results to see which required
components are not yet completed.
Task 4: Configure Routers with Easy IP
Step 1. Configure R1 to act as a DHCP server for the 192.168.10.0 and 192.68.11.0 networks.
•
Name the DHCP pool for the 192.168.10.0 network R1LAN1. For the 192.168.11.0 network, use
the name R1LAN2.
•
Exclude the first nine addresses on each network from dynamic assignment.
•
In addition to the IP address and subnet mask, assign the default gateway and DNS server
addresses.
Step 2. Configure R3 to act as a DHCP server for the 192.168.30.0 network.
•
Name the DHCP pool for the 192.168.30.0 network R3LAN.
•
Exclude the first nine addresses on each network from dynamic assignment.
•
In addition to the IP address and subnet mask, assign the default gateway and DNS server
addresses.
All contents are Copyright © 1992–2007 Cisco Systems, Inc. All rights reserved. This document is Cisco Public Information.
Page 3 of 5
CCNA Exploration
Accessing the WAN: IP Addressing Services
PT Activity 7.5.1: Packet Tracer Skills Integration Challenge
Step 3. Check results.
Your completion percentage should be 75%. If not, click Check Results to see which required
components are not yet completed.
Task 5: Verify that PCs Are Automatically Configured with Addressing Details
Step 1. Configure PC1, PC2, and PC3 for automatic IP configuration using DHCP.
Step 2. Verify that each PC has an address assigned from the correct DHCP pool.
Step 3. Check results.
Your completion percentage should be 88%. If not, click Check Results to see which required
components are not yet completed.
Task 6: Configure a DNS Server with DNS Entries
Step 1. Configure the DNS server.
To configure DNS on the Inside Server, click the DNS button in the Config tab.
Make sure that DNS is turned on, and enter the following DNS entry:
•
www.cisco.com
209.165.201.30
Step 2. Check results.
You will not be able to ping the www.cisco.com server by domain name until you configure the static
route in Task 10. Your completion percentage should be 90%. If not, click Check Results to see which
required components are not yet completed.
Task 7: Configure an ACL to Permit NAT
Step 1. Create a standard named ACL.
Create the standard named ACL, R2NAT, which permits all the internal networks to be mapped by NAT.
Note: For Packet Tracer to grade this task correctly, you must enter the permitted networks in the
following order:
•
192.168.10.0
•
192.168.20.0
•
192.168.30.0
•
192.168.11.0
Step 2. Check results.
Your completion percentage should be 91%. If not, click Check Results to see which required
components are not yet completed.
Task 8: Configure Static NAT
Step 1. Configure static NAT for an inside web server.
Configure static NAT to map the local IP address and global IP addresses for Inside Server. Use the
addresses listed in the addressing table.
All contents are Copyright © 1992–2007 Cisco Systems, Inc. All rights reserved. This document is Cisco Public Information.
Page 4 of 5
CCNA Exploration
Accessing the WAN: IP Addressing Services
PT Activity 7.5.1: Packet Tracer Skills Integration Challenge
Step 2. Check results.
Your completion percentage should be 92%. If not, click Check Results to see which required
components are not yet completed.
Task 9: Configure Dynamic NAT with Overload
Step 1. Configure the dynamic NAT pool.
Configure a dynamic NAT address pool using the Nat Pool specified in the topology diagram. Name the
address pool R2POOL.
Step 2. Configure the dynamic NAT mapping.
Map the addresses in R2POOL to the networks defined above in R2NAT.
Step 3. Apply NAT to the internal and external interfaces of R2.
Step 4. Check results.
Your completion percentage should be 99%. If not, click Check Results to see which required
components are not yet completed.
Task 10: Configure the ISP Router with a Static Route
Step 1. Configure a static route to the global IP addresses of R2.
This is the 209.165.202.128/27 network. Use the serial interface of ISP as the next-hop address.
Step 2. Check results.
Your completion percentage should be 100%. If not, click Check Results to see which required
components are not yet completed.
Task 11: Test Connectivity
•
Inside hosts should be able to ping Outside Host.
•
Inside hosts should be able to ping www.cisco.com.
•
Outside Host should be able to ping Inside Server by its global IP address.
All contents are Copyright © 1992–2007 Cisco Systems, Inc. All rights reserved. This document is Cisco Public Information.
Page 5 of 5

