Science Lab #_1__ - Cogburn Woods PTO
advertisement
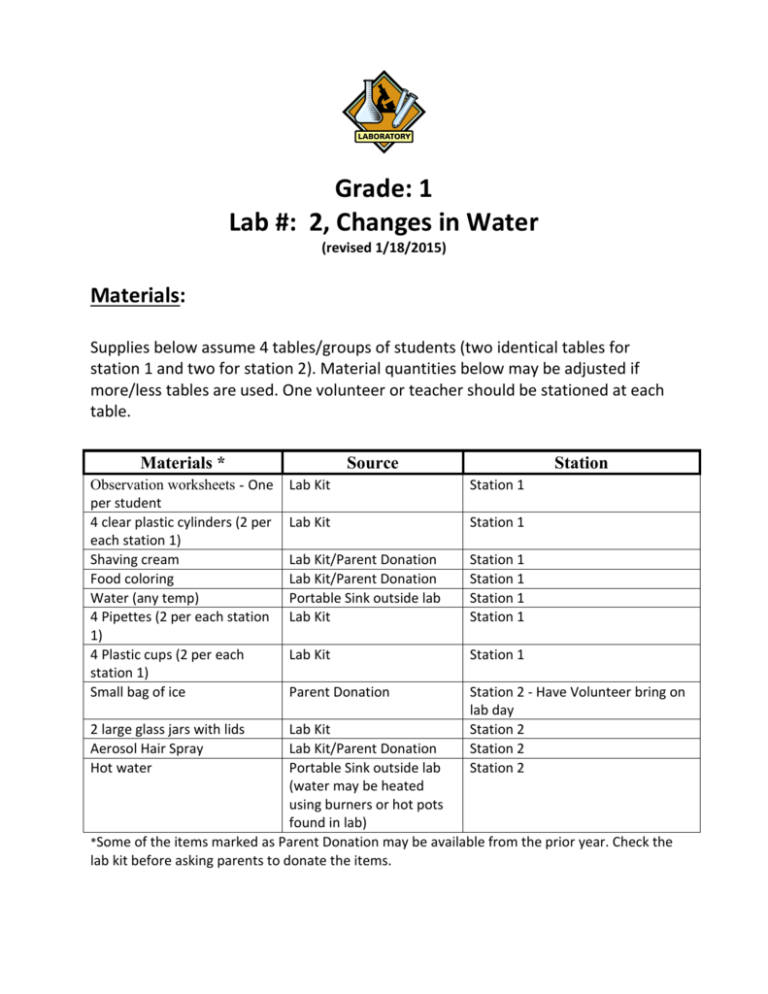
Grade: 1 Lab #: 2, Changes in Water (revised 1/18/2015) Materials: Supplies below assume 4 tables/groups of students (two identical tables for station 1 and two for station 2). Material quantities below may be adjusted if more/less tables are used. One volunteer or teacher should be stationed at each table. Materials * Observation worksheets - One per student 4 clear plastic cylinders (2 per each station 1) Shaving cream Food coloring Water (any temp) 4 Pipettes (2 per each station 1) 4 Plastic cups (2 per each station 1) Small bag of ice 2 large glass jars with lids Aerosol Hair Spray Hot water Source Station Lab Kit Station 1 Lab Kit Station 1 Lab Kit/Parent Donation Lab Kit/Parent Donation Portable Sink outside lab Lab Kit Station 1 Station 1 Station 1 Station 1 Lab Kit Station 1 Parent Donation Station 2 - Have Volunteer bring on lab day Station 2 Station 2 Station 2 Lab Kit Lab Kit/Parent Donation Portable Sink outside lab (water may be heated using burners or hot pots found in lab) *Some of the items marked as Parent Donation may be available from the prior year. Check the lab kit before asking parents to donate the items. Grade: 1 Lab #: 2, Changes in Water (revised 1/18/2015) Set up in lab prior to class arriving: Set up the stations per instructions in the lab write up below. Heat water in hot pots or on burners found in lab for use in station 2. Be aware water can take up to 20 min to heat. Make copies of observation worksheets for station 1. Roughly 25 per class OR enough for 1 per student. Pass out worksheets, glue, pencils & crayons Jobs for volunteers on the day of the lab: Set up. Teachers are responsible for introducing and leading the lab with parent volunteers assisting with the activities at each station. Place all unused or reusable supplies back in the Lab Bin for the next class and place the bin back on the shelf. Clean up lab. Grade: 1 Lab #: 2, Changes in Water (revised 1/18/2015) Learning Goal for Lab: Students will learn about how rain clouds are formed and how clouds produce rain. Introductory Volunteer Talking Points: Remember what you have learned about the water cycle – water falls from the clouds in the form of rain or snow and collects on the ground. The water on the ground heats up and turns to vapor and the vapor travels up into the atmosphere and creates clouds. But how do those clouds form? Today we will do an experiment that demonstrates how the water molecules join together and form a cloud. But let’s talk a little more about clouds first. A cloud is a large collection of very tiny droplets of water and or ice crystals. The droplets are so small and light that they can float in the air. All air contains water but near the ground it is usually in the form of an invisible gas called water vapor. When warm air rises, it expands and cools. Cool air can’t hold as much water vapor as warm air so some of the vapor condenses onto tiny pieces of dust that are floating in the air creating these droplets. When billions of these droplets come together they form a cloud. Why do clouds float instead of sinking to the earth? A cloud forms when air is heated by the sun. As it rises, it slowly cools and reaches the saturation point and water condenses forming a cloud. As long as the cloud and the air that its made of is warmer that the outside air around it, it floats! Grade: 1 Lab #: 2, Changes in Water (revised 1/18/2015) Station 1:Colorful Rain Cloud in a Jar Activity (identical stations can be set up at 2 tables to allow for smaller group sizes): 1) Before students arrive, fill clear cylinders ¾ full with water (any temperature). In a plastic cup, mix several drops of food coloring with a little water. 2) With help from students, spray shaving cream to cover top of water completely. Allow a few minutes for the shaving cream to fully settle on top of the water. Explain to students that the shaving cream represents a cloud. 3) Allow students to drip colored water from the plastic cup on top of the shaving cream using pipette. 4) Observe your cloud as it gains mass and changes in composition. (As you continue to add more colored water to the shaving cream cloud, the water will start to break through creating “rain”). 5) Have students record what they see on the observation sheet. 6) Volunteers can watch experiment performed at: https://www.youtube.com/watch?v=pglbX1xtofE Science Lab Observation Sheet CWES Science Lab: Changes in Water, Station One Name: Date: Question: (Problem Statement) What will happen when you add drops of food coloring to the cloud made of shaving cream? Hypothesis: (A guess to be tested) Procedures: (step by step instructions) 1) Spray shaving cream to cover top of water in cylinders completely. Allow a few minutes for the shaving cream to fully settle on top of the water. 2) Using a pipette and water colored with food coloring, add drops of water to the shaving cream cloud until water breaks through. Record Your Observations by drawing what you saw: Conclusion: (Revisit the hypothesis. Support your conclusion with your findings.) The hypothesis is correct/incorrect because in the experiment… ___________________________________________________________________ ___________________________________________________________________ Grade: 1 Lab #: 2, Changes in Water (revised 1/18/2015) Station 2:Cloud in a Jar Activity (identical stations can be set up at 2 tables to allow for smaller group sizes): 1) Before students arrive have hot water ready. 2) Pour about 2cm of boiled water into the jar. Swirl the hot water in the jar so that it heats up the sides of the jar. 3) Turn the lid of the jar upside down and use it as a small container to put a few cubes of ice into. Rest it on top of the jar for a few seconds. 4) Take it off and quickly squirt in some hairspray, or whatever aerosol you're using. (Try to spray the hairspray into the middle of the jar. If you hit the side of the jar, a cloud might not form.) Put the lid, with the ice resting in it, back on top of the jar. 5) Watch the cloud form inside the jar. When it is fully formed, take the lid off and watch the cloud escape. 6) Volunteers can watch experiment performed at: https://www.youtube.com/watch?v=qjGzd09JStQ Grade: 1 Lab #: 2, Changes in Water (revised 1/18/2015) Volunteer Talking Points: Here's what happened to make your cloud Clouds in the atmosphere form in a very similar way as our cloud in the jar. First, clouds need water vapor. This was provided as the hot water evaporated into the jar. Next, clouds need cooling. As the water vapor rises, the air in the atmosphere is cooler. This causes the water vapor to condense. The last thing a cloud needs to form is a surface to condense upon. Small particles called cloud condensation nucluei fill this role. In the atmosphere, these particles could be dust, smoke, air pollution, soot, sea salt, sulfate, and more. In our cloud jar, the aerosol spray served as the cloud condensation nuclei.
