EnergyPlusHomeHandout
advertisement
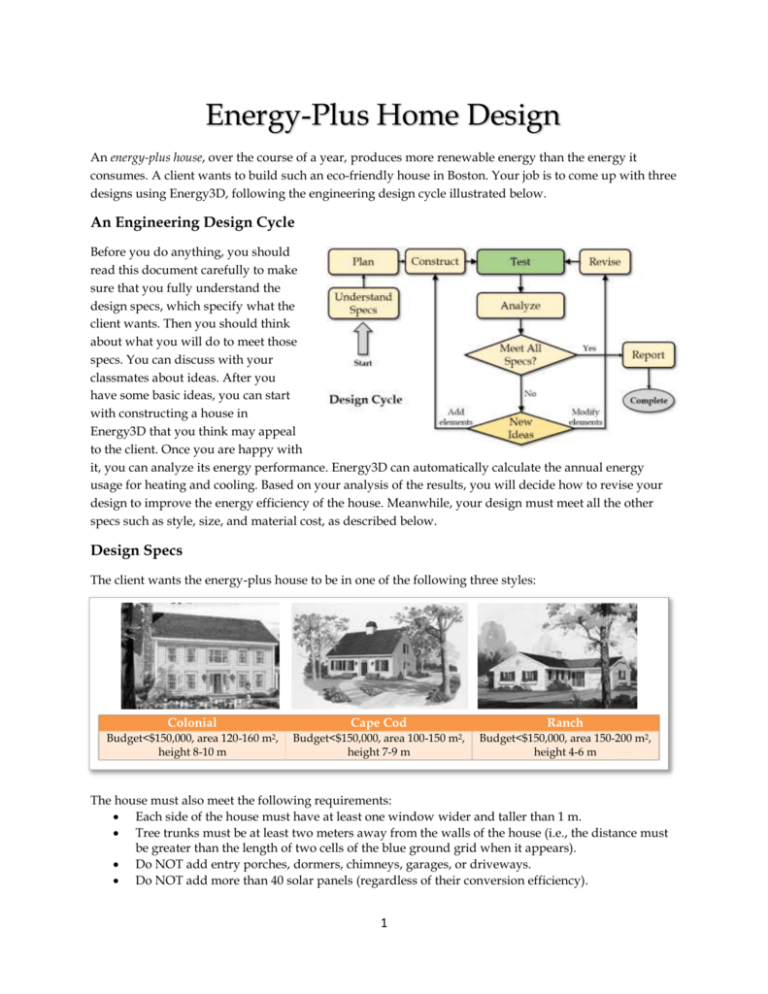
Energy-Plus Home Design An energy-plus house, over the course of a year, produces more renewable energy than the energy it consumes. A client wants to build such an eco-friendly house in Boston. Your job is to come up with three designs using Energy3D, following the engineering design cycle illustrated below. An Engineering Design Cycle Before you do anything, you should read this document carefully to make sure that you fully understand the design specs, which specify what the client wants. Then you should think about what you will do to meet those specs. You can discuss with your classmates about ideas. After you have some basic ideas, you can start with constructing a house in Energy3D that you think may appeal to the client. Once you are happy with it, you can analyze its energy performance. Energy3D can automatically calculate the annual energy usage for heating and cooling. Based on your analysis of the results, you will decide how to revise your design to improve the energy efficiency of the house. Meanwhile, your design must meet all the other specs such as style, size, and material cost, as described below. Design Specs The client wants the energy-plus house to be in one of the following three styles: Colonial Cape Cod Ranch Budget<$150,000, area 120-160 m2, height 8-10 m Budget<$150,000, area 100-150 m2, height 7-9 m Budget<$150,000, area 150-200 m2, height 4-6 m The house must also meet the following requirements: Each side of the house must have at least one window wider and taller than 1 m. Tree trunks must be at least two meters away from the walls of the house (i.e., the distance must be greater than the length of two cells of the blue ground grid when it appears). Do NOT add entry porches, dormers, chimneys, garages, or driveways. Do NOT add more than 40 solar panels (regardless of their conversion efficiency). 1 There is no need to design any interior structure such as rooms, floors, or stairs. Roof overhang must be less than 50 centimeters wide (the default is 25 centimeters). Doors cannot be wider than two meters or taller than 3 m. Keep the room temperature of the house to be 20°C all the time. Since you cannot predict what the client may like, you will design a Colonial house, a Cape Code house, and a Ranch house. You will spend two class periods planning, constructing, experimenting, analyzing, optimizing, and documenting each of the three designs. At the end of this project, you will summarize the pros and cons of each design based on its aesthetics, material cost, and energy efficiency and present your best design to the class. Until this project is over, you can always revisit and improve a design. Instructions The client has provided the initial computer models of the land parcel on which the house will be constructed. These models also come with existing surrounding trees, grayed out because you are not allowed to move or cut them. The files for these models, colonial.ng3, capecod.ng3, and ranch.ng3, can be found in your USB drive and can be opened from within Energy3D (using File > Open). The trees and land are identical in all the three files. The differences are in their specifications of area and height. Remember, don’t start from scratch—you must always start with these provided files. To get started, 1) Write your name on the tag attached to your USB drive. 2) Connect the USB drive to the computer and then open the USB folder on the computer. 3) Double-click energy3d.jar on the USB drive to run Energy3D. 4) After Energy3D is ready, use the “File > Open” menu to open an ng3 file on the USB drive. You can choose any of the three files as your first design. 5) Start working on your design. While designing, use the “Show Note” button on the task bar of Energy3D to open a text area below the 3D view window. The text area provides some instruction, questions, and a check list to guide you through the design process. You must answer those questions based on your design. Save everything you have done in this file—do not save your work into a different file unless you want to keep a backup copy. 6) At the end of each session, remember to save your design. You MUST save all your work in the USB drive (as you may use a different computer next time). At the end of a class period, do NOT just pull the USB drive—use the EJECT function of the computer to safely remove it. 7) Repeat for your second and third designs. Important Notes You can only build one house on the platform. Don’t put multiple houses on a single platform. (A house is defined as a space enclosed by one and only one set of connected walls.) The house can be rotated and its height can be adjusted as a whole. Focus on its shape design initially and keep in mind that you can always raise, lower, or rotate it later. Always document your work and thoughts in the Note Area, especially when you are analyzing the energy efficiency of your design. Your notes will be saved when you save your design. 2

