tool palette
advertisement
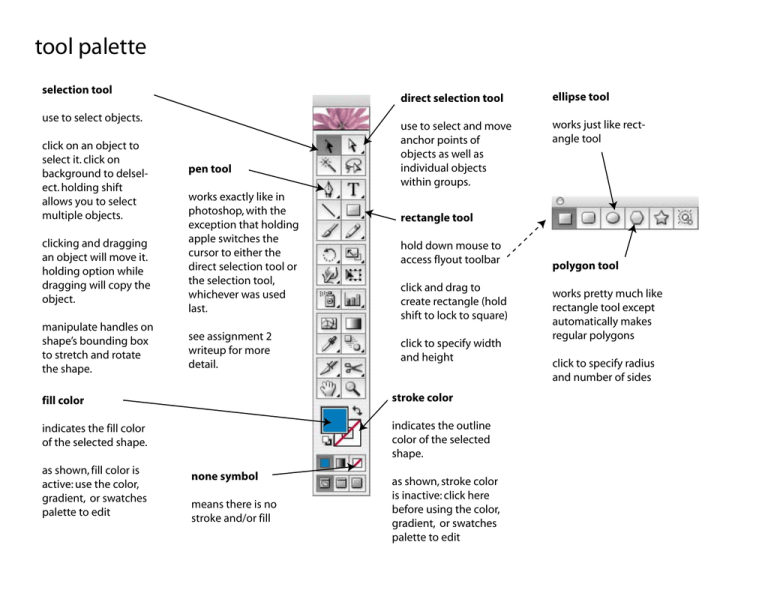
tool palette selection tool use to select objects. click on an object to select it. click on background to delselect. holding shift allows you to select multiple objects. clicking and dragging an object will move it. holding option while dragging will copy the object. manipulate handles on shape’s bounding box to stretch and rotate the shape. pen tool works exactly like in photoshop, with the exception that holding apple switches the cursor to either the direct selection tool or the selection tool, whichever was used last. see assignment 2 writeup for more detail. direct selection tool ellipse tool use to select and move anchor points of objects as well as individual objects within groups. works just like rectangle tool rectangle tool hold down mouse to access flyout toolbar click and drag to create rectangle (hold shift to lock to square) click to specify width and height fill color stroke color indicates the fill color of the selected shape. indicates the outline color of the selected shape. as shown, fill color is active: use the color, gradient, or swatches palette to edit none symbol means there is no stroke and/or fill as shown, stroke color is inactive: click here before using the color, gradient, or swatches palette to edit polygon tool works pretty much like rectangle tool except automatically makes regular polygons click to specify radius and number of sides layers palette click arrow to display or hide the objects in a layer or group click eye to toggle visibility of object or entire layer. double click name to rename object or layer click here to lock/unlock layer or object. this prevents the object/layer from being selected or modifed. a group links a number of objects together, so that when you click on one with the selection tool, all are selected. to group selected objects, choose “group” from the object menu. to ungroup, select “ungroup”. click here to turn selected object into a clipping path. (this option may not always be available--see instructions at right for an alternative) the layers palette in illustrator is a lot like the layers palette in photoshop. however, layers in illustrator are basically folders for organizing “objects” such as paths, text, images, etc. click here to highlight object/layer. hold shift (or apple) to highlight multiple items. highlighted items can be dragged higher or lower in the stacking order, or into other layers. a clipping path crops all objects in the same layer or group to its outline. clipping paths can be any shape. to make a clipping path, select the prospective clipping path and the paths you want clipped (make sure the clipping path is highest in the stacking order) and choose “clipping mask > make” from the object menu click here to select object/layer. hold shift to select multiple objects/layers, click here to create new layer. or, drag object/layer here to duplicate it. drag object/layer here to delete other palettes if you can’t find a particular palette, look in the “window” menu. it lists every palette. if your palettes are missing some of the options shown here, click the triangle button in the upper right corner of the palette and select “show options” the transform palette lets you enter exact values for the width, height, rotation and skew of the selected object this diagram indicates the center of the transform effect the align palette lets you precisely line up and space the selected objects the pathfinder palette allows you to add subtract and intersect the selected objects. after combining the shapes, click expand to merge them into one path. choose “release compound shape” from the palette menu to separate the shapes. the stroke palette allows you to control the thickness and other attributes of the selected shape’s outline. if you want to get rid of an effect you’ve applied from the effect menu or the graphic styles palette, go to the appaearance palette and drag it into the trash view menu turning on rulers allows you to create guidelines by dragging from the rulers onto the artboard smart guides allow you to snap to corners and anchor points of objects use these to turn on and show grid. gird parameters can be adjusted by choosing “preferences > guides & grid” from the illustrator menu effects and filters effects and filters do very similar things. the difference is, a filter actually changes your original shape, whereas an effect leaves the original shape alone and is just applied over top of it. therefore, it’s a lot easier to get rid of an effect after the fact than it is a filter, and effects can also be copied from one shape to another. to remove an undesired effect, go to the appearance palette and drag it into the trash. one effect you might want to try for this assignment is “3d rotate.” select the object you want to apply the effect to and choose “3D > rotate” from the effect menu. play around with the different options to see what they do. to see the results of your chagnes in real time, check the preview box. when you are satisfied, click ok.
