Accessible by Design PDF Documents
advertisement
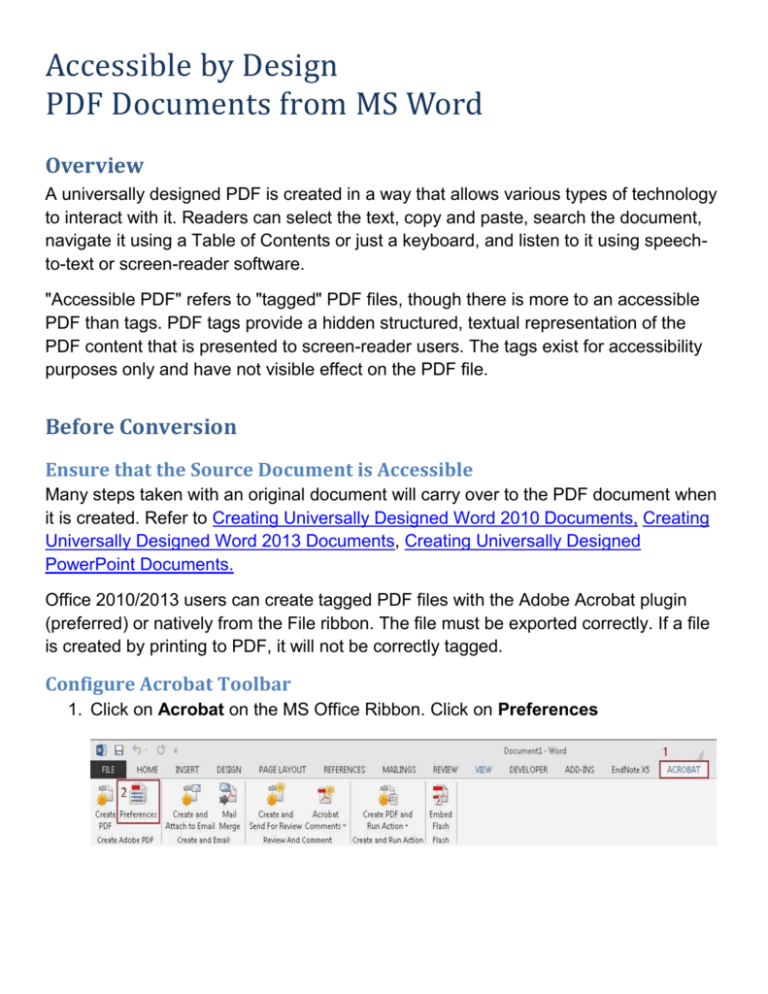
Accessible by Design PDF Documents from MS Word Overview A universally designed PDF is created in a way that allows various types of technology to interact with it. Readers can select the text, copy and paste, search the document, navigate it using a Table of Contents or just a keyboard, and listen to it using speechto-text or screen-reader software. "Accessible PDF" refers to "tagged" PDF files, though there is more to an accessible PDF than tags. PDF tags provide a hidden structured, textual representation of the PDF content that is presented to screen-reader users. The tags exist for accessibility purposes only and have not visible effect on the PDF file. Before Conversion Ensure that the Source Document is Accessible Many steps taken with an original document will carry over to the PDF document when it is created. Refer to Creating Universally Designed Word 2010 Documents, Creating Universally Designed Word 2013 Documents, Creating Universally Designed PowerPoint Documents. Office 2010/2013 users can create tagged PDF files with the Adobe Acrobat plugin (preferred) or natively from the File ribbon. The file must be exported correctly. If a file is created by printing to PDF, it will not be correctly tagged. Configure Acrobat Toolbar 1. Click on Acrobat on the MS Office Ribbon. Click on Preferences 2. Check the box for Enable Accessibility and Reflow with tagged Adobe PDF if not already checked. Convert to PDF Use “Save as Adobe PDF” Click on File, then Save as Adobe PDF. Use “Create PDF” Switch to the Acrobat Ribbon and select Create PDF. Avoid “Print to PDF” The “Adobe PDF” printer is a bad option for accessibility. It does not save any of the work done in the original document. Use one of the two other two options above. Conversion without Acrobat Toolbar File Save As Save as type: PDF Click on “Options” and select: (Page range) “All” (Publish what) “Document” (Include non-printing information) “Create Bookmarks Using Headings”, “Document Properties”, “Document structure tags for accessibility”. After Conversion (Adobe Acrobat Pro) Once the PDF is created, there are additional steps that will enhance accessibility. Some of them are listed below. Check the Reading Order Screen readers and text-to-speech software look at the Tags of a PDF to determine the correct reading order of the page. Tags define the Document Structure, and also generate a Table of Contents. Unfortunately, Tags generated during conversion are not always in the correct order. This is especially true with images, which are often lumped together at the end of each page. This means they will be described all at once, out of context. To check the Reading Order, use the Check Order Panel in the Accessibility Toolbar. 1. To activate the Accessibility Toolbar, click on View > Tools > Accessibility. 2. It will open in the Tools Pane on the right-hand side of the document. 3. Expand the Accessibility Toolbar, and select TouchUp Reading Order. 4. In the new window that pops up, click on Show Order Panel. 5. The Order Panel will show up in the Navigation Pane on the left side of the screen. Expand a page number to see its tags. These numbers correspond to the boxes that now appear in your document, showing the order in which the items will be read. 6. If they are incorrect, Select and Drag the numbers into the right order using the Order Panel. 7. Check each page in the document, and don’t forget to save. Set the Tab Order Some readers use a keyboard to navigate the document instead of a mouse or a screen reader. For keyboard users, the Tab Order is just as important as the Tag Order that you just fixed in the previous section. There is one extra setting to make sure that the two match. 1. In the Page Thumbnails navigation pane on the left side of the document, select all pages. You can do this by Clicking on one of the thumbnails, then simultaneously pressing the Ctrl and A keys. 2. Click on the Page Thumbnail dropdown menu in the navigation pane. Select Page Properties. 3. Select the Use Document Structure option: PDF Accessibility Check (Adobe Acrobat Pro) Tools Accessibility Accessibility Full Check List of accessibility barriers will appear on left side of screen. right click on a figure that has been identified as “Failed” and click “Fix” Using the Adobe Acrobat XI Accessibility Checker (http://www.adobe.com/content/dam/Adobe/en/accessibility/products/acrobat/ pdfs/acrobat-xi-accessibility-checker.pdf) Back to the Top

