This sample chapter is for review purposes only. Copyright © The Goodheart-Willcox Co., Inc. All rights reserved.
58
6
CHAPTER
Weld Joints
and Weld Types
Gas Metal Arc Welding Handbook
Butt
Bevel-groove
J-groove
Objectives
After studying this chapter, you will be able to:
• Identify different types of welds used with
various joints.
• Read and draw common welding symbols.
• Discuss advantages and disadvantages of different
weld joints.
• List factors involved with joint design.
Joint Types
The American Welding Society defines a joint as
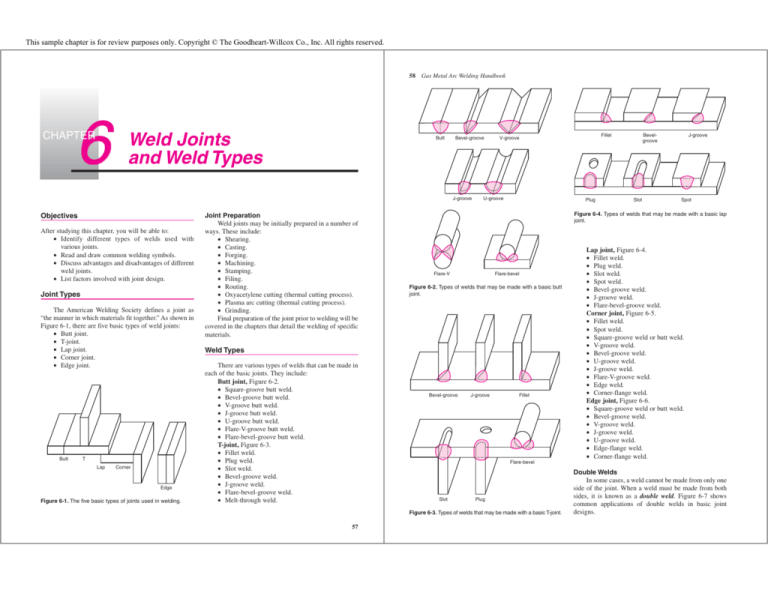
“the manner in which materials fit together.” As shown in
Figure 6-1, there are five basic types of weld joints:
• Butt joint.
• T-joint.
• Lap joint.
• Corner joint.
• Edge joint.
Butt
T
Lap
Corner
Edge
Figure 6-1. The five basic types of joints used in welding.
Joint Preparation
Weld joints may be initially prepared in a number of
ways. These include:
• Shearing.
• Casting.
• Forging.
• Machining.
• Stamping.
• Filing.
• Routing.
• Oxyacetylene cutting (thermal cutting process).
• Plasma arc cutting (thermal cutting process).
• Grinding.
Final preparation of the joint prior to welding will be
covered in the chapters that detail the welding of specific
materials.
U-groove
Plug
Flare-V
Flare-bevel
Figure 6-2. Types of welds that may be made with a basic butt
joint.
Bevel-groove
J-groove
Fillet
Flare-bevel
Slot
Plug
Figure 6-3. Types of welds that may be made with a basic T-joint.
57
J-groove
Bevelgroove
Slot
Spot
Figure 6-4. Types of welds that may be made with a basic lap
joint.
Weld Types
There are various types of welds that can be made in
each of the basic joints. They include:
Butt joint, Figure 6-2.
• Square-groove butt weld.
• Bevel-groove butt weld.
• V-groove butt weld.
• J-groove butt weld.
• U-groove butt weld.
• Flare-V-groove butt weld.
• Flare-bevel-groove butt weld.
T-joint, Figure 6-3.
• Fillet weld.
• Plug weld.
• Slot weld.
• Bevel-groove weld.
• J-groove weld.
• Flare-bevel-groove weld.
• Melt-through weld.
Fillet
V-groove
Lap joint, Figure 6-4.
• Fillet weld.
• Plug weld.
• Slot weld.
• Spot weld.
• Bevel-groove weld.
• J-groove weld.
• Flare-bevel-groove weld.
Corner joint, Figure 6-5.
• Fillet weld.
• Spot weld.
• Square-groove weld or butt weld.
• V-groove weld.
• Bevel-groove weld.
• U-groove weld.
• J-groove weld.
• Flare-V-groove weld.
• Edge weld.
• Corner-flange weld.
Edge joint, Figure 6-6.
• Square-groove weld or butt weld.
• Bevel-groove weld.
• V-groove weld.
• J-groove weld.
• U-groove weld.
• Edge-flange weld.
• Corner-flange weld.
Double Welds
In some cases, a weld cannot be made from only one
side of the joint. When a weld must be made from both
sides, it is known as a double weld. Figure 6-7 shows
common applications of double welds in basic joint
designs.
Chapter 6
Butt
Fillet
Weld Joints and Weld Types
59
60
Gas Metal Arc Welding Handbook
J-groove
Butt
Bevel
V-groove
Figure 6-8. Joggle-type joint.
Figure 6-11. Plate butt weld with a fabricated backing bar.
Spot
U -groove
J-groove
Edge
V-groove
Figure 6-9. Tubular butt joint with a built-in backing bar.
Figure 6-12. Controlled weld penetration joint.
Corner
flange
Flare-V
Bevel and fillet
Figure 6-5. Types of welds that may be made with a basic
corner joint.
Butt
U-groove
Bevel-groove
Edge flange
J-groove
V-groove
Corner flange
Figure 6-6. Types of welds that may be made with a basic edge
joint.
Fillet
Double fillet
Figure 6-7. Applications of double welds.
Weldment Configurations
The basic joint often is changed to assist in a
component’s assembly. A weld joint might be modified to
gain access to the weld joint or to change a weld’s
metallurgical properties. Some common weldment
configuration designs are described here. Joggle-type
joints are used in cylinder and head assemblies where
backing bars or tooling cannot be used. See Figure 6-8.
Another application of joggle joints is in the repair of
unibody automobiles where skin panels are placed
together and welded. A built-in backing bar is used when
enough material is available for machining the required
backing or when tooling cannot be inserted (as in some
tubular applications). An example in which tubing is
being joined to heavy wall tube is shown in Figure 6-9.
Pipe joints often use special backing rings or are
machined to fit specially designed mated parts. Types of
backing rings are shown in Figure 6-10. Figure 6-11
shows a fabricated backing bar. These bars must fit
tightly or problems will be encountered in heat flow and
penetration. Weld joints specially designed for controlled
penetration are used where excessive weld penetration
would cause a problem with assembly or liquid flow. This
type of joint is shown in Figure 6-12.
Figure 6-13. Buttered weld joint face.
Figure 6-10. Various types of backing rings for pipe joints.
Figure 6-14. Overlaid welds, called surfacing or cladding,
protect the base metal from wear or contamination.
Welding Terms and Symbols
A series of bead welds overlaid on the face of a joint
is called buttering, Figure 6-13. Buttered welds are often
used to join dissimilar metals. A series of overlaid welds
on the surface of a part to protect the base material is
called surfacing or cladding. Refer to Figure 6-14.
Communication from the weld designer to the
welder is essential to proper completion of most
weldments. Some of the common terms used to describe
parts of the weld joint are found in Figure 6-15. Other
Chapter 6
terms used to describe welds are given in Figure 6-16.
The AWS welding symbol shown in Figure 6-17 was
developed as a standard by the American Welding
Society. This symbol is used on drawings to indicate the
type of joint, placement, and the type of weld to be made.
Groove angle
Bevel angle
Weld Joints and Weld Types
61
The symbol may also include other information, such as
finish and contour of the completed weld.
It is important to study and understand each part of
the welding symbol. Figure 6-18 is a table showing basic
weld symbols that are used with the AWS welding
Gas Metal Arc Welding Handbook
Groove
Square
Scarf
V
Bevel
U
J
Fillet
Plug
or
slot
Stud
Spot
or
projection
Seam
Back
or
backing
Flare-V
Flarebevel
Weld crown
Weld toe
Crown
height
Root penetration
Root opening
Root face
thickness
62
Weld toe
Surfacing
Edge
Root
penetration
Weld crown
Riser
Leg length
Weld throat
Leg length
Finish symbol
symbol to direct the welder in producing the proper weld
joint. The arrow of the welding symbol indicates the
point at which the weld is to be made. The line
connecting the arrow to the reference line is always at an
angle. Whenever the basic weld symbol is placed below
the reference line, as shown in Figure 6-19, the weld is
Groove angle; included angle of
countersink for plug welds
Contour symbol
Tail (may be omitted
when reference
is not used)
Weld symbol
Length of weld
Pitch (center-to-center
spacing) of welds
OTHER
SIDE
SIDES
{
{
BOTH
S(E)
made on the side where the arrow points (referred to as
the arrow side). Whenever the basic symbol is placed
above the reference line, the weld is to be made on the
other side of the joint, as shown in Figure 6-20. By
placing dimensions on the symbol and drawings, the
exact size of the weld may be indicated. Study the
} L-P
}
Fillet weld
symbol
Field weld symbol
Fillet weld
symbol
Weld-allaround symbol
ARROW
SIDE
Depth of bevel; size or
strength for certain welds
T
Root opening; depth of filling
for plug and slot welds
F
A
R
Groove weld size
Specification,
process, or
other reference
Figure 6-18. Basic weld symbols. (Printed with permission of the American Welding Society)
Figure 6-16. Weld and weld area terms.
Figure 6-15. Weld joint terms.
(N)
Reference
line
Number of spot, seam, stud,
plug, slot, or projection welds
Elements in this area remain as shown
when tail and arrow are reversed
Arrow connecting
reference line to
arrow side member
of joint or arrow
side of joint
Other side
Arrow side
Desired
weld
Desired
weld
Weld symbols shall be contained
within the length of the reference line
Figure 6-17. The AWS welding symbol conveys specific and complete information to the welder.
(Printed with permission of the American Welding Society)
Figure 6-19. Fillet weld symbol shown on the bottom side of the
reference line indicates that the weld is located where the arrow
points.
Figure 6-20. Fillet weld symbol shown on the upper side of the
reference line indicates that the weld is located on the opposite
side of the joint.
Chapter 6
examples of typical weld symbols and weldments shown
in Figure 6-21.
The complete weld symbol gives the welder
instructions on how to prepare the base metal, the
welding process to use, and the finish for the completed
weld. Through careful use of these symbols, the weld
designer can convey all the information needed to
complete a weldment.
Classes are offered that provide advanced study in
the area of print reading for welders. By taking such
classes, the welder can improve his or her ability to read
and interpret welding drawings. Studying texts on print
reading is another method of gaining ability to read prints.
Weld Joints and Weld Types
63
64
Gas Metal Arc Welding Handbook
Overhead 4G
U-groove weld
symbol
Desired weld
Fixed 6G
Overhead 4F
V-groove weld
symbol
Desired weld
Vertical 3G
Weld Positions
For a welder, it is important to be able to weld in
different positions. The American Welding Society has
defined the positions of welding to include:
• Flat.
• Horizontal.
• Vertical.
• Overhead.
Figure 6-22 demonstrates the four positions for fillet
welds, grooved butt welds, and pipe welds. While
practicing welding in these positions, you should note how
gravity affects the molten weld pools. In addition to this,
heat distribution also varies with each position. These
factors make the skills needed for each position distinct.
Practice is required to produce good welds in all positions.
Design Considerations
Design of the weld type and weld joint to be used is
of prime importance if the weldment is to do the intended
job. The weld should be made at reasonable cost. Several
factors concerning the weld design must be considered:
• Material type and condition (annealed, hardened,
tempered).
• Service conditions (pressure, chemical, vibration,
shock, wear).
• Physical and mechanical properties of the
completed weld and heat-affected zone.
• Preparation and welding cost.
• Assembly configuration and weld access.
• Equipment and tooling.
Vertical fixed 5G
Two-sided fillet
weld symbol
Desired weld
Vertical 3F
Horizontal 2G
Fillet weld-allaround symbol
Desired weld
Horizontal 2G
Horizontal 2F
Bevel-groove
weld symbol
Desired weld
Rotated flat rolled 1G
Grooved Butt Welds
Pipe Welds
Flat 1F
Fillet Welds
Figure 6-22. American Welding Society definitions of welding positions.
Entire surface built
up weld symbol
Desired weld
Figure 6-21. Typical weld symbols and weld applications.
Butt Joints and Welds
Butt joints are used where high strength is required.
They are reliable and can withstand stress better than any
other type of weld joint. To achieve full stress value, the
weld must have 100 percent penetration through the joint.
This can be done by welding completely through from
one side. The alternative is working from both sides, with
the welds joining in the center.
Flat 1G
Thinner-gauge metals are more difficult to fit up
for welding. Thin metals also require more costly
tooling to maintain the proper joint configuration. Tack
welding may be used as a method of holding the
components during assembly. However, tack welds
present many problems:
• They conflict with penetration of the final weld
into the weld joint.
• They add to the crown dimension (height).
• They often crack during welding due to the heat
and expansion of the joint.
Expansion of the base metal during welding often
will cause a condition known as mismatch, Figure 6-23.
When mismatch occurs, the weld generally will not
penetrate completely through the joint. Many specifications limit highly stressed butt joints to a 10 percent
maximum mismatch of the joint thickness.
Whenever possible, butt joints should mate at the
bottom, Figure 6-24. Joints of unequal thickness should
be tapered in the weld area to prevent incomplete or
inadequate fusion. This is shown in Figure 6-25. When
this cannot be done, the heavier piece may be tapered on
the upper part of the joint as well.
Weld shrinkage. Butt welds always shrink across
the joint (transversely) during welding. For this reason, a
shrinkage allowance must be made if the “after welding”
overall dimensions have a small tolerance. Butt welds in
pipe, tubing, and cylinders also shrink on the diameter of
Chapter 6
Weld Joints and Weld Types
65
66
Gas Metal Arc Welding Handbook
Correct
Figure 6-23. Welds made on mismatched joints often will fail
below the rated load when placed in stress conditions.
Single fillet
Open to
corrosion
Figure 6-27. Weld joint shrinkage can be determined in four
steps. 1. Tack weld the test joint together. 2. Scribe parallel
lines, as shown, on approximately 2” centers. Record this
dimension. 3. Weld joint with test weld procedure. 4. Measure
linear distance and compare with original dimension.
Figure 6-24. Mating the joint at the bottom equalizes the load
during stress when the weld is made from the top and penetrates completely through the joint.
Figure 6-25. Joints of unequal thickness absorb different
amounts of heat and expand at different ratios. Equalize the
heat flow by tapering the heavier material to the thickness of
the thinner material.
Figure 6-26 Butt welds shrink during welding in both transverse
and circumferential directions.
the material. This shrinkage is shown in Figure 6-26. In
areas where these dimensions must be maintained, a
shrinkage test must be done to establish the amount of
shrinkage. Figure 6-27 shows how such a test is made.
Heavier materials will shrink more than thinner
materials. Double-groove welds will shrink less than
single-groove welds. This is because less welding is
involved and less filler material is used.
T-Joints and Welds
Various T-joint designs are used to join parts at an
angle to each other. Depending on the intended use of the
weldment, the joint may be made with a single fillet,
double fillet, or a groove and fillet weld combination.
Figure 6-28 shows these designs.
Fillet welds are made to specific sizes that are determined by the allowable design load. They are measured
as shown in Figure 6-29. Where design loads are not
known, a “rule of thumb” may be used for determining
the fillet size. In these cases, the fillet weld leg lengths
must equal the thickness of the thinner material.
The main problem in making fillet welds is lack of
penetration at the joint intersection. To prevent this
condition, always make stringer beads at the intersection.
Weave beads do not provide the desired penetration on
fillet welds.
Lap Joints and Welds
Lap joints may be either single fillet, double fillet,
plug slot, or spot-welded. They require very little joint
preparation. They are generally used in static load applications or in the repair of unibody automobiles. Where
corrosive liquids are involved, both edges of the joint
must be welded. See Figure 6-30. One of the major problems with lap joint design is shown in Figure 6-31. Where
the component parts are not in close contact, a bridging
fillet weld must then be made. This leads to incomplete
fusion at the root of the weld and oversize fillet weld
dimensions. When using this type of design in sheet or
plate material, clamps or tooling must be used to maintain adequate contact of the material at the weld joint.
An interference fit eliminates this problem in
assembly of cylindrical parts, Figure 6-32. The inside
diameter of the outer part is made several thousandths of
an inch smaller than the outside diameter of the inner
Correct
Section A
Correct design
Section B
Incorrect design
Figure 6-30. Corrosive liquids must not be allowed to enter the
penetration side of the weld joint. In Section A, the back of the
weld is closed to corrosion. In Section B, the back of the weld
is open to corrosion.
Double fillet
Bevel and fillet
Figure 6-31. Lap joint problem areas that result from improper
fit-up.
Figure 6-28. Various types of T-joints and welds.
Outer part
I.D.
Size of
required
weld
Inner part
O.D.
Leg length
Figure 6-29. Fillet weld leg lengths from the root of the joint
should be equal. Unequal leg length, unless otherwise specified, will not carry the designed load and may fail under stress.
Figure 6-32. The diameters of the parts to be assembled with
an interference fit may be found by using a “pi” tape around the
inner and outer cylinder components. The tape measures in
thousandths of an inch and full inches.
Chapter 6
Weld Joints and Weld Types
67
68
Gas Metal Arc Welding Handbook
part. Before assembly, the outer part is heated until it
expands enough to slide over the inner part. As the part
cools, it shrinks and locks the two pieces together.
Corner Joints and Welds
Corner joints are similar to T-joints, since they
consist of sheets or plates mating at an angle to one
another. They are usually used in conjunction with
groove welds and fillet welds. Some of the many
different corner weld designs are shown in Figure 6-33.
When using thinner gauges of metal, it may be difficult
to assemble component parts without proper tooling.
Tack welding and welding often will cause distortion and
buckling of thinner materials. For the most part, use of
corner joints should be limited to heavier materials in
structural assemblies.
Edge Joints and Welds
Edge welds are used where the edges of two sheets
or plates are adjacent and are in approximately parallel
planes at the point of welding. Figure 6-34 shows several
types of edge weld designs. These designs are common
only in structural use. Since the weld does not penetrate
completely through the joint thickness, it should not be
used in stress or pressure applications.
Edge to edge
Flush corner
Half overlap
Figure 6-33. Common corner weld joint designs that may be
used in fabrication.
Wall
thickness
Reinforcement
Heat affected zone
within this area
Figure 6-37. Temperature crayons and pellets may be used to
determine preheating temperatures prior to welding.
Figure 6-35. The joint thickness and the filler material tensile
strength is equivalent to the strength of the base material in this
design.
Hold-down and chill bars
Figure 6-34. Common edge weld joint designs that may be
used in fabrication.
Special Designs and Procedures
Special designs are often used in the fabrication of a
weldment where:
• Welds cannot be thermally treated after welding
because of configuration or size. Material is added
to the joint thickness, as shown in Figure 6-35, and
the weld is made restricting the heat flow into the
thinner metal. This type of joint will achieve the
full mechanical values of the base material.
• Joining of dissimilar materials can be done by
buttering the face of one material to match the
other, as shown in Figure 6-36.
Special procedures and tooling may be used to
provide a preheating, interpass, and postheating operation to control grain size. Preheating is generally used to
slow down the cooling rate of the weld to prevent
cracking. Interpass temperature is the Min/Max temperature at which a weld can be made on a multi-pass weld.
Individual chapters regarding the welding of various
metals will define the requirements for preheating, interpass, and postheating temperatures. These temperatures
may be checked by the use of special crayons, paints, or
pellets like those in Figure 6-37.
Special procedures, tooling, and chill bars may be
used to localize and remove welding heat during the
welding application. Figure 6-38 shows an application of
tooling used to remove heat from the part.
Backing and
chill bar
New
weld
Original material
Buttered weld
Original material
Buttered weld
Figure 6-36. Buttering techniques are commonly used to adapt
dissimilar metals for welding.
Review Questions
Write your answers on a separate sheet of paper. Do
not write in this book.
1. What are the five basic types of joints?
2. Welds made from both sides of the joint are called
_____ welds.
3. _____ welds are often used where dissimilar
materials are joined.
4. Weld material placed on the surface of a joint for
protection of the base material is called _____ or
_____.
5. The oxyacetylene and the plasma arc processes are
_____ cutting processes.
6. Where high-strength welds are required, a _____
joint weld with 100 percent penetration is used.
Figure 6-38. Tooling and bars used to remove heat from the
weld and resist heat flow into the base material are sometimes
called “chill bars.”
7. Unless tack welds are made properly, they often
_____ during the welding operation.
8. Fillet welds are always measured by the length of
the fillet _____.
9. Where fillet weld dimensions are not specified, the
size of the weld should equal the thickness of the
_____ material.
10. The condition of a butt joint where neither the top
nor the bottom edge of the material is flush is called
_____.
11. _____ joints always shrink across the weld joint.
12. The main problem in making fillet welds is _____
_____ _____ into the root of the joint.
13. Edge-type joints without full penetration of the weld
should not be used in _____ _____.
14. _____ bars are used during welding to localize and
remove heat from the weld area.
15. The American Welding Society defines four positions of welding: _____, _____, _____, and _____.
