Network Security Solutions
Implementing Network Access Control (NAC)
Tested Solution: Protecting your network with Microsoft
Network Access Protection (NAP) and Allied Telesis Switches
Today’s networks increasingly require protection against attacks that originate from within the network. All too often these LAN-based
attacks are released accidentally onto a network when a naive or careless user connects a device infected with malicious software into the
LAN. To effectively defend against these internal threats, network administrators need secure LAN switches to inhibit network attacks, and
to control network access using Health and Security policies. These policies can ensure that only legitimate users access the network and
that the connecting devices conform to strict security requirements.
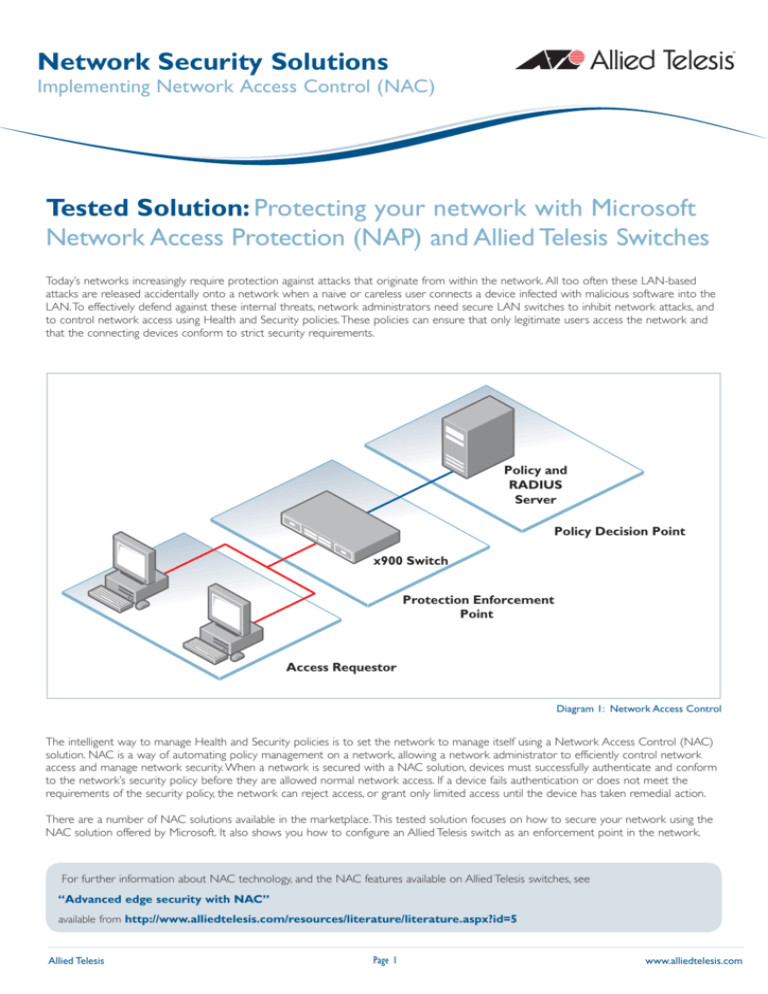
Policy and
RADIUS
Server
Policy Decision Point
x900 Switch
Protection Enforcement
Point
Access Requestor
Diagram 1: Network Access Control
The intelligent way to manage Health and Security policies is to set the network to manage itself using a Network Access Control (NAC)
solution. NAC is a way of automating policy management on a network, allowing a network administrator to efficiently control network
access and manage network security. When a network is secured with a NAC solution, devices must successfully authenticate and conform
to the network’s security policy before they are allowed normal network access. If a device fails authentication or does not meet the
requirements of the security policy, the network can reject access, or grant only limited access until the device has taken remedial action.
There are a number of NAC solutions available in the marketplace. This tested solution focuses on how to secure your network using the
NAC solution offered by Microsoft. It also shows you how to configure an Allied Telesis switch as an enforcement point in the network.
For further information about NAC technology, and the NAC features available on Allied Telesis switches, see
“Advanced edge security with NAC”
available from http://www.alliedtelesis.com/resources/literature/literature.aspx?id=5
Allied Telesis
Page 1
www.alliedtelesis.com
NETWORK SECURITY SOLUTIONS | Implementing Network Access Control (NAC)
In this tested solution, the Allied Telesis switch acts as a:
■
RADIUS Network Access Server (NAS)
■
802.1X authenticator
■
DHCP server
■
Network Protection enforcement point
The example configuration script in this document is for a switch running the AlliedWare Plus OS, however you can configure switches that run the
AlliedWare OS in a similar manner. The Products section at end of this document lists the Allied Telesis products that support NAC solutions.
The Microsoft Solution
The NAC solution offered by Microsoft is known as Network Access Protection (NAP). It allows network administrators to automate policies to
protect their network, such as ensuring that legitimate users have client PCs with the:
■
most recent Microsoft security patches installed
■
latest anti-malware scanners installed and updated
■
host-based firewall enabled
This document explains how to configure a simple network protected by NAP. The connecting devices in the example network are PCs using
802.1X authentication. VLAN identifiers are used to separate the PCs based on whether they conform to the network Health policies.
In this document’s example network, when a device connects to the network it must initially send an authentication request to the network. All
other traffic from it is dropped while it remains unauthenticated. The Microsoft server receives this request and tells the switch what action to take:
■
Clients that fail authentication are not allowed access to the network.
■
Clients that authenticate but do not meet the security requirements are assigned to VLAN 2, which has access only to network servers.
■
Authenticated clients that meet the security requirements are assigned to VLAN 3, which has normal access to the network.
Software Requirements
Microsoft NAP requires a server running Windows Server 2008-either Enterprise, Datacenter, or Standard Edition. Client PCs must run Windows
Vista, or Windows XP with Service Pack 3 (SP3) installed.
The following Microsoft software components are configured in NAP solutions:
Microsoft Network Policy Server
This software feature acts as the policy manager and is available on Windows Server 2008. It unifies the processes that are involved in creating
and enforcing network access policies—it acts as a RADIUS server, evaluates the Health policy compliance of clients, and determines the network
access to grant to clients.
Microsoft Domain Controller
This software feature acts as the authenticator, and is available on either Windows Server 2008 or Windows Server 2003. It is used to:
■
Hold a database of username and password information that the Network Policy Server can access when authenticating clients
■
Define groups of client PCs, so that you can apply Group Policies to those Client PCs
The Domain Controller can run on the same Windows Server 2008 instance as the Network Policy Server, or on a separate server. In this tested
solution, the Domain Controller is on a separate server.
NAP Client Software
This software is included in Windows Vista, and in Windows XP Service Pack 3.
Allied Telesis
Page 2
www.alliedtelesis.com
NETWORK SECURITY SOLUTIONS | Implementing Network Access Control (NAC)
Building the Network
This tested solution uses the example network in figure 1. The client PCs are connected to authenticating ports, while the servers are on nonauthenticating ports.
Domain
Controller
192.168.0.1
Network
Policy Server
1.0.1
192.168.0.2
1.0.2
1.0.9
1.0.10
1.0.11
Layer 3 Switch
Acts as:
RADIUS NAS
802.1x authenticator
DHCP server
Network Protection enforcement point
Client PCs
Figure 1: example network
To build this network, follow the three configuration sections of this document. These sections are summarized here:
■
Layer 3 Switch Configuration:
Configure the switch to act as a RADIUS NAS, 802.1X authenticator, DHCP server, and Network Protection enforcement point. Create two
VLANs, one for compliant PCs, one for noncompliant PCs. Create ACLs to limit access to the network for noncompliant PCs.
■
Server Configuration:
Configure the Domain Controller first. On the Domain Controller, configure a domain, the user accounts, and client PC groups. On the
Network Policy Server, configure the policies the network requires, and link the Network Policy Server to the Domain Controller.
■
Client PC Configuration:
Attach the client PCs to non-authenticating ports so that they can communicate with the Domain Controller. Add the Client PCs to a Client
Group with the Domain Controller. Enable 802.1X authentication on the PCs. You can now attach the client PCs to authenticating ports on
the switch.
Allied Telesis
Page 3
www.alliedtelesis.com
NETWORK SECURITY SOLUTIONS | Implementing Network Access Control (NAC)
x900 Switch Configuration
Sends authentication requests to the Network Policy Server
at 192.168.0.2
radius-server host 192.168.0.2 key testing123-2
aaa authentication dot1x default group radius
Sets the switch to use the configured RADIUS servers for
802.1X authentication requests
Creates the DHCP pool for client PCs that the Network Policy
Server deems noncompliant. These are allocated an IP address in
the range 192.168.2.167 – 192.168.2.200
ip dhcp pool NAC-noncompliant
network 192.168.2.0 255.255.255.0
range 192.168.2.167 192.168.2.200
dns-server 192.168.0.1
default-router 192.168.2.3
lease 1 1 1
subnet-mask 255.255.255.0
Creates the DHCP pool for client PCs that the Network Policy
Server deems compliant. These PCs are allocated an IP address
in the range 192.168.3.167 – 192.168.3.200
ip dhcp pool NAC-compliant
network 192.168.3.0 255.255.255.0
range 192.168.3.167 192.168.3.200
dns-server 192.168.0.1
default-router 192.168.3.3
lease 1 1 1
subnet-mask 255.255.255.0
Enables the DHCP server
service dhcp-server
Creates the ACLs that will restrict network access to the client PCs.
Compliant PCs (with an IP address in the 192.168.3.0 subnet) are
allowed normal access to the network.
Noncompliant PCs (with an IP address in the 192.168.2.0 subnet)
are allowed access ONLY to the servers.
access-list 3001 permit ip 192.168.3.0/24 any
access-list 3002 permit ip 192.168.2.0/24 192.168.0.1/32
access-list 3003 permit ip 192.168.2.0/24 192.168.0.2/32
Allows all DHCP traffic.
access-list 3005 permit udp any range 67 68 any range 67 68
Sets the switch to drop all traffic that does not match the other
ACLs
access-list 3006 deny ip any any
Creates the compliant and noncompliant VLANs. There are
no statically allocated ports on these VLANs. Instead the
switch dynamically allocates the ports using the 802.1X VLAN
assignment process.
vlan database
vlan 2 name noncompliant
vlan 3 name compliant
vlan 2-3 state enable
Sets ports 1.0.1-1.0.8 to be non-authenticating ports. Connect
servers and routers to these ports.
interface port1.0.1-1.0.8
switchport
switchport mode access
interface port1.0.9-1.0.24
switchport
switchport mode access
ip access-group 3001
ip access-group 3002
ip access-group 3003
ip access-group 3004
ip access-group 3005
ip access-group 3006
dot1x port-control auto
dot1x control-direction in
auth host-mode single-host
auth dynamic-vlan-creation
Sets the remaining ports as authenticating ports. The ACLs that
constrain the access to the network are applied to these ports.
802.1X is enabled on these ports and configured to accept
dynamic VLAN assignment.
interface vlan1
ip address 192.168.0.3/24
Allocates IP addresses to all the VLANs on the switch, so that it
can L3 switch between these VLANs.
interface vlan2
ip address 192.168.2.3/24
interface vlan3
ip address 192.168.3.3/24
Allied Telesis
Page 4
www.alliedtelesis.com
NETWORK SECURITY SOLUTIONS | Implementing Network Access Control (NAC)
Server Configuration
This section gives an overview of the configuration steps for the Domain Controller and Network Policy Server. How you configure the Network
Policy Server and Domain Controller depends on your specific needs. For detailed instructions consult Microsoft documentation, in particular read
the Step-by-Step Guide: Demonstrate NAP 802.1X Enforcement in a Test Lab document available on the following webpage:
http://www.microsoft.com/windowsserver2008/en/us/nap-technical-resources.aspx
Domain Controller overview
Configure the Domain Server first:
1. Create a Forest.
2. Within the Forest, create a Domain. This houses the user information. The Network Policy Server will also join this domain.
3. Create the user accounts. These accounts hold the username and password that a user must supply when logging into the network.
4. Create a security group for the Client PCs; for example called “NAP Client Computers”. You will add each Client PC to this group later. Once
a user has authenticated on the network, the PC they are using is checked to see whether it belongs to this security group. The security
policies defined in the Network Policy Server are applied to matching Client PCs.
5. Install the Enterprise Root Certificate Authority service. The Network Policy Server receives a certificate from this service.
Network Policy Server overview
To configure the Network Policy Server:
1. Join the domain you have created on the Domain Server.
2. Install Network Policy Server role.
3. Install Group Policy Management feature.
4. Obtain a computer certificate from the Domain Controller.
5. Run the NPS console (nps.msc) and create your policies using the configuration Wizard. See Figure 2 for a summary of the policy configuration.
NPS console (nps.msc)
Within the NPS console, run the NAP configuration Wizard, which creates the following policies:
Connection Request Policy called 802.1x (wired)
Specify:
* RADIUS clients
IP Address
Shared Secret
* Authentication Method as EAP - PEAP
* NAS Port Type as Ethernet
Windows Security Health Validator:
Browse to Network Access Protection >
System Health Validators >
Windows Security Health Validator
Define the Health requirements for the Client PCs:
Firewall ON/OFF
Virus Checker ON/OFF
Spyware Checker ON/OFF
Automatic Updates ON/OFF, etc.
NAP Health Policies called:
* NAP 802.1x (wired) compliant
* NAP 802.1x (wired) noncompliant
Specifying whether or not a Client
passed some or all Health checks in
the Windows Security Health Validator.
Network Policies called:
* NAP 802.1x (wired) compliant
* NAP 802.1x (wired) noncompliant
* NAP 802.1x (wired) non NAP capable
Specify what to do if certain conditions are met, for example when a Client PC matches a given
Heath Policy. This defines RADIUS attributes (like VID) to send.
Figure 2: NPS console
Allied Telesis
Page 5
www.alliedtelesis.com
NETWORK SECURITY SOLUTIONS | Implementing Network Access Control (NAC)
6. Run the Group Policy Management Editor (gpme.msc) to create a new Group Policy Object. Change
the settings for this object as shown in Figure 3.
Group Policy Management Editor (gpme.msc)
Create a new Group Policy Object, called “NAP client settings”. Specify the following settings for this Group Policy Object:
Computer Configuration > Policies > Windows Settings > Security Settings > System Services >
Network Access Protection Agent = enable
Computer Configuration > Policies > Windows Settings > Security Settings > System Services >
Wired Auto Config = enable
Computer Configuration > Policies > Windows Settings > Security Settings > Network Access Protection >
NAP Client Configuration > Enforcement Clients >
EAP Quarantine Enforcement = enable
Computer Configuration > Policies > Administrative templates > Windows Components >
Security Center = turn on Security Center (Domain PCs only)
Figure 3: GPM editor
7. Run the Group Policy Management Console (gpmc.msc). Browse to the Group Policy Objects for the domain. An available object will be the
“NAP client settings” you created using the Group Policy Management Editor. Under the Security Filtering for this Group Policy Object, add the
group “NAP client computers”, which is the security group you created within the Domain Controller. This defines the group of client PCs that
the Group Policy applies to.
Client PC Configuration
To configure the client PCs, you will need to:
1.
2.
3.
4.
Attach the PCs to non-authenticating ports
Set each PC to join the domain you have created (described in detail below)
Set each PC to use 802.1X authentication
Attach the PCs to authenticating ports, and check that the NAP network configuration is working
Joining the domain
The clients need to join the domain before you can configure 802.1X
authentication on them. Attach the client PCs to non-authenticating ports on the
switch so that they can communicate with the Domain Controller and join the
domain.
On each client PC, browse to System Properties > Computer Name tab, and
click change to enter the Computer Name Changes dialog box:
■
In the Computer Name field, type the name you wish to give the client PC.
■
In the Member of field, choose Domain, and type the name of the domain
you created for the network.
Click OK to return to the previous window.
Allied Telesis
Page 6
www.alliedtelesis.com
NETWORK SECURITY SOLUTIONS | Implementing Network Access Control (NAC)
On PCs running Windows XP, you must configure the network settings:
1. In the System Properties > Computer Name tab, click the Network ID button to run the Network Configuration Wizard.
2. In the dialog How do you use this computer?, choose:
This computer is part of a business network
3. In the dialog What kind of network do you use?, choose:
My company uses a Network with a domain
4. In the dialog User account and Domain Information, specify the User name, Password, and Domain of the user account that you
created on the Domain Controller.
On the Domain Controller, add each Client PC to the “NAP client computers” group. This applies the policies set in the “NAP Client Settings”
Group Policy Object (created on the Network Policy Server) to the Client PCs.
Allied Telesis
Page 7
www.alliedtelesis.com
NETWORK SECURITY SOLUTIONS | Implementing Network Access Control (NAC)
Enabling 802.1X authentication
Browse to start > settings > Network Connections. Double-click on the network interface that you are interested in to
open the Status window for the interface.
Click on the Properties button to open the Properties dialog for the interface. Select the Authentication tab and check that the:
■
Enable IEE 802.1X authentication tick box is ticked
■
network authentication method is Protected EAP (PEAP)
Click on the Settings button in this dialog to open the PEAP properties dialog. On the bottom half of the dialog, check that the
Select Authentication Method field is set to Secured password (EAP-MSCHAP v2).
Allied Telesis
Page 8
www.alliedtelesis.com
NETWORK SECURITY SOLUTIONS | Implementing Network Access Control (NAC)
Click the Configure button in this dialog to open the EAP MSCHAP v2 Properties dialog. Check that the checkbox is ticked.
The client PCs are now ready to connect to the network on authenticated ports.
Confirming the NAP network configuration
Log into the network using one of the configured PCs. 802.1X authentication should successfully work.
If the state of the PC passes the Health Checks defined in the Windows Security Health Validator on the Network Protection Server, then a bubble
will appear near the bottom of the screen confirming this:
The port to which the PC is connected is dynamically assigned to the Compliant VLAN (VLAN 3), as defined by the Network Policy NAP 802.1X
(wired) Compliant on the Network Protection Server.
If the state of the PC does not pass the Health Checks defined in the Window Security Health Validator on the Network Protection Server, then a
bubble will appear near the bottom of the screen reporting this:
Allied Telesis
Page 9
www.alliedtelesis.com
NETWORK SECURITY SOLUTIONS | Implementing Network Access Control (NAC)
Products
About Allied Telesis Inc.
The following Allied Telesis Layer 3 switches, running the Alliedware Plus
operating system, will support the configuration detailed in this solution
SwitchBlade® x908
Advanced
Adva
Ad
vanc
nced
d LLay
Layer
ayyer 3 M
Modular
od
dul
ular
lar SSwitch
wititch
wi
tch
Allied Telesis is a world class leader in delivering IP/Ethernet network
solutions to the global market place. We create innovative, standards-based
IP networks that seamlessly connect you with voice, video and data services.
Enterprise customers can build complete end-to-end networking
solutions through a single vendor, with core to edge technologies
ranging from powerful 10 Gigabit Layer 3 switches right through to
media converters.
Allied Telesis also offer a wide range of access, aggregation and backbone
solutions for Service Providers. Our products range from industry
leading media gateways which allow voice, video and data services to be
delivered to the home and business, right through to high-end chassisbased platforms providing significant network infrastructure.
SwitchBlade x908
8 x 60Gbps Expansion Bays
Allied Telesis' flexible service and support programs are tailored to
meet a wide range of needs, and are designed to protect your Allied
Telesis investment well into the future.
Visit us online at www.alliedtelesis.com
x900-12X and 24X Series
Advanced Gig
Gigabit
gabit Lay
Layer
yer 33+ Expa
Expandable
p ndable Switches
x900 Family
x900-24XT
■
2 x 60Gbps Expansion Bays
■
24 x 10/100/1000BASE-T (RJ-45) copper ports
x900-24XT-N
NEBS Compliant
■
2 x 60Gbps Expansion Bays
■
24 x 10/100/1000BASE-T (RJ-45) copper ports
x900-24XS
■
2 x 60Gbps Expansion Bays
■
24 x 100/1000BASE-X SFP ports
x900-12XT/S
■
1 x 60Gbps Expansion Bay
■
12 x combo ports (10/100/1000BASE-T copper or SFP)
Allied Telesis
Page 10
www.alliedtelesis.com
USA Headquarters | 19800 North Creek Parkway | Suite 100 | Bothell | WA 98011 | USA | T: +1 800 424 4284 | F: +1 425 481 3895
European Headquarters | Via Motta 24 | 6830 Chiasso | Switzerland | T: +41 91 69769.00 | F: +41 91 69769.11
Asia-Pacific Headquarters | 11 Tai Seng Link | Singapore | 534182 | T: +65 6383 3832 | F: +65 6383 3830
www.alliedtelesis.com
© 2008 Allied Telesis Inc. All rights reserved. Information in this document is subject to change without notice. All company names, logos, and product designs that are trademarks or registered trademarks are the property of their respective owners.
000-000000 Rev. A

