Failure: Chapter 9
advertisement
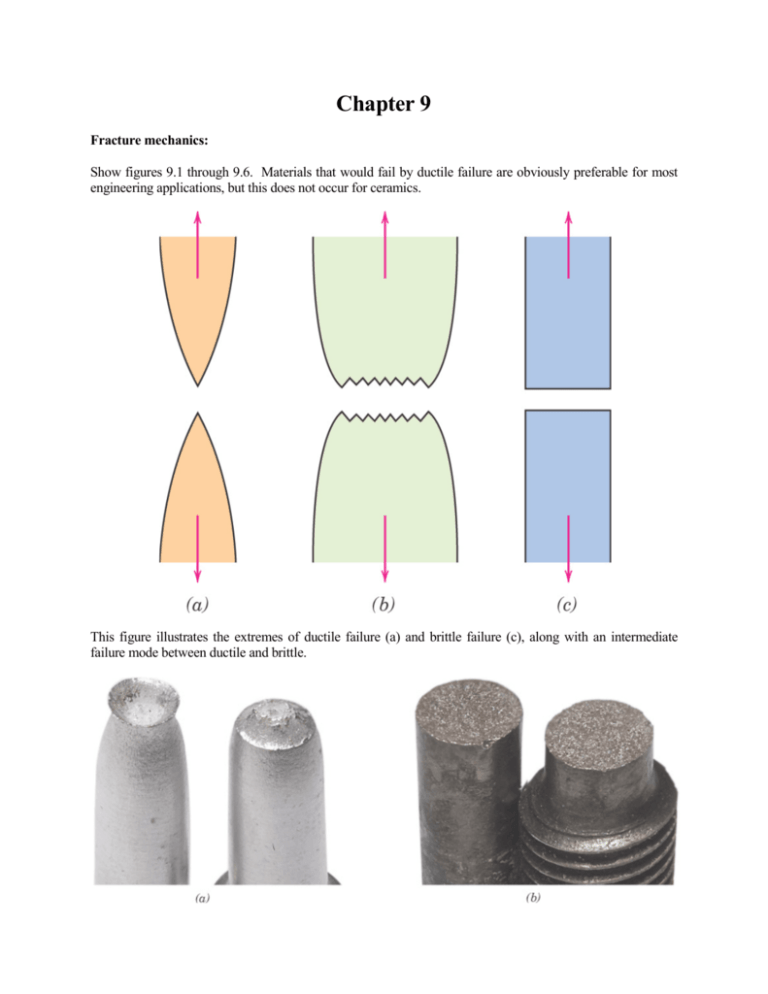
Chapter 9 Fracture mechanics: Show figures 9.1 through 9.6. Materials that would fail by ductile failure are obviously preferable for most engineering applications, but this does not occur for ceramics. This figure illustrates the extremes of ductile failure (a) and brittle failure (c), along with an intermediate failure mode between ductile and brittle. The figure above illustrates the difference between brittle fracture and cup-and-cone fracture. Experts in fracture mechanics can understand the failure mechanism of specific materials by microscopic inspection of the failure surface. The figure above illustrates the difference SEM images of ductile fracture arising from uniaxial tensile loads (a) and the parabolic dimples characteristic of ductile fracture arising from shear loading (b). The figure at right illustrates crack propagation through polycrystalline samples, illustrating the cracks must change direction at grain boundaries (a). SEM image of trans-granular fracture surface (b). Stress concentration: Statics analysis shows that when microscopic cracks occur in a solid material, the stress at the crack tip is concentrated, or in other words magnified above the level of the applied stress. Show figure 9.8. The maximum stress occurs at the crack tip according to: σm a = σ 0 1 + 2 ρt 1/ 2 Here σm is the maximum stress at the crack tip, σ0 is the nominal applied tensile stress, ρt is the radius of curvature at the crack tip, and a is the length of a surface crack, or half the length of an internal crack. For a long enough crack, this reduces to: σm a = 2σ 0 ρc 1/ 2 The ratio σm/σ0 is often referred to as the stress concentration factor, Kt a K t = 2 ρc 1/ 2 Omit Griffith theory of brittle fracture, and stress analysis of cracks. Fracture toughness: Due to the disastrous nature of fracture, much effort has been expended to understand fracture mechanics. From a combination of fundamental and empirical reasons, brittle fracture will occur when the fracture toughness (Kc) of a material is exceeded, where K C = Y (a / w )σ c π a Here Y(a/w) is a geometrical factor that depends on the crack dimensions, where a is the crack length and w is the specimen thickness; σc is the critical stress for crack propagation, and subsequent failure; and a is again the length of a surface crack of half the length of an internal crack. If a→0 or w→∞, then Y →1. As the sample thickness is increased, the fracture toughness declines, until the plane strain region is obtained. The fracture toughness (KIC) is the critical value of the stress intensity factor at a crack tip needed to produce catastrophic failure under simple uniaxial loading. The subscript I stands for Mode I loading (unixial), illustrated in figure 9.10a while the subscript C stands for critical. The fracture toughness is given by: K IC = Yσ c πa where Y is a dimensionless geometry factor on the order of 1, σf is the stress applied at failure, and a is the length of a surface crack (or one-half the length of an internal crack). The MKS units of KIC are MPa-m1/2. Show table 9.1, which provides values for KIC under “plane strain” conditions, meaning that ( t ≥ 2.5 K IC / σ y ) 2 , where t is the sample thickness. For thin specimens, or “plane stress” conditions, the fracture toughness becomes thickness dependent. This type of approach predicts that flaws larger than a certain size will cause fracture. This provides a lower detection limit for manufacturing flaws. The analysis given here applies to brittle fracture rather than to ductile failure. For design problems, we can use the equation for plane strain fracture toughness in two different manners, as illustrated in equations (9.6) and (9.7): σc ≤ K Ic Y πa 1K ac = Ic π σ 2 Example: Estimate the flaw size responsible for the failure of a turbine motor made from partially stabilized zirconia that fractures at a stress level of 300 MPa. From above, we know that: K IC = Yσ f πa Rearranging: 1K ac = IC π σ 2 From table 9.1, but missing in this textbook, KIC = 9 MPa-m1/2. Substituting: 1 9 MPa − m 1 / 2 ac = π 300 MPa 2 ac = 2.86 x10 −4 m = 286 µm Note that were we to substitute electrical porcelain (KIC = 1 MPa-m1/2) for partially stabilized zirconia, the critical flaw size would be reduced by 81x to about 3.54 µm. Clearly, preventing flaw formation during fabrication becomes much more difficult for electrical porcelain. Impact Fracture Testing: Since fracture occurs abruptly in some materials, tensile stress-strain test are inadequate, since the stress is applied gradually. This particularly applies to failure by brittle fracture. Impact testing techniques have been developed to test for abrupt failure arising from a sharp impact, the two most common being the Charpy and Izod tests. These are used to measure the impact energy, sometimes called the notch toughness. Show Figure 9.18. Note that a V-notch is machined into the sample for these impact testing techniques. Impact testing is more qualitative than fracture toughness, with only the latter characterized by a materials constant (plain strain fracture toughness). One of the important observations during Charpy and Izod tests is the possible existence of ductile-to-brittle transitions. This is illustrated by the figure above, where a ship was used at a temperature below this transition temperature. During low temperature operation, some materials become dramatically more brittle, and therefore subject to failure when exposed to impact forces. At high temperature, where the impact energy absorbed before failure is high, ductile failure occurs, with extensive elastic and plastic deformation before failure. At low temperature, where the impact energy absorbed before failure is low, brittle fracture occurs, with little deformation before failure. Show Figure 9.22, which illustrates the dramatic effect of temperature on impact energy that is observed in some metals, such as low-strength steels. Typical results for different types of metals are shown in Figure 9.21. In the last figure, the effect of increasing the C content (atom%) on ductile-to-brittle impact evahior is illustrated. Fatigue: We have discussed methods for testing materials under a constant load (tensile stress-strain test) and under rapid loading (Charpy impact test). However, some materials undergo brittle failure by fatigue when exposed to a cyclic load, which is illustrated in Figure 9.23. A typical fatigue curve is shown in Figure 9.25a for materials, such as ferrous (Fe) and Ti alloys, that show a fatigue strength or endurance limit. However, most nonferrous alloys do not exhibit a horizontal region in the fatigue curve, as shown in Figure 9.25b. These SN curves are obtained using fatigue testing apparatus, as shown in Figure 9.24. The statistical variation in SN curves is illustrated in Figure 9.26 below. The magnitude of the cyclic stress can be calculated as the mean stress (σm), the stress range (σr), the stress amplitude (σa), or the stress ratio (R), as given below: σm = σ max + σ min 2 σ r = σ max − σ min σa = σ max − σ min R= 2 σ min σ max The reason for the decay in strength of materials under cyclic stress is crack formation, followed by gradual crack growth. Repeated stress application creates numerous local regions of plastic deformation, forming sharp discontinuities (extrusions and intrusions) that act as stress concentrators. In addition, cracks are gradually lengthened by similar processes. Fracture mechanics (toughness) can be used to predict the crack size at which brittle fracture will occur. However, additional theory is needed to model the evolution of crack growth during cyclic stress. Creep: Materials that are exposed to stress at elevated temperatures often deform (and eventually fail) by creep. Show figure 9.35, which illustrates the three stages of creep. The instantaneous, elastic deformation is followed by primary creep, where the creep rate diminishes with time, possibly due to strain hardening. Secondary creep, often called steady-state creep, is characterized by a constant creep rate and is usually the longest stage in duration. During secondary creep, and a balance exists between strain hardening and recovery. Tertiary creep is characterized by an acceleration of the creep rate to failure. For engineering design purposes, the magnitude of creep can be described by the steady state creep rate, since this is of the longest duration, and is most predictable. The steady-state creep rate is strongly affected by temperature, as shown by equations (9.20) and (9.21): εs = K 1σ n εs = K 2σ n exp − Qc RT Obviously, K1 and K2 are related. The dependence of creep rate on stress and temperature can be illustrated by the Figures below. Example Steady-state creep data for an alloy at 200ºC yield: εs (hr-1) -3 2.5x10 2.4x10⁻² σ (MPa) 55 69 The activation energy for creep is known to be 140 kJ/mol. What is the steady-state creep rate at 250ºC and 48 MPa? We eventually need to use equation (9.21) above: εs = K 2σ n exp − Qc RT However, we first need to determine the constants K2 and n. We can do that from the two data points that are given, which allow us to setup a 2x2 system of equations. Taking the ln of both sides of this equation: ln ε s1 = ln K 2 + n ln σ 1 − Qc RT1 ln ε s 2 = ln K 2 + n ln σ 2 − Qc RT2 Now we can subtract these to yield: ε σ ln s1 = n ln 1 σ2 ε s 2 Notice that because T1 = T2, the last term cancels out. Substituting in the data that was given: 2.4 x10 −2 69 = n ln ln −3 55 2.5 x10 n = 9.97 Substituting into either of the two equations above yields K 2 = 3.27 x10 back into the original equation for the steady state strain: ε s = (3.27 x10 − 5 hr −1 )(48 MPa )9.97 exp − −5 hr −1 . Now we can substitute (140,000 J / mole ) (8.314 J / mole − ° K )(523° K ) ε s = 1.97 x10 −2 hr −1 Data Extrapolation Methods: Practitioners in the materials field often encounter the following dilemma. Their company is selling or purchasing products that are expected to have a lifetime of years, or even decades. Yet these materials cannot be tested for year or decades. Instead, practitioners typically used accelerated testing, where the material is tested under more extreme conditions that it will actually be exposed to, so failure will occur after a shorter time. If the failure mechanism is correctly understood, and the failure mechanism remains unchanged under these extreme conditions, then the data can be extrapolated to longer time. This problem is commonly encountered for materials that fail due to creep, and for those that fail due to corrosion. Corrosion cabinet testing is widely used commercially to accelerate corrosion through the use of higher temperature and more corrosive reagents than actually encountered during use. For creep testing, accelerated testing could involve the use of either higher temperature or higher DC stress. The Larson-Miller parameter is defined as: T (C + log t R ) where C is a constant (on the order of 20), T is the temperature (°K), and tR is the rupture lifetime in hours. The rupture lifetime of a given material measured as some specific stress level will vary with temperature such that this parameter remains constant. Alternatively, the data may be plotted as in Figure 9.39 (below), given for S-590 alloy.

