step-by-step: draw formline shapes
ACTIVITY 2
STEP-BY-STEP:
DRAW FORMLINE SHAPES
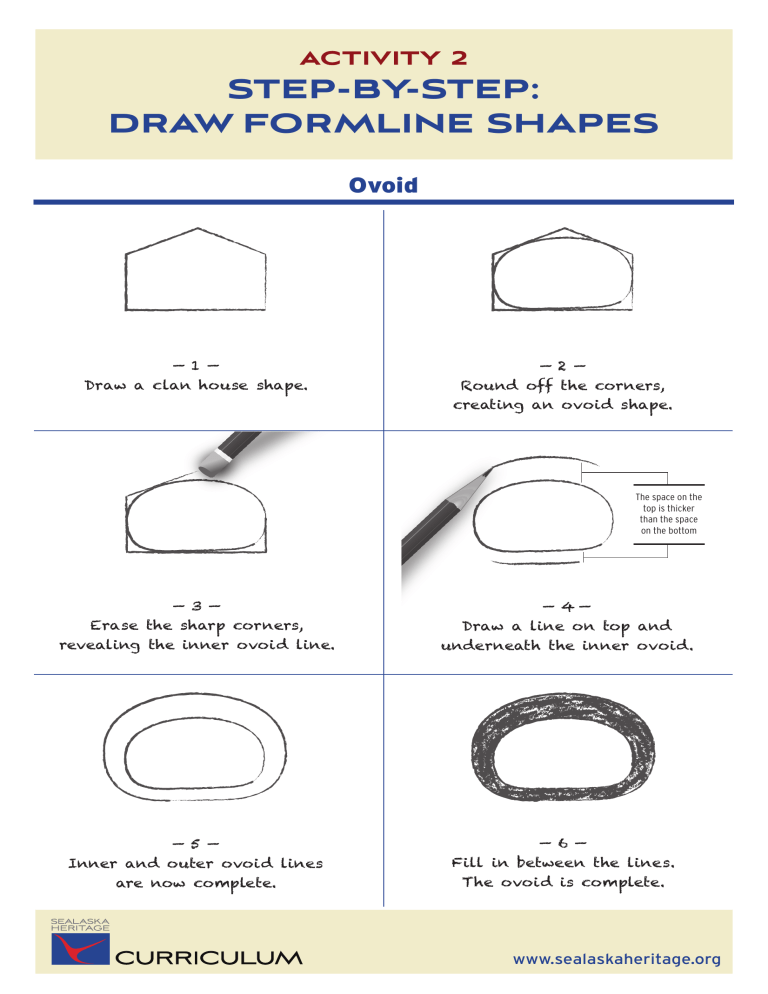
Ovoid
— 1 —
Draw a clan house shape.
— 3 —
Erase the sharp corners, revealing the inner ovoid line.
— 2 —
Round off the corners, creating an ovoid shape.
The space on the top is thicker than the space on the bottom
— 4 —
Draw a line on top and underneath the inner ovoid.
— 5 —
Inner and outer ovoid lines are now complete.
— 6 —
Fill in between the lines.
The ovoid is complete.
www.sealaskaheritage.org
ACTIVITY 2
STEP-BY-STEP:
DRAW FORMLINE SHAPES
U-shape
— 1 —
Draw an upside-down “U” shape.
— 2 —
Draw an outer line above the “U” shape, connecting at the ends.
— 3 —
Fill in between the lines.
The U-shape is complete.
www.sealaskaheritage.org
ACTIVITY 2
STEP-BY-STEP:
DRAW FORMLINE SHAPES
Crescent Trigon
— 1 —
Lightly draw two dots.
— 1 —
Lightly draw 3 dots in the form of a triangle.
— 2 —
Draw an arcing line between the two dots; slightly shorter than a half circle.
— 2 —
Connect each dot with a line that curves inward toward the center.
— 3 —
Draw a line from the same two dots outside the first line.
The crescent is complete.
— 3 —
The trigon is complete.
www.sealaskaheritage.org
ACTIVITY 5
STEP-BY-STEP:
FOIL “ENGRAVING”
1. Tape the foil on top of the felt. Use just enough tape to keep the foil in place. The foil does not have to cover all the edges.
Tape the feather or salmon-trout head design template on top of the foil.
2. Trace all the edges of the design with a blunt pencil. Use enough pressure to create a groove on the foil underneath, careful not to tear through the paper or the foil. Keep the line as even as possible, tracing on the outside edge of the positive (black) spaces.
www.sealaskaheritage.org
ACTIVITY 5
STEP-BY-STEP:
FOIL “ENGRAVING”
3. Remove the paper template, referring to it as a guide for the positive (black) and negative (white) shapes.
4. Keeping the template as a reference, begin to “carve” the negative spaces of the design. www.sealaskaheritage.org
ACTIVITY 5
STEP-BY-STEP:
FOIL “ENGRAVING”
5. In larger negative (white) areas, “carve” out the space by stroking the foil with the back end of your pencil. Experiment with back ends of different pencils or pens to see how they create different textures in the foil. Try your best to only “carve” out the negative spaces, and avoid the positive spaces.
Your foil “engraving” is now complete! www.sealaskaheritage.org
SALMON-TROUT HEAD
FINAL DESIGN
Salmon-Trout Head | Tsimshian Style www.sealaskaheritage.org
FEATHERS
FINAL DESIGN
A B www.sealaskaheritage.org
Shuká Hít House Front
SEALASKA HERITAGE
Am’ala: Wil Mangaa da Ha’lidzogat (“Am’ala: He Who Holds Up the Earth”)
Shuká Hít house front in the Walter Soboleff Building, by David A. Boxley.
www.sealaskaheritage.org
