Fun with Word
Created by Michael Hyland
Fun with Word
Fun with Word is a help desk that shares things about Word that might not be used or discovered unless someone instructed a help desk on the topic. This help desk will share how to do the following:
Backgrounds in a word document
Page borders
Animate fonts
WordArt
Hyperlinks
Clipart
Drop Caps
Hidden Text
AutoText
Columns
Backgrounds in Word
1.
To place a background in a word document, go to the Format menu option and down to Background . A paint pallet should appear. At this point, select a color, or select
Fill Effects…
for textures and pictures. Click OK when finished.
Page Borders
1.
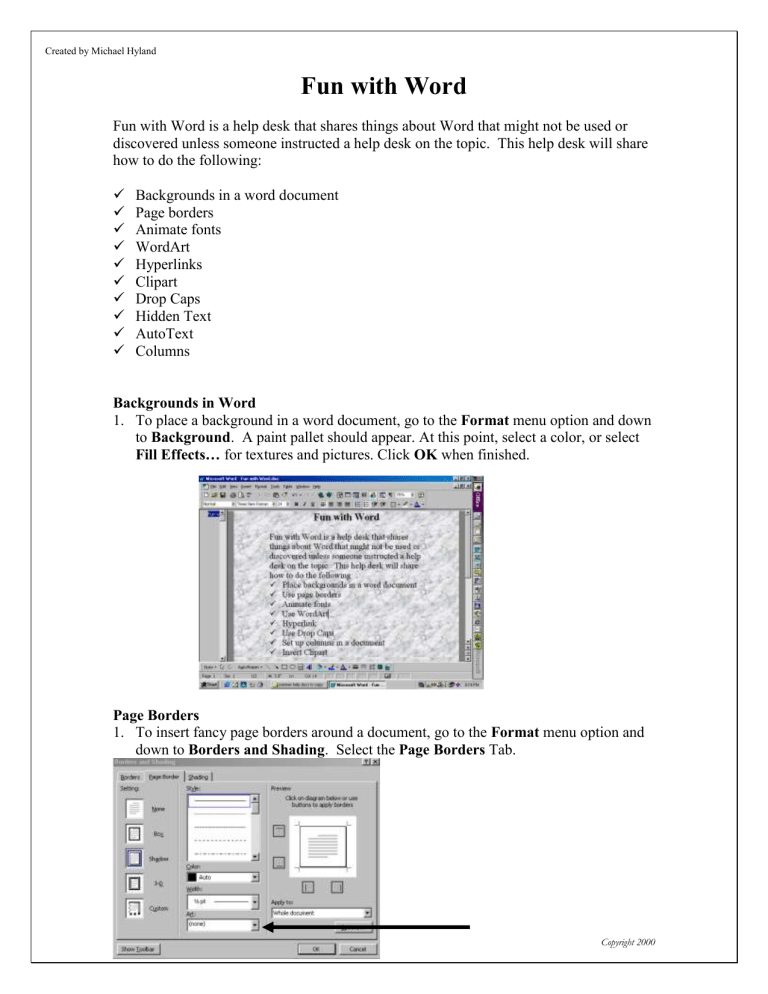
To insert fancy page borders around a document, go to the Format menu option and down to Borders and Shading . Select the Page Borders Tab.
Copyright 2000
Created by Michael Hyland
2.
Select the Art : option and choose the design of your choice.
Font Animation
1.
To bring life to the fonts on a page- add animation. Highlight the fonts or words that you want to animate.
2.
Go to the Format menu option and select Font…
3.
Select the Text Effect Tab.
4.
Select the desired animation and then click OK . (Note: animations won’t print.)
Inserting WordArt
1.
To insert WordArt, go to the Insert menu option, to Picture , to WordArt .
2.
In the WordArt Gallery window, select the style for a title and then click OK .
3.
In the Edit WordArt Text window, type your name or the title of something. Click
OK .
Copyright 2000
Created by Michael Hyland
4.
The WordArt title should appear in the word document. Click in the middle of the object to move it around (cursor will change to a four-headed arrow). The title can be resized just like a piece of clipart.
Select the object, move the cursor to the bottom corner of the object.
Click and hold on the corner selection square and drag.
5.
The title can be edited with the WordArt toolbar.
Inserting a Hyperlink
1.
Click on a picture or highlight a word or words in which you want to turn into a
Hyperlink. (a connection to
2.
Click Insert Hyperlink icon another document, web site, etc.) or go to Insert menu and down to
Hyperlink .
3.
When window opens, under Browse for: select File.
4.
Find file that you would like to link to.
5.
Click Okay . Click Okay again. Link should appear on the page.
Insert ClipArt
1.
Go to the Insert menu.
2.
Click on Picture .
3.
Select
Clip Art…
4.
When Clip Art window opens, select desired picture and then click Okay .
A Add a Drop Cap to Text
1.
Switch to Page layout view. (View menu to
Page layout)
Copyright 2000
Created by Michael Hyland
2.
Click in the paragraph where you want to create a drop cap.
3.
Click on the Format menu and then click on Drop Cap .
4.
Click the Dropped icon to flow text around the drop cap or the In Margin icon to move the dropped cap to the margin.
5.
If you want click the Font drop down arrow and select a different font for the drop cap.
6.
In the Lines to Drop box, type in the height for the drop cap.
7.
In the Distance from Text box, type (in inches) how far you want the drop cap from the paragraph text.
8.
Click Okay .
Hidden Text
1.
Create a document that you would like to have as hidden text. You will need to put several spaces between your directions so the students will have a place to respond
2.
Highlight the first direction - click on Format - Font - and check the box that says
Hidden .
Copyright 2000
Created by Michael Hyland
DO NOT SELECT THE ENTIRE PAGE AT ONCE. YOU MUST HIGHLIGHT
AND FORMAT EACH DIRECTION SEPARATELY OR THE STUDENT'S
WORK WILL ALSO BE HIDDEN.
3.
Highlight the second direction and repeat the formatting or you may go to Edit and click on repeat font formatting if it is highlighted. (This is a shortcut)
4.
Now click on the show/hide button and see your work appear.
5.
Save
NOTE: If hidden text is not working, go through these steps:
1. Go under Tools menu- select Options. Under the View tab make sure that Hidden
Text is NOT selected.
Auto Text
1. Write a word or create a table that you would like to have appear multiple times in a document.
2. Highlight the word or chart. Go to Insert menu, select
AutoText , and New .
3. Decide what key word you would like to type to recall the AutoText. Whenever you type in that word, a small pop-up box will appear over your typing, when you see that pop-up box, if you hit return, the word or chart will automatically be recreated.
Copyright 2000
Created by Michael Hyland
Inserting Columns
1.
To set up the page with columns, click the Format menu option and select
Columns
…
2.
Select the number of columns desired. Click in the Line Between box so that you can see where columns begin and end. The dividing lines can be removed later by returning to the Columns window and removing the check in the Line Between box.
Finally, make sure it says “
This point forward
” in the
Apply to: window. Click
Okay .
*Note: The columns will begin where the cursor was left. Be sure to put the cursor where the columns are to begin.
3.
The column lines will appear as soon as the text from column one flows over to column two. To have the lines appear before the articles are typed, push and hold the
Enter key. This will move the cursor down the first column and up to the second.
Copyright 2000
