fluidigm ep1 protocol - Department of Animal Science
advertisement
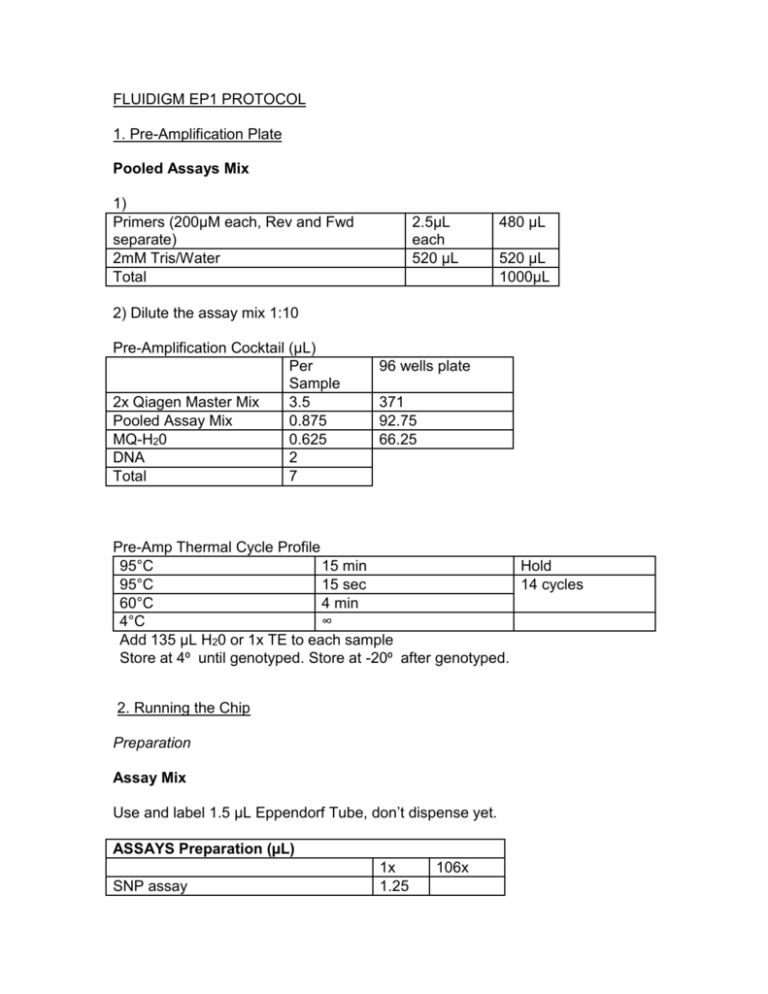
FLUIDIGM EP1 PROTOCOL 1. Pre-Amplification Plate Pooled Assays Mix 1) Primers (200µM each, Rev and Fwd separate) 2mM Tris/Water Total 2.5µL each 520 µL 480 µL 520 µL 1000µL 2) Dilute the assay mix 1:10 Pre-Amplification Cocktail (µL) Per Sample 2x Qiagen Master Mix 3.5 Pooled Assay Mix 0.875 MQ-H20 0.625 DNA 2 Total 7 96 wells plate 371 92.75 66.25 Pre-Amp Thermal Cycle Profile 95°C 15 min Hold 95°C 15 sec 14 cycles 60°C 4 min 4°C ∞ Add 135 µL H20 or 1x TE to each sample Store at 4⁰ until genotyped. Store at -20⁰ after genotyped. 2. Running the Chip Preparation Assay Mix Use and label 1.5 µL Eppendorf Tube, don’t dispense yet. ASSAYS Preparation (µL) SNP assay 1x 1.25 106x 2x assay loading reagent ROX (50x) diH20 Total 2.5 0.25 1 5 282.67 28.267 113.07 PREPARE ASSAY PLATE - Vortex and spin down Assay Mix Spin down Assay Plate Dispense 4µL of Assay Mix into each well of 96 well plate (use 300 µL Eppendorf tips) Add 1.3 µL of Assay (use multi-channel with red tips) SPIN plate Sample Mix Use and label 1.5 µL Eppendorf Tube, don’t dispense yet. SAMPLE Preparation (µL) 1x 10⁶x TaqMan Universal Master Mix 2.5 353.33 0.25 35.33 20x GT Sample loading reagent AmpliTaq Gold DNA Polymerase 0.05 7.067 diH20 0.2 28.267 Pre-amped DNA 2.67 Total 6.67 PREPARE SAMPLE PLATE - Vortex and spin down Sample Mix Spin down Sample Plate (Pre-amp plate) Dispense 4µL of Sample Mix into each well of 96 well plate (use 300 µL Eppendorf tips) Add 2.3 µL of each Sample (use multi-channel with red tips) SPIN plate PRIME THE CHIP Inject Control Line Fluid (in syringes) into both wells of chip o Hold the chip at a 45-degree angle o Make sure to depress valve with end of syringe o dispense entire volume You can remove the blue film underneath the chip at this time Place the chip into IFC controller, run the Prime (138x) script Note A1 well placement Tips: -Prepare mix before priming chip. -Prepare plate while chip is priming -ASSAY on the LEFT side of the chip (with A1 notch) -SAMPLE on the RIGHT side of the chip (without A1 notch) LOAD THE CHIP - Remove chip from IFC Controller (when script has finished) Add 4 µL of each ASSAY to LEFT SIDE of chip (with A1 notch) Add 5 µL of each SAMPLE to RIGHT SIDE of chip (without A1 notch) Return chip to IFC Controller Run Load Mix (138x) script 2 negative samples – use H20 RUN PCR - When Load Mix has finished, transfer plate to PCR machine Turn on main power (in back on the right) Turn on vacuum power (on the front) – should drop below -80 Press ENTER (“start”) Press ENTER again (“PCRGTM96”) READING THE CHIP - Shut off vacuum when the PCR is finished and remove chip Use scotch tape to remove any dust on the chip surface Load into EP1 and follow instructions Fluidigm SNP Genotyping Analysis - Set up Assay & Sample Plate - Mark NTC for the two negative controls Last Updated: 3/23/2011
