Courseware - Douglas County School System
advertisement
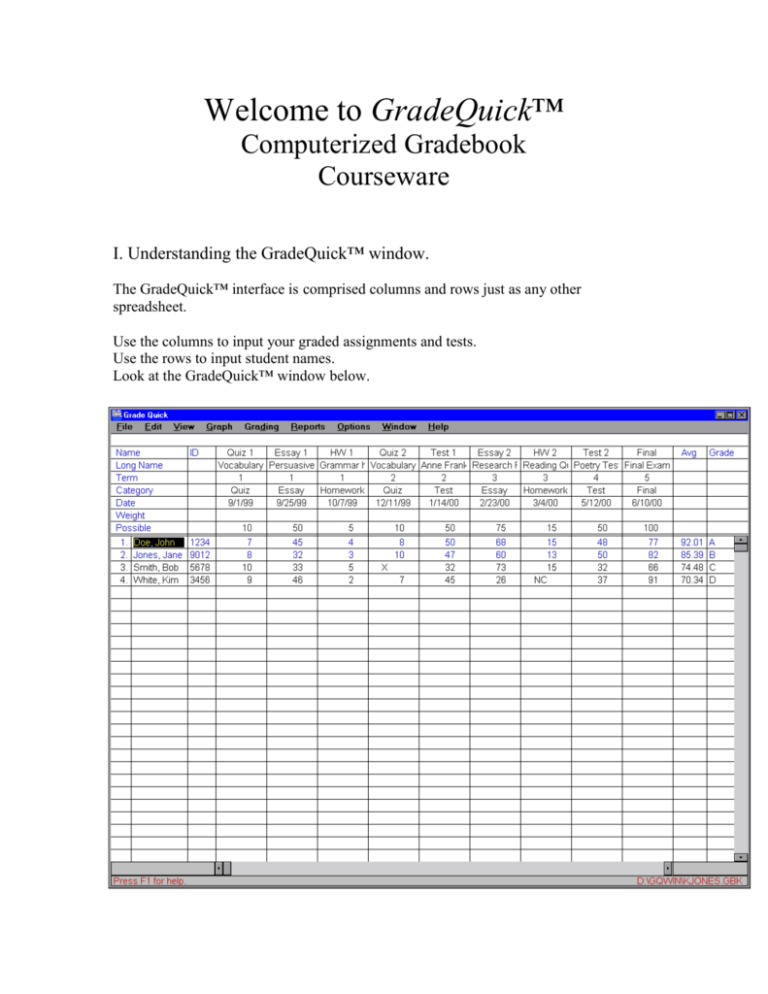
Welcome to GradeQuick™ Computerized Gradebook Courseware I. Understanding the GradeQuick™ window. The GradeQuick™ interface is comprised columns and rows just as any other spreadsheet. Use the columns to input your graded assignments and tests. Use the rows to input student names. Look at the GradeQuick™ window below. The upper area of your gradebook is used to enter information for your graded assignments. Notice the top rows contain the following headings: name, long name, term, category, date, weight, and possible. These rows are used for the following: Name: This row heading is misleading. The program will only accept 8 characters here, so make your name a short one or abbreviate. This limitation accommodates reports. Long Name: This is the real name. There is a limit on characters here too, but you’ll have enough room to name most of your assignments the way you want to. Term: Use this row to enter which of the four nine-week periods your assignments/tests should be calculated. Category: Use this row to categorize your graded assignments. For example, you may wish to create the following categories for your graded assignments: tests, quizzes, homework. After doing so, you may then apply different weights to those different categories if you wish for tests to be weighted twice as much as quizzes when calculating a term grade. Date: When entering information in a column, the program will automatically enter the current date (taken from the computer’s system date). If you wish for this date be something other that the current date, you may change it at any time. Weight: You may only enter individual assignment/test weights here if you have the “Weight Tests” mode turned on. You can do this by clicking on “Grading” on the menu bar and selecting “Weighting”. You would use this feature if you wished to manually enter weights for tests and assignments. Possible: In order for GradeQuick™ to properly calculate student grades, you must enter the total points possible for each graded assignment/test. The area underneath “Possible” is for student names and scores. Type student names in any order. You can have GradeQuick™ alphabetize them for you later. Now that we understand the screen, there are some things you will want to do before you begin to work on student records. It is not necessary that you do these things first; however, doing so will prevent you having to worry about forgetting to do them later. 1. You must set the grading scale. You must tell GradeQuick™ what you need the grading scale to be. To set your grading scale, left click on grading set grading scale You will then be presented with the following dialogue box. By default, the grading scale is 90, 80, 70. However, you must change the cutoffs to reflect your scale. To do so, complete the following steps: 1. Click on the row for the letter grade cutoff you wish to change in the large grade scale box toward the top of the grading scale window. 2. Change the percentage number to the desired cutoff score (keeping in mind whether or not you round up your grades) inside the small box labeled Cutoff that is located underneath the grading scale window. Note: Make sure your are changing the cutoff percentage for the right grade by noticing what letter grade is inside the box labeled “Grade”, which is located to the left of the box labeled “cutoff”. 3. Click the “Make Change” button. Then, you will notice that the minimum score has changed to reflect your desired cutoff percentage. If you plan on using the reports feature of this program to print individual student and/or test reports, you’ll want to enter some class information that you would like to appear on your reports. 2. Enter your class information. To do this, select the following from your menu options: edit class information The following window will appear: Enter in any information that you feel is relevant, and would like to appear on your reports. It is a good idea to enter information for Subject, Teacher Name and Period. Using the buttons toward the bottom of the above window, you may add new fields to include any other information you would like to include about your class. You may also delete fields from this class information area; however, it is suggested that you do not delete any fields that you didn’t create yourself. 3. Entering Student Information You may or may not choose to use this feature. This is like your address book for students. Many teachers ask students for information on the first day of school on notecards. For example, telephone number, parent name(s), etc. If you wish to keep this information in electronic format, you may enter it here. edit student information Once this window is open you may use the buttons at the bottom (labeled “Previous Student” & “Next Student”) to toggle to the next student or previous student. You may also add and delete fields using the buttons underneath the previous and next student buttons. Now you are ready to begin entering student names and test assignments. Please enter in student and test information as seen below Notice that Bob Smith has an “x” entered for Quiz 2 and Kim White has an “NC” entered for HW2. An “x” stands for EXEMPT. The program will not factor in that assignment for the final term and overall grade. An “NC” stands for NO CREDIT. This is the same as entering a "0” grade. You may wish to differentiate “0” and “NC” - i.e. students who got zero correct from students who weren’t given credit for cheating, or some other reason. If you enter nothing, the computer will count the blank space as EXEMPT by default. Notice that when you entered different term numbers to indicate the different marking periods, you received a message about “viewing subtotals”. This is because: When you input grades for different nine-week periods (referred to as “terms” by GradeQuick™), the program will calculate a cumulative total for the AVG & GRADE columns. This is the final grade and average for the entire year, or what you have entered anyway. But this is not what we want to pay attention to for the 9-weeks grades. To have the program to display and/or print 9-weeks grades and averages we need to view subtotals by terms. Click the following: view subtotals This window will appear. You will need to click to check “Terms” on the left-hand side in order to have nine-week grades calculated in a separate column. Click to check “Categories by Terms” if you wish to weight your grades by categories (more about that later). You may check any or all that apply to your needs here. On the right hand side you have the option to choose what information to display in the subtotal columns. Choose whichever one best meets your needs. Most people would probably choose “Average.” After you select these settings you will have subtotal columns for each term (or nineweek period). THESE ARE YOUR NINE-WEEK GRADES!! You will probably need to use your scrollbar along the bottom of your screen to view these subtotal columns that might be hidden on the right-hand side. Note to High School teachers and others who use final exams to calculate end-of-the-year grades: Enter your final exam grade as a 5th term. You then can weight your terms as necessary to calculate the final end-of-the-year grade. Below is a picture of gradebook window with subtotal columns showing. ((((((( (Nine-week subtotals) ))))))))))))))))))))))) ((Final Exam)) (Final Grade) HOW WAS I SUPPOSED TO REMEMBER TO SAVE? Ahhhhh…. DON’T FORGET TO SAVE YOUR GRADEBOOK! Let’s discuss all of the neat places you can save your grades. To save your electronic gradebook, click the following: file save as The following window will appear. Click here to choose the drive you wish to save on. Saving Steps 1. Choose a file name for your gradebook file. First initial, last name would be a good filename. DO NOT USE PUNCTUATION OR SPACES IN YOUR FILE NAME. The file type is Gradebooks (*.gbk). Do not change this. 2. Select the drive that you wish to save your gradebook on. You have several options; let’s talk about them. a. The a: drive. This is your floppy diskette drive. It is not a terrible choice for a backup, especially if you want a traveling copy. However, floppy disks are very sensitive and somewhat unreliable. DO NOT USE A FLOPPY DISK AS YOUR ONLY SAVED COPY. If you have your gradebook on floppy diskette, make sure it is somewhere else, too. b. The h: drive. This is the best and most secure place to store your grades. This is your personal network share (your allocation of server space) on the district server. Only you can access your personal h: drive because you need your user name and password to log on to the network. Another bonus to this solution is that you can then access your gradebook (or any other file you save here) from any computer that is part of the school network by using your user name and password. c. You may also print a copy to keep filed away. 3. Click the OK button to then save your file to the designated area. If you choose cancel, your file will not be saved. Working with Weighted Grades You can weight individual tests/assignments, categories of grades, and even grading terms. To choose grade weighting options, click grading weighting This window will appear. Notice on the left side you can choose term weighting options for each term you have already identified in your gradebook. Remember 5 terms were entered into my gradebook, so I can weight 5 different terms here. If you keep separate grades for homework, quizzes, tests, etc., you may wish to assign your gradebook entries categories by typing in a category name in the category row on your gradebook spreadsheet. You can then later weight these categories so that homework scores are only worth one fourth the weight of your test grades. Turn on the “Weight Tests” option if you wish to weight individual tests/assignments manually. You then enter the individual weights for each gradebook entry in the “Weight” row on your gradebook spreadsheet. Yes, you may weight terms and categories and tests simultaneously, but be sure to assign a weight to each term, category, or test otherwise serious grade distortions may occur! Working With Reports As mentioned earlier, you may print individualized reports for your students and/or for your gradebook test entries. To do this click reports You then have several types of reports from which to choose. Student: You have several options here. Standard is the most commonly used. An example is on the next page. Test (or subtotal): Provides information particular to an individual test or term subtotal including statistical information like the medium and the mean of a particular gradebook entry. Summary: Will provide you with class summary (final grades only) information. Gradebook spreadsheet: Print this each time you update and save your grades in case of fire, prolonged power outage, etc. Blank gradebook: You might want this to use as a checklist. Multi-file report: To print multiple teacher reports on a particular student. Once you’re in “report mode” you may customize your reports to show only information you want by clicking on “students”, “tests”, and/or “options” on your menu bar. You can then select which students, tests, terms, etc. to show or print information about. Note: The final average and final grade you see on the example report on the next page reflect the end-of –the-year cumulative totals. If you want to focus on a term subtotal, do not allow for these items to appear on the report. Also, you may wish to eliminate class rank from your reports too. To eliminate class rank from your reports in “report mode”, click students student overall statistics Then uncheck, the rank box by clicking on it. You may check other boxes if you wish for any of that other information to appear on your reports. To eliminate the Final (cumulative) Average and Grade from your repots, click students student info. Then click to uncheck items “Final Grade” and “Final Average” to eliminate these items from your reports. If you want to save these special report settings for your gradebook without having to change them for each new file you create in GradeQuick™, click print save configuration Then, these settings will be saved for other gradebook files. Other handy things to know… 1. How to sort student names to alphabetize, or tests to arrange by date. If your student names are not in alphabetical order due to a new student, etc. You may arrange them at any time. Click view sort (choose) students or tests Then choose how you specifically how you wish to sort the student or test data. 2. How to add/delete students and/or tests from your gradebook. Click edit add/delete students or tests Then, make proper selections. 3. How to tell the program to drop the lowest test/assignment score(s). Assigning categories comes in handy here, also. Click grading drop low scores The following window will appear. Then choose the term, category, and/or number of assignments to drop. The computer will take care of the rest. These settings will take place for every students in your gradebook. You cannot apply this setting to only selected students. 4. Creating Seating Charts Click edit seating chart The following window will appear. Choose the settings in this window which best suit your seating arrangements and print out needs. Once you click the “OK” button, your seating chart will be created. You can make various changes to your seating chart at any time by using options in “seating chart mode”. Check out the FILE, EDIT, and OPTIONS menus for seating chart options. You will need to save your seating chart as a separate file. When prompted by the program, click “yes” to save your chart and type in an appropriate file name and click OK to save your seating chart. You may retrieve it at any time by clicking FILE, OPEN, and choosing the filename for your chart. 5. Graphing student and/or test data. (GREAT for parent conferences!) Click graph Then, choose what you wish to view a graph of, and select the appropriate settings. Then click “OK”, and your graph will appear. 6. Change the font settings for your gradebook and report data. Click options font The following window will appear. Make your desired changes by clicking on font, style, and size you desire. Look in the “sample” area in the lower right-hand corner of the window to see a preview of what your text will look like with the selected font settings. For online help, click help tutorial for more information.

