Refworks training manual
advertisement
Refworks training workbook
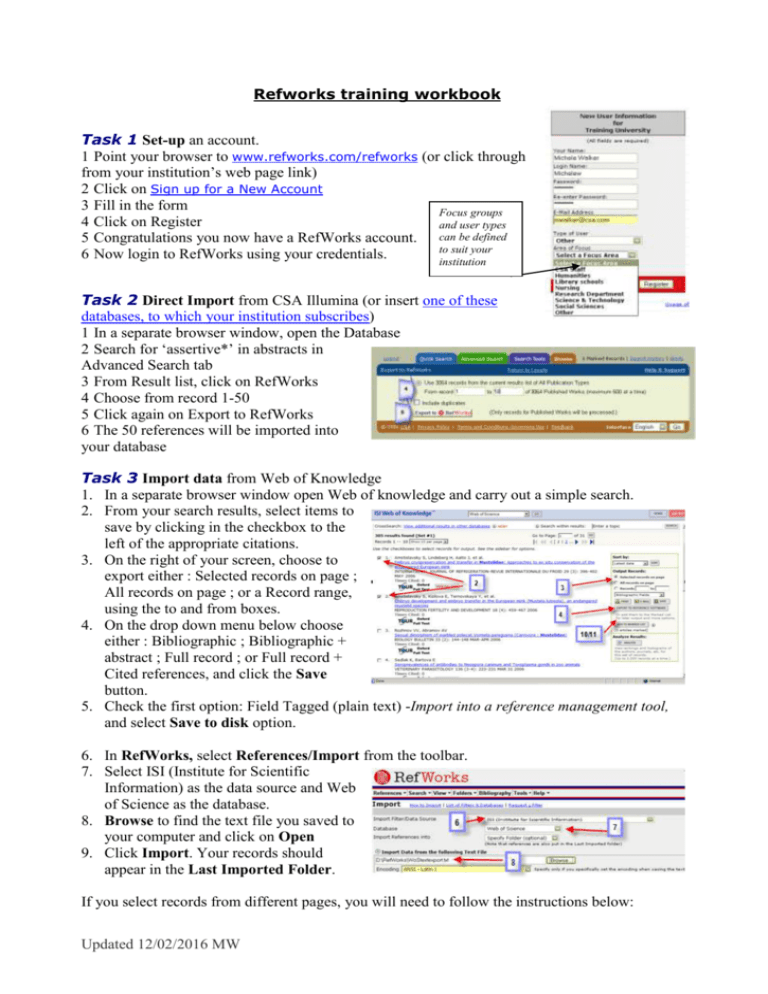
Task 1 Set-up an account.
1 Point your browser to www.refworks.com/refworks (or click through
from your institution’s web page link)
2 Click on Sign up for a New Account
3 Fill in the form
Focus groups
4 Click on Register
and user types
5 Congratulations you now have a RefWorks account. can be defined
to suit your
6 Now login to RefWorks using your credentials.
institution
Task 2 Direct Import from CSA Illumina (or insert one of these
databases, to which your institution subscribes)
1 In a separate browser window, open the Database
2 Search for ‘assertive*’ in abstracts in
Advanced Search tab
3 From Result list, click on RefWorks
4 Choose from record 1-50
5 Click again on Export to RefWorks
6 The 50 references will be imported into
your database
Task 3 Import data from Web of Knowledge
1. In a separate browser window open Web of knowledge and carry out a simple search.
2. From your search results, select items to
save by clicking in the checkbox to the
left of the appropriate citations.
3. On the right of your screen, choose to
export either : Selected records on page ;
All records on page ; or a Record range,
using the to and from boxes.
4. On the drop down menu below choose
either : Bibliographic ; Bibliographic +
abstract ; Full record ; or Full record +
Cited references, and click the Save
button.
5. Check the first option: Field Tagged (plain text) -Import into a reference management tool,
and select Save to disk option.
6. In RefWorks, select References/Import from the toolbar.
7. Select ISI (Institute for Scientific
Information) as the data source and Web
of Science as the database.
8. Browse to find the text file you saved to
your computer and click on Open
9. Click Import. Your records should
appear in the Last Imported Folder.
If you select records from different pages, you will need to follow the instructions below:
Updated 12/02/2016 MW
10. From your search results, select the items you wish to save by clicking in the checkbox to
the left of the appropriate citations.
11. Submit each page’s selections
12. When your search and selection is complete, click the Marked List button, which appears
once you have marked and submitted items.
13. Choose the service you used from the Display Marked list drop down edit menu
14. In the section called Step 1. Select the fields to include in the output: Select the fields
that you want to include in your database.
15. Click the Save to File button. You should leave the option as Field Tagged. Select Text as
the Save As file type. Choose the Save to Disk option and click on OK.
16. Continue as for 5-8 above.
Task 4 Import direct from Google Scholar (http://scholar.google.com)
1 Make sure cookies are enabled to allow
setting of preferences in Google Scholar
2 From the GS search screen click on Scholar
preferences
3 At the bottom of the screen, in ‘Show links to
import citations into’, select RefWorks
4 Search results now display an ‘Export to
RefWorks’ link.
NOTE: this needs to be done on a one by one
basis. GS does not have facility to mark records
NOTE: consistent data such as title, author, year, etc may not exist in your results; the only
thing they may display is the URL. If the metadata exist, it will import into RefWorks.
Task 5 Add new reference manually
1 Click References | Add a reference
2 Select BibTex standard in AccuCite
3 Select Journal as reference type
4 Enter details in all field marked with
(ie fields required for correct citation
in this output style)
5 Save reference, or Save & Add New to continue
adding more references
Task 6 Search z39.50 Database (PubMed)
1 Click on Search | Online databases and Catalogues
2 Select Pubmed
3 Search for ‘avian flu’ as quick search
4 Import all on ‘Page’
5 Close the Search results page and return to
RefWorks
Updated 12/02/2016 MW
Task 7 Search a library Catalogue.
1 Click on Search | Online Catalog or Database
2 Choose a library catalogue from the alphabetical
drop down list (your own, or a National Library?)
3 Do an Advanced Search for the Descriptor:
Influenza
4 Import ‘All in the list’
5 Close the Search results and return to RefWorks
Task 8 Search RSS feeds
1 Click on Search | RSS Feeds
2 Enter the URL for an RSS feed (eg http://www.nature.com/nature/current_issue/rss for
Nature; http://www.newstatesman.co.uk/nsfreetoview.xml for New Statesman
Or type <journal title> and RSS into Google, and if you find a feed either select and copy the
displayed URL – or right click on the RSS or XML orange button, and select Copy Shortcut to
paste as RSS feed URL)
3 Click Add RSS Feed
4 Once the feed has been added, click on feed
title
5 A separate window will open with updated
feeds
6 Select a few you are interested in
7 Click Import to pull them into RefWorks
8 From RefWorks you can now click live link
to get to fulltext from Reference
Task 9 Searching your RefWorks database using
the Lookup Function
1 Click on Search | Lookup by Periodicals
2 Go to a journal title and click on the link,
- to see all records in your RefWorks account that are
published in this journal
Task 10 Creating folders and moving information
1 Click on Folders | Organize Folder
2 Click on Create New Folder
3 Name it Viruses and click on OK
4 Create another folder called Assertiveness
5 In Quick Search, search for flu
6 Select all in list
7 Add to the folder Viruses
8 Click on Search | Advanced
9 Search in the abstracts for ‘assertiveness’ and
publication year ‘2005’
10 Import ‘All in the list’ direct to the Assertiveness folder
Updated 12/02/2016 MW
Task 11 Sort your references by journal name
1 Click on View | Folder and choose Viruses
2 From drop down box Sort By Periodical Full
( If you can not see the box on the right hand side of the
screen you will need to hide the search tool, by clicking on
Hide in the Search tools section)
Task 12 Do a global edit
1 Click on View | Folder and choose Assertiveness
2 Click on Global edit
3 Select to edit references from ‘Page’
4 Choose to change the user defined field.
5 Type in : - Full text article requested from the library
on the 12 February 2016
6 Select ‘Append to Existing data’
7 Click on OK.
Task 13 Exporting your references
1 Click on References | Export
2 Select to export the content of the folder Viruses
3 Select Bibliographic Software format
4 Click on Export to text file
5 Save to text file in format required for import to
Endnote, Procite etc
Task 14 Create a Bibliography with Write n Cite
1 Log out of RefWorks.
2 Open Word and type the following text:
Word window
This document will help you understand how to
create a bibliography quickly and efficiently using
Write-N-Cite. How to insert single and multiple
citations and how to create a bibliography.
3 Click the Write-n-cite plug in on the toolbar or
the desktop
4 Login to your RefWorks database.
5 Tick the ‘Always on top’ radio button
6 Do a quick search for ‘flu’
7 In Word document, place your cursor in the
text, where you want to insert the citation
8 Back in the Write n Cite list, click on Cite next
to the record that you want to cite
9 Repeat this in a few different places. Try duplicate entries in the same citation.
Updated 12/02/2016 MW
Write n Cite Window
10 Save your document as RWcite.
Sample ‘final document ‘– with properly
formatted citations and bibliography
11 Back on the Write n Cite Window, click on
Bibliography and choose Nature output style
12 This will create a second document called
FinalRWcite. Save as RWCiteNature
13 Repeat the bibliography creation using a different
output style. Another FinalRWcite document will be
created with the new style. Save as RWCite<Style>.
NOTE: remember to always work and edit in the
original work document (though you can save as
many final documents, at various stages and in as many styles as you wish)
Task 15 Create a Bibliography without Write-N-Cite
1 Open Word and type the following text:
This document will help you understand how to
create a bibliography quickly and efficiently when
Write-N-Cite plug in is not available. (This can
happen when working from machines other than
your own or off campus).
2 Login to RefWorks
3 Do a quick search for “assertiveness”
4 Choose the One line / Cite view
5 Choose a reference and click on Cite
6 A box will open with the citation number properly
formatted for Write n Cite. Select everything in the
window and save to clipboard
7 Place your cursor where you want the citation to appear in your text and paste this citation
into your word document
8 Repeat the previous steps with another citation, or multiple citations, placing them elsewhere
in the text
9 Close and save your document as RWtraining2.
10 In RefWorks click on Bibliography
11 Choose Harvard British Standard
12 Tick Format Paper and Bibliography
13 Browse to your Word file as the Document to
Format
14 Click on Create Bibliography
15 You now have a second document, with proper citations and formatted bibliography. Save
as RWFinalHarvard
Task 16 Add citations while working offline
1 (Before you go) In RefWorks go to References |
Export
2 Select to export: All references
3 Select Citation List format
4 Click export to text file
Updated 12/02/2016 MW
5 Save file on laptop, to USB and/or print out
6 (While away) Refer to this list when typing working documents, and add citations where
needed in format {{refID}}e.g.
This document will help you understand how to create citations {{4}} quickly and efficiently
{{23; 3}} when the internet is not available
7 Save working document
8 When back to internet access, open RefWorks and proceed, as above with bibliography, to
create final document
Task 17 Create a list of references in preferred
Output Style
1 In RefWorks, click View | Folder ! Viruses
2 Select one or two references
3 Click on Add to my list
4 Click on Folders | View | Assertiveness
5 Select two or three references
6 Click on Add to my list
7 Click Bibliography
8 Tick Format a Bibliography from a List of
References radio button
9 Select RTF (Rich Text Format) as File Type to
Create
10 Tick My List
11 Click on Create Bibliography
A list of properly formatted references will be created in an RTF file for you to save, print,
email as required.
Task 18 Edit/Create Output style
1 Click Bibliography
2 Select an output style you think may be close to your
preferred format
3 Preview style (untick Use Your References button, to
review style for all reference types)
4 Click Edit box, beside or under Output style selection box
5 Rename
6 Click ‘Save as’ to mark it as your own (title
will appear in the list in red)
7 Make any changes to the format you require
8 Preview of how the citation looks displays at
bottom of screen
9 Save.
(Refer to Using the Output Style Editor, in the
Help file, for assistance)
Updated 12/02/2016 MW
Task 19 Share Output Styles with colleagues
1 Clicking References | Backup/Restore,
2 De-select References and RSS feeds
3 Select output style/s you wish to share.
4 Click to Perform Backup
5 Pass the file created to colleagues, who
should then, in their own RefWorks database:
6 Click on References |Backup/Restore
7 Browse to and Select the file
8 Select Output style/s and click ‘Restore’ to
add the style/s (still in red) to their list.
9 To make it site wide, pass the file to the
Administrator who can add it to the Master Admin account.
Once site wide the style will appear to everyone at that institution in black
Alternatively (for ‘official’ styles not already listed) :
1. Click on Bibliography
2. Click on ‘Request an Output Style’
3. Fill in style format details, or link to journal web page
4. Submit to RefWorks, who will create the style for you and add it to the RefWorks list of
Output styles.
Updated 12/02/2016 MW


