1.2.3.A Circuit Theory : Simulation
advertisement
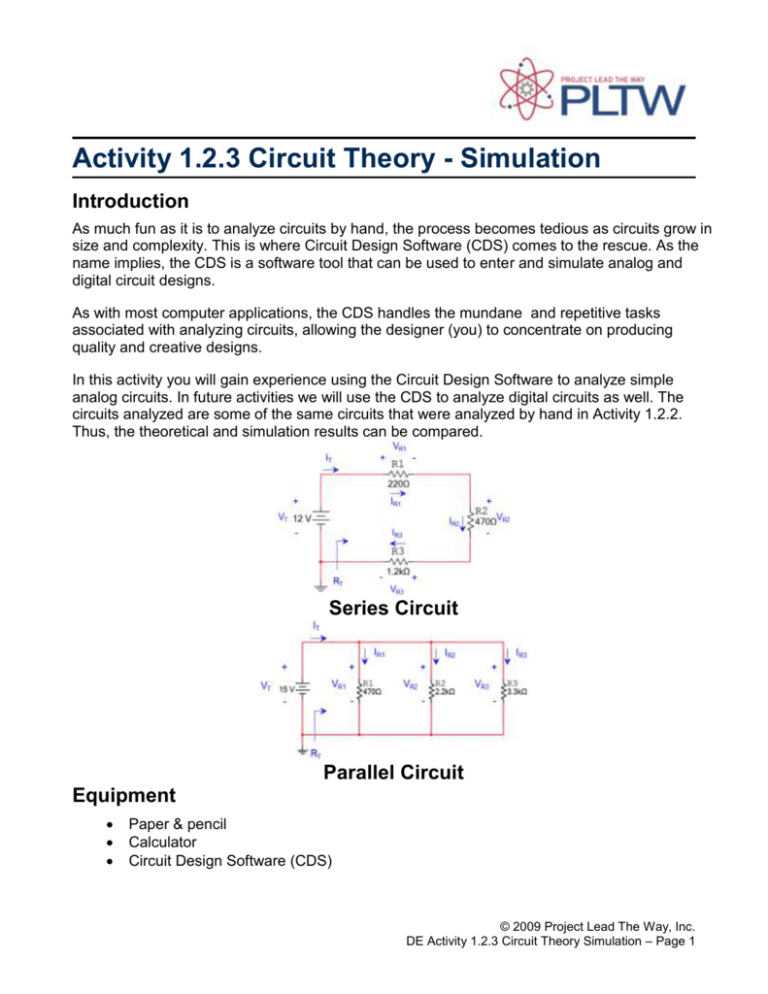
Activity 1.2.3 Circuit Theory - Simulation Introduction As much fun as it is to analyze circuits by hand, the process becomes tedious as circuits grow in size and complexity. This is where Circuit Design Software (CDS) comes to the rescue. As the name implies, the CDS is a software tool that can be used to enter and simulate analog and digital circuit designs. As with most computer applications, the CDS handles the mundane and repetitive tasks associated with analyzing circuits, allowing the designer (you) to concentrate on producing quality and creative designs. In this activity you will gain experience using the Circuit Design Software to analyze simple analog circuits. In future activities we will use the CDS to analyze digital circuits as well. The circuits analyzed are some of the same circuits that were analyzed by hand in Activity 1.2.2. Thus, the theoretical and simulation results can be compared. Series Circuit Parallel Circuit Equipment Paper & pencil Calculator Circuit Design Software (CDS) © 2009 Project Lead The Way, Inc. DE Activity 1.2.3 Circuit Theory Simulation – Page 1 Procedure 1. Shown below is the schematic for a simple series circuit. Analyze this circuit to determine its total current and the voltage across each of the two resistors. To make these measurements, add an ammeter and two voltmeters. The second schematic shown is the original circuit with the added meters. Calculated Values: Using the CDS, enter and simulate this circuit. Measure and record the circuit’s total current and the voltage across each of the resistors. Measured Values: 2. Using the CDS, analyze the circuit shown below to determine RT, IT, VR1, VR2, & VR3. Add the appropriate ammeters and voltmeters. Be sure to put your answer in proper engineering notation and use the correct units. This circuit was analyzed by hand in Activity 1.2.2. How do these measured values compare to the previously calculated values? If they do not match, review your circuit, your calculations, and make any necessary corrections. © 2009 Project Lead The Way, Inc. DE Activity 1.2.3 Circuit Theory Simulation – Page 2 3. Using the CDS, analyze the circuit shown below to determine RT, IT, VR1, VR2, VR3, & VR4. Do the measured values compare to your previously calculate values in Activity 1.2.2? 4. R Using the CDS, analyze the circuit shown below to determine RT, IT, IR1, IR2, & IR3. Do the measured values compare to your previously calculate values in Activity 1.2.2? 5. Using the CDS, analyze the circuit shown below to determine RT, IT, IR1, IR2, IR3, & IR4. Do the measured values compare to your previously calculate values in Activity 1.2.2? © 2009 Project Lead The Way, Inc. DE Activity 1.2.3 Circuit Theory Simulation – Page 3 PRINT THIS PAGE (ONLY THIS PAGE #4) 6. Draw your own series circuit below with at least 4 resistors, then using the CDS; analyze the circuit shown below to determine IT, IR1, IR2, IR3, & IR4. 7. Draw your own parallel circuit below with at least 4 resistors, using the CDS; analyze the circuit shown below to determine IT, IR1, IR2, IR3, & IR4. © 2009 Project Lead The Way, Inc. DE Activity 1.2.3 Circuit Theory Simulation – Page 4 Conclusion 1. It should be obvious that using a CDS to analyze circuits is far easier than performing the calculations by hand. Yet, being able to perform these calculations by hand is still an important skill for a circuit designer. Why? 2. Using the results from step (3) of the procedure, verify Kirchhoff’s Voltage Law. 3. Using the results from step (5) of the procedure, verify Kirchhoff’s Current Law. © 2009 Project Lead The Way, Inc. DE Activity 1.2.3 Circuit Theory Simulation – Page 5


