here - MLZ
advertisement
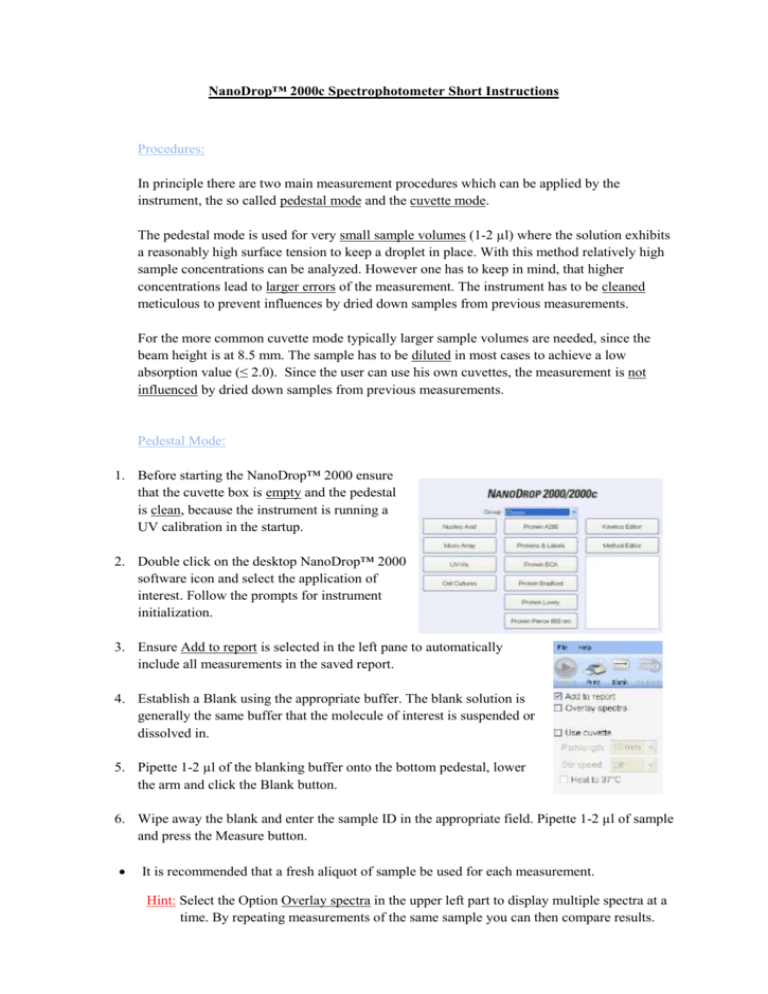
NanoDrop™ 2000c Spectrophotometer Short Instructions Procedures: In principle there are two main measurement procedures which can be applied by the instrument, the so called pedestal mode and the cuvette mode. The pedestal mode is used for very small sample volumes (1-2 µl) where the solution exhibits a reasonably high surface tension to keep a droplet in place. With this method relatively high sample concentrations can be analyzed. However one has to keep in mind, that higher concentrations lead to larger errors of the measurement. The instrument has to be cleaned meticulous to prevent influences by dried down samples from previous measurements. For the more common cuvette mode typically larger sample volumes are needed, since the beam height is at 8.5 mm. The sample has to be diluted in most cases to achieve a low absorption value (≤ 2.0). Since the user can use his own cuvettes, the measurement is not influenced by dried down samples from previous measurements. Pedestal Mode: 1. Before starting the NanoDrop™ 2000 ensure that the cuvette box is empty and the pedestal is clean, because the instrument is running a UV calibration in the startup. 2. Double click on the desktop NanoDrop™ 2000 software icon and select the application of interest. Follow the prompts for instrument initialization. 3. Ensure Add to report is selected in the left pane to automatically include all measurements in the saved report. 4. Establish a Blank using the appropriate buffer. The blank solution is generally the same buffer that the molecule of interest is suspended or dissolved in. 5. Pipette 1-2 µl of the blanking buffer onto the bottom pedestal, lower the arm and click the Blank button. 6. Wipe away the blank and enter the sample ID in the appropriate field. Pipette 1-2 µl of sample and press the Measure button. It is recommended that a fresh aliquot of sample be used for each measurement. Hint: Select the Option Overlay spectra in the upper left part to display multiple spectra at a time. By repeating measurements of the same sample you can then compare results. Cuvette Mode: Follow the steps 1-4 from the Pedestal Mode as they are the same for the Cuvette Mode 5. Select the Use cuvette box to make measurements with a cuvette 6. Select the cuvette size you are using for your measurements 7. Insert the cuvette noting the direction of the light path indicated by the etched arrow 8. The arm must be down for all measurements-including measurements made with cuvettes 9. The optical path is directed 8.5 mm above the bottom of the cuvette. Refer to the manufacturer for volume recommendations Hint: Select the Option Overlay spectra in the upper left part to display multiple spectra at a time. By repeating measurements of the same sample you can then compare results. 10. Remove the cuvette with the buffer solution. Fill the cuvette with the sample diluted in the buffer solution and annotate the dilution ratio for data treatment. It is recommended that a fresh aliquot of sample be used for each measurement. Data Treatment: Select the Reports tab in the bottom left part to export the data set for usage with other programs. There you can also create user configurable reports associated with current data set. For quick concentration measurements using the cuvette mode take the value of absorbtion at the corresponding wavelength. E.g. for proteins the absorbance at 280 nm is proportional to the protein concentration. The concentration can then be calculated by the Beer-Lambert Law: 𝐴 = 𝜀 ∙ 𝑐 ∙ 𝑑 ∙ (𝑟𝑑 ) Where 𝐴 denotes the absorbtion at the corresponding wavelength, 𝜀 the extinction coefficient 𝑚𝑙 1 in 𝑚𝑔 𝑐𝑚, 𝑑 the path length in cm and 𝑟𝑑 the dilution rate. When using the pedestal mode, the results are evaluated by the program. The instrument is adjusting the beam path (from 0.05 mm to 1mm) and normalizes the value of absorption to 10 mm for evaluation. Please consult the user guide for further instructions on different sample systems and methods. Pedestal Cleaning: 1. Apply 3-5 µl of dH20 (ultrapure aka Millipore water) on to the bottom pedestal. Never use a squirt bottle to apply de-ionized water or any other liquid to the surface of the instrument. 2. Lower the upper pedestal arm to form a liquid column; let it sit for approximately 2-3 minutes. 3. Wipe away the water For further Instructions on cleaning and reconditioning we refer to the last page of the user guide. Blanking Cycle for coincidence check: It is generally recommended that an aliquot of the blanking buffer be measured as if it were a sample. This will confirm that the instrument is working well and that any sample dried down from previous measurements is not a concern. To run a blanking cycle, perform the following: 1. Load an aliquot of the blank onto the lower measurement pedestal and lower the sampling arm into the down position. 2. Click on the Blank button to store the blank reference. 3. Analyze a fresh replicate of the blank as though it were a sample by selecting Measure. The result should be a spectrum that varies no more than 0.04 A (10 mm absorbance equivalent). 4. Wipe the blank from both measurement pedestal surfaces and repeat the process until the spectrum is within 0.04 A (10 mmpath). Although it is not necessary to blank between each sample, it is recommended that a new blank be taken every 30 minutes when measuring many samples.
