DNA concentration by Yo
advertisement
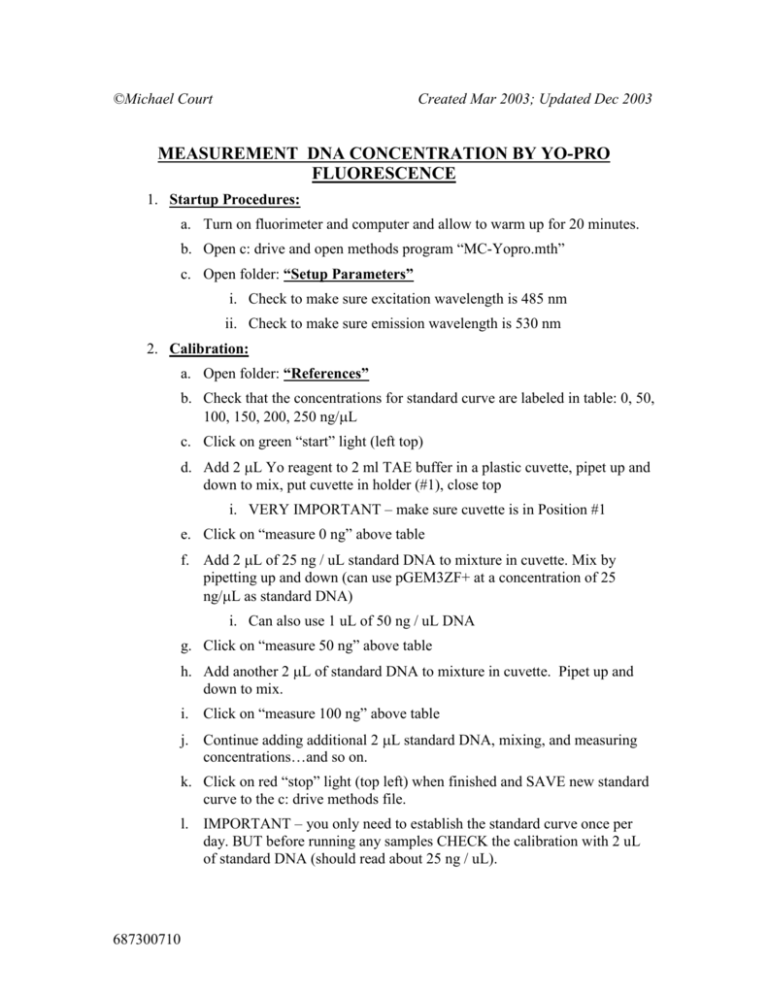
©Michael Court Created Mar 2003; Updated Dec 2003 MEASUREMENT DNA CONCENTRATION BY YO-PRO FLUORESCENCE 1. Startup Procedures: a. Turn on fluorimeter and computer and allow to warm up for 20 minutes. b. Open c: drive and open methods program “MC-Yopro.mth” c. Open folder: “Setup Parameters” i. Check to make sure excitation wavelength is 485 nm ii. Check to make sure emission wavelength is 530 nm 2. Calibration: a. Open folder: “References” b. Check that the concentrations for standard curve are labeled in table: 0, 50, 100, 150, 200, 250 ng/L c. Click on green “start” light (left top) d. Add 2 L Yo reagent to 2 ml TAE buffer in a plastic cuvette, pipet up and down to mix, put cuvette in holder (#1), close top i. VERY IMPORTANT – make sure cuvette is in Position #1 e. Click on “measure 0 ng” above table f. Add 2 L of 25 ng / uL standard DNA to mixture in cuvette. Mix by pipetting up and down (can use pGEM3ZF+ at a concentration of 25 ng/L as standard DNA) i. Can also use 1 uL of 50 ng / uL DNA g. Click on “measure 50 ng” above table h. Add another 2 L of standard DNA to mixture in cuvette. Pipet up and down to mix. i. Click on “measure 100 ng” above table j. Continue adding additional 2 L standard DNA, mixing, and measuring concentrations…and so on. k. Click on red “stop” light (top left) when finished and SAVE new standard curve to the c: drive methods file. l. IMPORTANT – you only need to establish the standard curve once per day. BUT before running any samples CHECK the calibration with 2 uL of standard DNA (should read about 25 ng / uL). 687300710 3. Measure samples a. Open folder called “Samples” b. Click on green “start” light (top left) c. Add 2 L Yo Pro reagent to 2 ml TAE buffer in a clean plastic cuvette, pipet up and down to mix, put cuvette in holder #1, close top. i. VERY IMPORTANT – make sure cuvette is in Position #1 ii. ALSO IMPORTANT – you need to start with a fresh Yo-Pro/TAE solution at this point (i.e. you should discard all the standard curve solution). d. Click on “measure sample 1”. This mixture should not contain any DNA so the calibrated concentration should read approximately “0 ng”. e. Add 2 L of 25 ng / uL (or 1 uL of 50 ng / uL) standard DNA to the mixture in cuvette and pipet up and down. Click on “measure sample 2”. (The calibrated concentration should be approximately 50 ng if standard DNA concentration is 25 ng/l.) f. Add 1 L of sample DNA from sample #1 to mixture in cuvette and pipet up and down. Click on “measure sample 3”. To determine the concentration of liver #1: i. Note that to get correct concentration you need to subtract the “apparent” concentration reading of the previous sample (sample 2) from “apparent” concentration reading of the current sample (sample 3) to get concentration in ng / L. ii. In other words the concentrations keep adding on to the previous concentration. g. Continue by adding 1 L of sample DNA from sample # 2 to mixture in cuvette and pipet up and down. Click on “measure sample 4”. i. Repeat this for the rest of the samples. ii. IMPORTANT!! With a lot of samples – or if they are very concentrated, you will see saturation of the signal and falsely low concentrations. Generally you want to stop adding more samples when the (apparent or total) concentration is > 1000 ng / uL. At this point you should discard the contents of the cuvette and add fresh TAE buffer and 2 uL Yo-Pro. YOU DO NOT need to repeat the standard curve at this point. The standard curve is very stable within each day. h. Finally, add 2 L of standard DNA (50 g) to the mixture in the cuvette for the final sample calibration to double check that the machine is still within the linear range (0 to 1000 ng / uL). i. Click on red “stop” light when finished. 687300710
