mathcad worksheet 8
advertisement
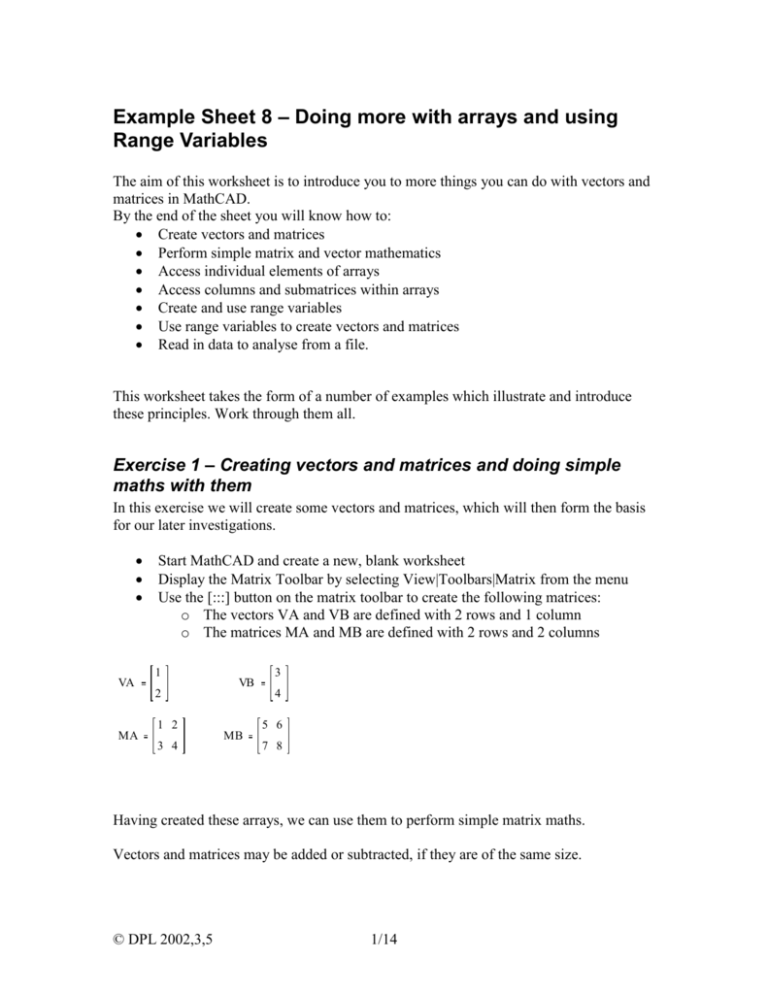
Example Sheet 8 – Doing more with arrays and using Range Variables The aim of this worksheet is to introduce you to more things you can do with vectors and matrices in MathCAD. By the end of the sheet you will know how to: Create vectors and matrices Perform simple matrix and vector mathematics Access individual elements of arrays Access columns and submatrices within arrays Create and use range variables Use range variables to create vectors and matrices Read in data to analyse from a file. This worksheet takes the form of a number of examples which illustrate and introduce these principles. Work through them all. Exercise 1 – Creating vectors and matrices and doing simple maths with them In this exercise we will create some vectors and matrices, which will then form the basis for our later investigations. VA MA Start MathCAD and create a new, blank worksheet Display the Matrix Toolbar by selecting View|Toolbars|Matrix from the menu Use the [:::] button on the matrix toolbar to create the following matrices: o The vectors VA and VB are defined with 2 rows and 1 column o The matrices MA and MB are defined with 2 rows and 2 columns 1 2 1 2 3 4 VB MB 3 4 5 6 7 8 Simple operators and matrix math Having created these arrays, we can use them to perform simple matrix maths. Vectors and matrices may be added or subtracted, if they are of the same size. © DPL 2002,3,5 1/14 PH15720 VA MathCAD Example Sheet 8 4 VB VA 6 6 MA MB 8 10 12 VB MB MA 2 Addition and subtraction of vectors 2 4 4 Addition and subtraction of matrices 4 4 MathCAD enforces rules of matrix maths and will not allow addition of matrices or vectors of different sizes. MA VA The number of rows and/or columns in these arrays do not match MathCAD will allow addition or multiplication of an array by a scalar. In this case the scalar is added or multiplied by each element of the matrix in turn: VA 1 VA 3 2 MA 1 3 3 MA 3 6 2 3 4 5 3 6 9 12 Addition of constant Multiplication by scalar MathCAD will also calculate the dot products of vectors and matrices, providing the inner dimensions are compatible… VA VB 11 MA MB 19 22 MA VA 5 Dot product of 2 vectors Dot product of 2 matrices 43 50 11 Dot product of matrix and vector The ‘dot’ operator for matrix multiplication is the same ‘*’ as is used for conventional multiplication, alternatively you can select the ‘dot product’ operator from the matrix toolbar. For practice, create the following arrays and matrices: © DPL 2002,3,5 2/14 PH15720 MathCAD Example Sheet 8 3 Vec3DA 4 5 Vec3DB 7 7 Vec3DC 11 1.2 3.4 5.6 7.8 9.0 1.2 MC 1 MD 2 3 0 1 3 5 0 5 ME 9 11 13 1 1 1 2 4 8 3 9 27 4 16 64 Exercise 2 – Accessing parts of Arrays In the last exercise we applied operators (such as addition and multiplication) to entire arrays. In this exercise we will see how to access individual elements or parts of arrays by using indices. MathCAD, by default, starts counting with indices at 0, so the first element of an array is at index 0. This can be changed but I would strongly advise against doing so. MathCAD uses array subscripts to address individual elements of an array. Array subscripts may be created either by selecting the subscript operator from the matrix toolbar or by using the <[> key. We will use the arrays you defined in the last exercise to practice on. VA MA MC 1 VB 2 1 2 MB 3 4 1.2 3.4 5.6 7.8 9.0 1.2 MD 3 4 5 6 7 8 0 1 3 5 0 5 9 11 13 ME 1 1 1 2 4 8 3 9 27 4 16 64 Using these arrays, we will first use subscripts to extract values from the arrays and then use subscripts to set individual elements of the array. © DPL 2002,3,5 3/14 PH15720 MathCAD Example Sheet 8 On the worksheet you have been using so far, position the cursor below the last matrix definition. Type VA[0= MathCAD responds by giving the value of the ‘zeroth’ element of the vector VA In the same way, query the value of VA1 by typing VA[1= The two values should be displayed as shown. VA0 1 VA1 2 For two dimensional arrays, (matrices), mathCAD uses 2 indices separated by a comma, in the order Row,Column MD0 1 1 MD1 0 5 ME1 2 8 ME2 1 9 We can use the same subscript operator to set individual elements of arrays. To do this, simply follow the expression which references the array with the assignment operator <:> For example, to set value of the zeroth element of VB to 7, type VB[0:7 VB0 VB 7 7 4 © DPL 2002,3,5 4/14 PH15720 MathCAD Example Sheet 8 Exercise 3 – Accessing parts of arrays As well as using the matrix indices to access individual elements of an array, we can use functions to access a subset of the matrix containing several elements. We met this operator earlier when we used it to separate out different parts of experimental data. MathCAD has an operator to access an entire column of a matrix at one time. It is shown on the worksheet as shown below Column Operator Column Index 1 Matrix to operate on 1 ME 4 9 16 To insert the row operator into your worksheet, you can either select it from the matrix toolbar or type <ctrl-6> from the keyboard. The ability to extract a column from a matrix is particularly useful when reading experimental data from a file into mathCAD, as we will see later. MathCAD also has a function, submatrix(), which can extract a number of rows and columns from an array First Column Matrix to operate on Last Column 1 1 submatrix( ME 0 2 1 2 ) 4 8 9 27 First Row Last Row © DPL 2002,3,5 5/14 PH15720 MathCAD Example Sheet 8 As an exercise, use the functions and operators to print out the following parts of the arrays: The zeroth column of array MA The first column of array MB The zeroth and first row of matrix MC The 2x2 submatrix at the bottom right hand corner of matrix MD The submatrix with 2 columns and 3 rows at the bottom right hand corner of ME Transposing Rows and Columns Another operator which works with arrays is the transpose operator (MT). This can be found on the matrix toolbar and swaps the rows and columns of a matrix. You can use the transpose operator in conjunction with the column select operator to extract a single row from a matrix. The examples below show the transpose operator in action. 1 1 1 2 4 8 3 9 27 1 2 3 4 T ME 1 4 9 16 4 16 64 1 8 27 64 © DPL 2002,3,5 6/14 ME T ME 2 T ( 3 9 27 ) PH15720 MathCAD Example Sheet 8 Exercise 4 – Other matrix functions and operators There are many other functions which operate on vectors and matrices. Some of these may be found on the matrix toolbar and others can be found on the functions dialog box (from the f(x) toolbar button) under the heading “Vector and Matrix”. I have given brief notes on some of the important ones below. In the summary I have followed the MathCAD convention of using V to refer to a vector function, M to refer to a matrix function and A to refer to an array, which can be either a vector or a matrix. rows(M), cols(M) min(A), max(A) last(V) length(V) matrix(r,c,F) stack(A,B) augment(A,B) identity(n) V sort(V) reverse(A) rsort(M,n) csort(M,n) Return the number of rows and columns in matrix M. Return the minimum or maximum value in array A. Returns the index of the last element of V Returns the number of elements in V Returns a matrix with r rows and c columns using the function F. Returns the result of putting matrix A on top of B. A & B must have the same number of columns Returns the result of placing matrix B to the right of matrix A Returns the identity matrix with n rows and n columns Sums the elements in the vector V – from toolbar The following sorting functions work on arrays and vectors and may be found under the “sorting” heading of function dialog box Sorts a vector V into ascending order Reverses the elements of a vector or the rows of an array Arranges the columns of M until row n is in ascending order Arranges the rows of M until column n is in ascending order Experiment with the using these functions on your example vectors and matrices to solve the following problems: What is the largest element in matrix ME ? What is the smallest element in matrix MC ? What is the smallest element in column 1 of matrix MD ? What is the largest element in row 2 of matrix MD ? Combine matrices MD & ME and sort the result to produce a matrix with 7 rows and 3 columns with column 0 in ascending order. © DPL 2002,3,5 7/14 PH15720 MathCAD Example Sheet 8 Element by element evaluation with the Vectorise operator The determinant operator (|M|) can be used to return the determinant of a matrix. We can also use the same operator to return the absolute value of a number. 2 2 7 7 Suppose that instead of wanting to find the determinant of a matrix we wish to find the absolute value of all the elements in the matrix. In order to do this we use the vectorise operator from the matrix toolbar. This is shown as an arrow over f(M). 1 2 3 4 2 1 2 3 4 1 2 3 4 In the example on the left, the determinant operator is applied to the 2x2 matrix and calculates the determinant as normal. In the example on the right, the vectorise operator has been applied to the determinant operator, causing it to be applied to each element of the matrix in turn. The vectorise operator also works with matrix multiplication, as shown below: 1 4 4 4 2 5 32 2 5 10 3 3 6 1 6 18 In the left hand case, two vectors are multiplied together using the normal rules of matrix multiplication, giving a scalar product. In the right hand case the vectorise operator forces the multiplication to take place on an element by element basis. The vectorise operator works for all operations that normally have a special meaning for matrices. Exercise 5 – Range Variables and filling matrices Up until now, all the variables you have used in mathCAD have taken a single value (or set of values in the case of arrays). A range variable is a special type of variable which takes on a whole series of values, any expression involving the range variable is evaluated a number of times, once for each value in the series. Because range variables take on a series of values, mathCAD places restrictions on where they may be used, if you attempt to use a range variable in the wrong place, mathCAD © DPL 2002,3,5 8/14 PH15720 MathCAD Example Sheet 8 will highlight the offending expression in red and the error message will refer to ‘Illegal Context’. Range values correspond to FOR loops in conventional programming languages, and are very useful when used with arrays to identify elements of the array. To start with, we will create a range variable, i, and do some experiments with it. Start with a fresh mathCAD sheet. Define the range variable by typing [i][:][0][;][3] Notice how you define the range variable by typing the semi-colon character [;] and mathCAD displays this as a series of dots. Once you have defined the range variable, you an ask mathCAD to print out the value of it, like you would any other variable, by typing [i][=] In this case, however, mathCAD prints a table of values. Your sheet should now look like this: 0 3 i i 0 1 2 3 Notice how the display of the values of I is subtly different from the way in which mathCAD displays a matrix or a vector. You can create an expression involving the range variable and mathCAD will evaluate the expression for each of the values taken by the range variable. In the example below I have asked mathCAD to do evaluate a number of expressions involving the range variable. 0 3 i i 0 1 2 3 i 1 1 2 3 4 2 i i 2 0 1 4 9 1 2 4 8 Again, you should note that mathCAD is simply displaying the result of a calculation repeated a number of times, changing the value of i each time. © DPL 2002,3,5 9/14 PH15720 MathCAD Example Sheet 8 Range variables find their greatest use when filling an array with a set of values. Suppose that we were performing an experiment where we took a reading every 10 minutes. We could create an array and type the times into it by hand, like this: 0 10 time 20 min 30 But this is tedious and prone to mistakes, especially if we had 100 times to type in instead of the 4 in this case. Looking at the series of numbers in the array, we can say that the i'th element is i times 10 minutes, which we express to mathCAD like this: i 0 3 timei i 10 min 0 0 600 time 1.2 10 3 1.8 10 3 s change the units to give: time 10 20 min 30 Note how the range variable on the left hand side of the assignment symbol is used to index through the array elements while the same variable on the right hand side is used to create their values. For practice, after you have created the ‘time’ array, have a go at creating the following arrays using range variables: The array ‘evens’, which contains the first 5 even numbers. The array ‘odds’ which contains the first 5 odd numbers The array ‘squares’ which contains the squares of the first 6 integers. When you have finished, your arrays should look like this: 0 1 0 2 3 1 evens 4 odds 5 6 7 8 9 squares 4 9 16 25 © DPL 2002,3,5 10/14 PH15720 MathCAD Example Sheet 8 Exercise 6 – Statistical functions and arrays MathCAD has a range of statistical and related functions which operate on arrays. As a simple example, we are going to perform some statistical analysis on a series of results. These can be placed into a vector and the mean and standard deviation calculated: 2.55 2.5 2.6 2.42 2.31 Diameters 2.53 2.56 2.62 2.28 2.44 2.41 2.49 mean( Diameters) 2.476 stdev( Diameters) 0.103 The mean and stdev functions may be selected from the f(x) dialog box, under the function category ‘statistics’. Note that you can add units to a vector. If all elements of a vector have the same units, the easiest way to do this is to select the entire matrix and multiply it by the appropriate unit. The units will then propagate through to the answers as shown below: © DPL 2002,3,5 11/14 PH15720 MathCAD Example Sheet 8 2.55 2.5 2.6 2.42 2.31 Diameters 2.53 2.56 mm 2.62 2.28 2.44 2.41 2.49 mean( Diameters) 2.476 10 © DPL 2002,3,5 3 m stdev( Diameters) 1.029 10 12/14 4 m PH15720 MathCAD Example Sheet 8 Exercise 7 – Getting data from a file. Although for simple experiments it is possible to type values directly into MathCAD using an input table, frequently we have to process sets of results that come from computer controlled test and measurement equipment, or that have been tabulated by other researchers. MathCAD can read data files stored on the computer and bring those into its calculations. As an exercise, I have prepared two files for you to bring into MathCAD and perform some simple analysis upon. The files are data taken from one of my detector experiments. The first column shows the detector number, and the second column the number of counts received on each detector over a 10 second period. The two files are nominally from the same spectrum but shifted along the array. Use a web browser to bring up the page http://users.aber.ac.uk/dpl/ph15720/handouts/handouts.htm and at the bottom of the page you should see a link to datafiles for exercise 8. Right click on the link and save the first file on your M: drive with your other MathCAD files, use the default filename of detectordata.txt. Repeat to save the second file in the same place, with the default filename of detectordata2.txt. Once the files have finished downloading, close the browser and return to MathCAD. On a blank MathCAD worksheet, select “Insert|Component…” from the menu. This will bring up a wizard where you should first indicate that you want to read data from a file. On the next page of the dialog box you should leave the file type as ‘Text File’ and use the browse button to locate the datafile you have stored on your M: drive in the previous step. Once the wizard closes, your worksheet should show an icon representing a file read component, with a little disk on it. The cursor will be positioned in a placeholder ready to hold the name you wish to give the dataset. Once you have given it a name your worksheet should look like this: Now, using the techniques we started to explore with the resistor experiment and the photoelectric effect, carry out the following analyses on the data. I have put some hints at the bottom of the page which may help if you get stuck. From the matrix of data, create a vector to hold the Detector number and another to hold the counts. Plot the counts against detector number. © DPL 2002,3,5 13/14 PH15720 MathCAD Example Sheet 8 Create a plot of count rate vs detector, given that the sample period was 10 seconds. Each detector is 20um x 2mm. Produce another graph with the plot rate scaled in terms of counts per second per cm2. There are 2 clear peaks in the data. Find the height of the largest peak in terms of counts per second. Create an expression which will give the number of the detector with the highest counts. Use the submatrix function to create a matrix containing the data from the highest counting channel together with the 6 channels on either side. Calculate the total number of counts in the highest peak and its adjacent channels that you have just created above. Create a function called PeakArea which takes as its arguments the channel number and the width of the peak in channels. It is to return the total number of counts of the given channel together with those up to 1 width away. For example, PeakArea(42,3) will give the total counts from detectors 39,40,41,42,43,44 and 45. Use the PeakArea function to re-calculate the area of the highest peak and the 6 channels either side. Create a graph which will show the largest peak and a specified number of adjacent channels on either side. Go back to the file read component and right click on it, select “Choose File…” from the pop-up menu and pick the file “DetectorData2.txt”. Click out of the file read component and check that all of your answers and graphs change to reflect the new data file. Hints The following hints may be useful to you. Use the help system and conduct some experiments with MathCAD to see how. You may want to create a unit for the micron (1 um is 10-6 m) The max() function will tell you the largest number in a vector The csort() function can be used to sort a matrix so that a particular column is in ascending order. You can reverse() the results of a sort. You can use variables in the placeholders which determine the axis scaling of a graph. The submatrix() function can be used to pick off part of a matrix. The matrix toolbar has one way of summing the elements of a vector. The calculus toolbar has two more ways of doing summations. END © DPL 2002,3,5 14/14
