Link to Product Characteristic Help Guide (Attachments B, C, D, E)
advertisement
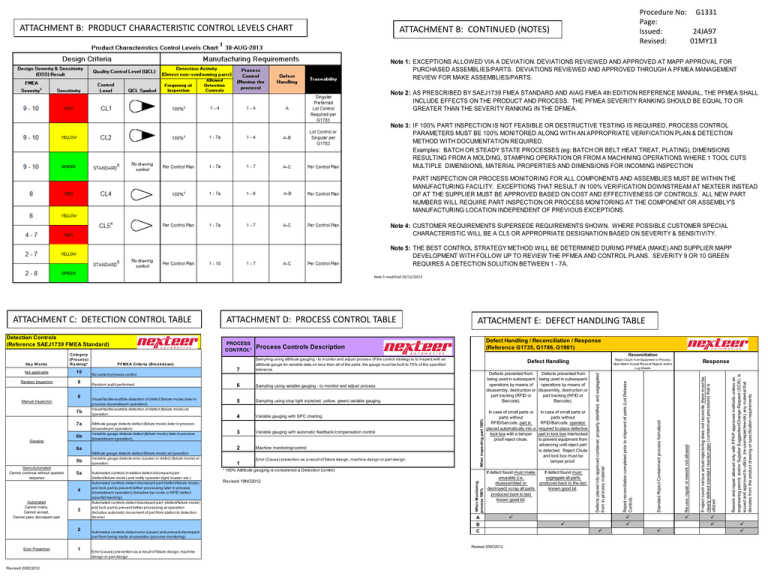
ATTACHMENT B: PRODUCT CHARACTERISTIC CONTROL LEVELS CHART Procedure No: G1331 Page: Issued: 24JA97 Revised: 01MY13 ATTACHMENT B: CONTINUED (NOTES) Note 1: EXCEPTIONS ALLOWED VIA A DEVIATION. DEVIATIONS REVIEWED AND APPROVED AT MAPP APPROVAL FOR PURCHASED ASSEMBLIES/PARTS. DEVIATIONS REVIEWED AND APPROVED THROUGH A PFMEA MANAGEMENT REVIEW FOR MAKE ASSEMBLIES/PARTS. Note 2: AS PRESCRIBED BY SAEJ1739 FMEA STANDARD AND AIAG FMEA 4th EDITION REFERENCE MANUAL, THE PFMEA SHALL INCLUDE EFFECTS ON THE PRODUCT AND PROCESS. THE PFMEA SEVERITY RANKING SHOULD BE EQUAL TO OR GREATER THAN THE SEVERITY RANKING IN THE DFMEA. Note 3: IF 100% PART INSPECTION IS NOT FEASIBLE OR DESTRUCTIVE TESTING IS REQUIRED, PROCESS CONTROL PARAMETERS MUST BE 100% MONITORED ALONG WITH AN APPROPRIATE VERIFICATION PLAN & DETECTION METHOD WITH DOCUMENTATION REQUIRED. Examples: BATCH OR STEADY STATE PROCESSES (eg: BATCH OR BELT HEAT TREAT, PLATING), DIMENSIONS RESULTING FROM A MOLDING, STAMPING OPERATION OR FROM A MACHINING OPERATIONS WHERE 1 TOOL CUTS MULTIPLE DIMENSIONS, MATERIAL PROPERTIES AND DIMENSIONS FOR INCOMING INSPECTION PART INSPECTION OR PROCESS MONITORING FOR ALL COMPONENTS AND ASSEMBLIES MUST BE WITHIN THE MANUFACTURING FACILITY. EXCEPTIONS THAT RESULT IN 100% VERIFICATION DOWNSTREAM AT NEXTEER INSTEAD OF AT THE SUPPLIER MUST BE APPROVED BASED ON COST AND EFFECTIVENESS OF CONTROLS. ALL NEW PART NUMBERS WILL REQUIRE PART INSPECTION OR PROCESS MONITORING AT THE COMPONENT OR ASSEMBLY'S MANUFACTURING LOCATION INDEPENDENT OF PREVIOUS EXCEPTIONS. Note 4: CUSTOMER REQUIREMENTS SUPERSEDE REQUIREMENTS SHOWN. WHERE POSSIBLE CUSTOMER SPECIAL CHARACTERISTIC WILL BE A CL5 OR APPROPRIATE DESIGNATION BASED ON SEVERITY & SENSITIVITY. Note 5: THE BEST CONTROL STRATEGY METHOD WILL BE DETERMINED DURING PFMEA (MAKE) AND SUPPLIER MAPP DEVELOPMENT WITH FOLLOW UP TO REVIEW THE PFMEA AND CONTROL PLANS. SEVERITY 9 OR 10 GREEN REQUIRES A DETECTION SOLUTION BETWEEN 1 - 7A. Note 5 modified 10/11/2013 ATTACHMENT C: DETECTION CONTROL TABLE Detection Controls (Reference SAEJ1739 FMEA Standard) 7a 6b Gauging Sampling using variable gauging - to monitor and adjust process Visual/tactile/audible detection of defect (failure mode) later in process (downstream operation) Visual/tactile/audible detection of defect (failure mode) at operation 5 Sampling using stop light style(red, yellow, green) variable gauging 4 Variable gauging with SPC charting 3 Variable gauging with automatic feedback/compensation control 2 Machine monitoring/control Attribute gauge detects defect (failure mode) later in process (downstream operation) Variable gauge detects defect (failure mode) later in process (downstream operation) 6a 5b Semi-Automated Cannot continue without operator response 5a 4 Automated Cannot make, Cannot accept, Cannot pass discrepant part 3 2 Error Prevention Revised 23OC2012 1 Defects prevented from Defects prevented from being used in subsequent being used in subsequent operations by means of operations by means of disasembly, destruction or disasembly, destruction or part tracking (RFID or part tracking (RFID or Barcode). Barcode). Attribute gauge detects defect (failure mode) at operation Variable gauge detects error (cause) or defect (failure mode) at operation Automated controls in-station detect discrepant part (defect/failure mode) and notify operator (light, buzzer, etc.) Automated controls detect discrepant part (defect/failure mode) and lock part to prevent further processing later in process (downstream operation) (Includes bar code or RFID defect pass/fail tracking) Automated controls detect discrepant part (defect/failure mode) and lock part to prevent further processing at operation (Includes automatic movement of part from station to detection device) Automated controls detect error (cause) and prevent discrepant part from being made at operation (process monitoring) 1 Error (Cause) prevention as a result of fixture design, machine design or part design. * 100% Attribute gauging is considered a Detection Control. Revised 19NO2012 In case of small parts or In case of small parts or parts without parts without RFID/barcode, part is RFID/Barcode, operator placed automatically into a required to place defective lock box with a tamper part in lock box interlocked proof reject chute. to prevent equipment from advancing until reject part is detected. Reject Chute and lock box must be tamper proof. If defect found must make If defect found must unusable (i.e. segregate all parts disassembled or produced back to the last destroyed) scrap all parts known good lot. produced back to last known good lot. A B C Revised 20NO2012 Error (cause) prevention as a result of fixture design, machine design or part design Rework and repair allowed only with PPAP approved methods unless an engineering permit, and/or Supplier Suggestion/Change Request (SCR), is issued and approved to utilize (re-use/repair/rework) any material that deviates from the product drawing or specification requirements 7b 6 If reject count versus actual rejects/log does not reconcile, there must be clearly defined standard reaction plan (containment procedure) that is utilized 8 Manual Inspection Random audit performed No current process control Response Re-use, repair or rework not allowed 9 Standard Reject Containment process formalized Random Inspection 7 Reject Count from Equipment or Process Must Match Actual Physical Rejects and/or Log Sheets Defect Handling Reject reconciliation completed prior to shipment of parts (Lot Release Control). 10 Reconciliation Sampling using attribute gauging - to monitor and adjust process (If the control strategy is to inspect with an attribute gauge for variable data on less than all of the parts, the gauge must be built to 75% of the specified tolerance. P FME A Crite ria (Bre a kdown) Defects placed into approved container, properly identified, and segregated from in-process material Not applicable Defect Handling / Reconciliation / Response (Reference G1735, G1786, G1901) Process Controls Description When inspecting part 100% Ca te gory (P roce ss) R a nking* PROCESS CONTROL* ATTACHMENT E: DEFECT HANDLING TABLE When Monitoring process 100% Ke y W ords ATTACHMENT D: PROCESS CONTROL TABLE


