DT7450UK2 DUAL TEC® Motion Sensor Installation Instructions
❹
❶
1K
2.2K
4.7K
5.6K
C
D
5.6K
D
A
4.7K
C
B
1K
2.2K
A
B
Factory default settings are shown in grey.
ALARM
(RA)
TAMPER
(RT)
Jumper Position EOL Value
EOL Settings
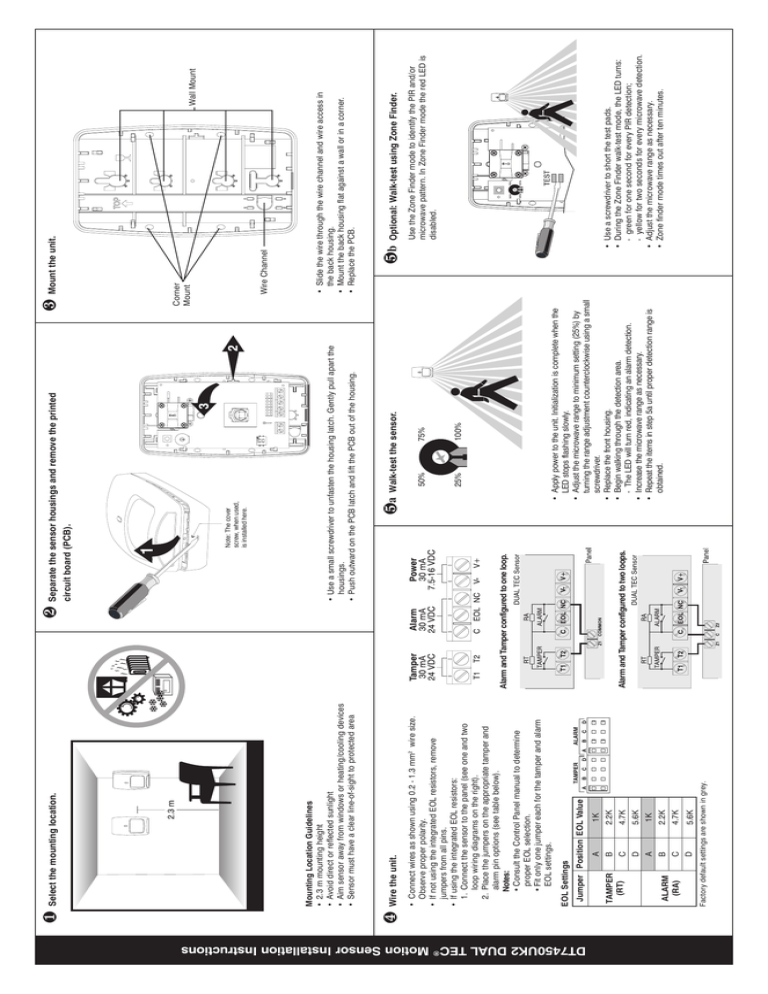
• Connect wires as shown using 0.2 - 1.3 mm2 wire size.
Observe proper polarity.
• If not using the integrated EOL resistors, remove
jumpers from all pins.
• If using the integrated EOL resistors:
1. Connect the sensor to the panel (see one and two
loop wiring diagrams on the right).
2. Place the jumpers on the appropriate tamper and
alarm pin options (see table below).
Notes:
• Consult the Control Panel manual to determine
proper EOL selection.
• Fit only one jumper each for the tamper and alarm
EOL settings.
Wire the unit.
Mounting Location Guidelines
• 2.3 m mounting height
• Avoid direct or reflected sunlight
• Aim sensor away from windows or heating/cooling devices
• Sensor must have a clear line-of-sight to protected area
Select the mounting location.
Alarm and Tamper configured to two loops.
75%
100%
50%
25%
Walk-test the sensor.
Mount the unit.
Wall Mount
Use the Zone Finder mode to identify the PIR and/or
microwave pattern. In Zone Finder mode the red LED is
disabled.
Optional: Walk-test using Zone Finder.
• Use a screwdriver to short the test pads.
• During the Zone Finder walk-test mode, the LED turns:
- green for one second for every PIR detection;
- yellow for two seconds for every microwave detection.
• Adjust the microwave range as necessary.
• Zone finder mode times out after ten minutes.
❺b
• Slide the wire through the wire channel and wire access in
the back housing.
• Mount the back housing flat against a wall or in a corner.
• Replace the PCB.
Wire Channel
Corner
Mount
❸
• Apply power to the unit. Initialization is complete when the
LED stops flashing slowly.
• Adjust the microwave range to minimum setting (25%) by
turning the range adjustment counterclockwise using a small
screwdriver.
• Replace the front housing.
• Begin walking through the detection area.
- The LED will turn red, indicating an alarm detection.
• Increase the microwave range as necessary.
• Repeat the items in step 5a until proper detection range is
obtained.
❺a
• Use a small screwdriver to unfasten the housing latch. Gently pull apart the
housings.
• Push outward on the PCB latch and lift the PCB out of the housing.
Note: The cover
screw, when used,
is installed here.
circuit board (PCB).
Separate the sensor housings and remove the printed
Alarm and Tamper configured to one loop.
❷
DT7450UK2 DUAL TEC® Motion Sensor Product Information
Low Sensitivity
(Pulse Count 2)
LED disabled
1
2
LED enabled
High Sensitivity
(Pulse Count 1)
ON
800-02414 Rev B
© 2008 Honeywell International Inc. • Honeywell, IntelliSense and DUAL TEC are registered trademarks of Honeywell International Inc.
All other trademarks are the properties of their respective owners. All rights reserved.
Made in China
TROUBLESHOOTING
Problem: Red LED is flashing rapidly.
Explanation: The sensor is in one of three conditions:
Microwave supervision failure: The sensor continues operating using
PIR as the only detection method. When detection occurs on the PIR
channel, the alarm relay will latch open until the Microwave fault is
removed.
PIR self-test failure: Alarm relay does not actuate.
Temperature compensation failure: When alarm occurs, the alarm relay
will latch open until the fault is cleared.
Solution: Power down the sensor or enter zone finder mode which will
perform self-test. If the fault does not clear, replace the sensor.
OFF
Switch
Factory default settings are shown in grey.
DIP SWITCH SETTINGS (SW1)
LED
OPERATION MODE
Normal Power Up Fault
Zone Finder
Slow
Fast
ON
OFF
Red
Blink
Blink
Alarm
OFF
OFF
ON
ON
Yellow
Microwave
Microwave
OFF
OFF
ON
ON
Green
PIR
PIR
LED INDICATORS
Side View
Minimum Detection Pattern
Sensitivity:
High (Pulse Count 1) 1 - 2 steps
Low (Pulse Count 2) 3 - 4 steps
Dimensions:
11.9 cm H x 7.1 cm W x 4.2 cm D
Weight:
174 g;
Packaged Product Approx.: 213 g
PIR fields-of-view:
High Security Lens
22 long range edges
12 intermediate edges
6 lower edges
4 look-down edges
Self-tests:
Microwave Supervision
PIR Self-Test
Temperature Compensation
Temperature Compensation:
Advanced dual slope.
Operating temperature:
-10o C to +55o C (14o F to +131o F)
5 - 95% relative humidity (non-condensing)
(Indoor use environment)
Fluorescent light filter:
50 Hz
PIR white light immunity:
6,500 Lux typical
Microwave frequencies:
24.200 GHz
Power requirements:
7.5 - 16 VDC
25 mA typical, 30 mA maximum,
12 VDC nominal
Tamper switch:
(NC) 30 mA, 24 VDC
Please contact your local authorised Honeywell
representative for product warranty information.
Maximum Detection Pattern
Range:
15 m x 18 m
Top View
Wide Angle Lens
Alarm relay:
Energized Form A
30 mA, 24 VDC,
40 Ohms resistance maximum
PRODUCT SPECIFICATIONS
DETECTION PATTERNS
Quality Assurance Department,
Honeywell Security & Custom Electronics,
Newhouse Industrial Estate
Motherwell,
Lanarkshire ML1 5SB,
Scotland,
United Kingdom.
Tel: +44(0)1698 738200
Email: UK64Sales@Honeywell.com.
Accessories:
Optional Lens Kit Long Range Curtain Lens Kit (P/N DT7000-LRLK)
Mounting Brackets SMB-10 Swivel Mount Bracket
(P/N 0-000-110-01)
SMB-10T Swivel Mount Bracket w/Tamper
(P/N 0-000-155-01)
SMB-10C Swivel Mount Ceiling Bracket
(P/N 0-000-111-01)
TS 50131-2-4 Compliant Accessories:
SMB-10T Swivel Mount Bracket w/ Tamper
(P/N 0-000-155-01)
Long Range Curtain Lens Kit (P/N DT7000-LRLK)
Approvals/listings:
CE
PD6662
EN 50131-1 and TS 50131-2-4 Security Grade 2,
Environmental Class II.
Suitable for connection to an EN 60950 Class II
Limited Power Source.
Note: In TS 50131-2-4 compliant installations:
mount the sensor at 2.3 m, select the high
sensitivity setting, and install a cover screw
(included).
To obtain applicable EU compliance Declaration of
Conformities for this product, please refer to our
Website, http://www.security.honeywell.com/hsce/
international/index.html. For any additional
information regarding the compliance of this
product to any EU specific requirements, please
contact:


