Installation Instructions
advertisement
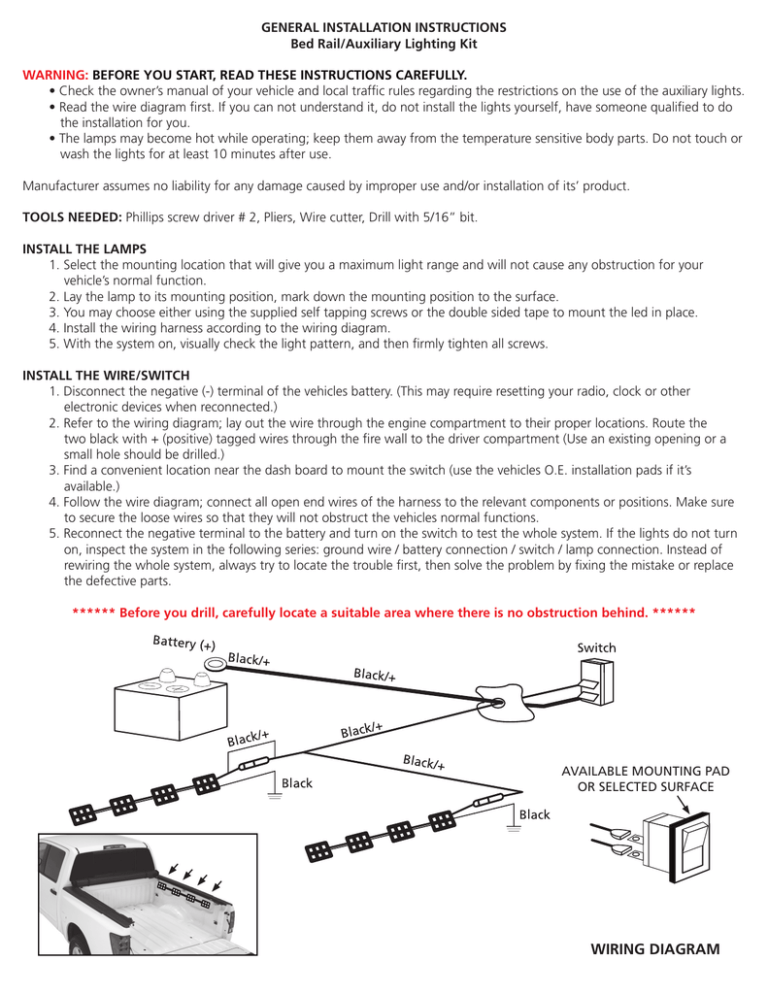
GENERAL INSTALLATION INSTRUCTIONS Bed Rail/Auxiliary Lighting Kit WARNING: BEFORE YOU START, READ THESE INSTRUCTIONS CAREFULLY. • Check the owner’s manual of your vehicle and local traffic rules regarding the restrictions on the use of the auxiliary lights. • Read the wire diagram first. If you can not understand it, do not install the lights yourself, have someone qualified to do the installation for you. • The lamps may become hot while operating; keep them away from the temperature sensitive body parts. Do not touch or wash the lights for at least 10 minutes after use. Manufacturer assumes no liability for any damage caused by improper use and/or installation of its’ product. TOOLS NEEDED: Phillips screw driver # 2, Pliers, Wire cutter, Drill with 5/16” bit. INSTALL THE LAMPS 1. Select the mounting location that will give you a maximum light range and will not cause any obstruction for your vehicle’s normal function. 2. Lay the lamp to its mounting position, mark down the mounting position to the surface. 3. You may choose either using the supplied self tapping screws or the double sided tape to mount the led in place. 4. Install the wiring harness according to the wiring diagram. 5. With the system on, visually check the light pattern, and then firmly tighten all screws. INSTALL THE WIRE/SWITCH 1. Disconnect the negative (-) terminal of the vehicles battery. (This may require resetting your radio, clock or other electronic devices when reconnected.) 2. Refer to the wiring diagram; lay out the wire through the engine compartment to their proper locations. Route the two black with + (positive) tagged wires through the fire wall to the driver compartment (Use an existing opening or a small hole should be drilled.) 3. Find a convenient location near the dash board to mount the switch (use the vehicles O.E. installation pads if it’s available.) 4. Follow the wire diagram; connect all open end wires of the harness to the relevant components or positions. Make sure to secure the loose wires so that they will not obstruct the vehicles normal functions. 5. Reconnect the negative terminal to the battery and turn on the switch to test the whole system. If the lights do not turn on, inspect the system in the following series: ground wire / battery connection / switch / lamp connection. Instead of rewiring the whole system, always try to locate the trouble first, then solve the problem by fixing the mistake or replace the defective parts. ****** Before you drill, carefully locate a suitable area where there is no obstruction behind. ****** AVAILABLE MOUNTING PAD OR SELECTED SURFACE WIRING DIAGRAM
