12-volt kit installation
advertisement
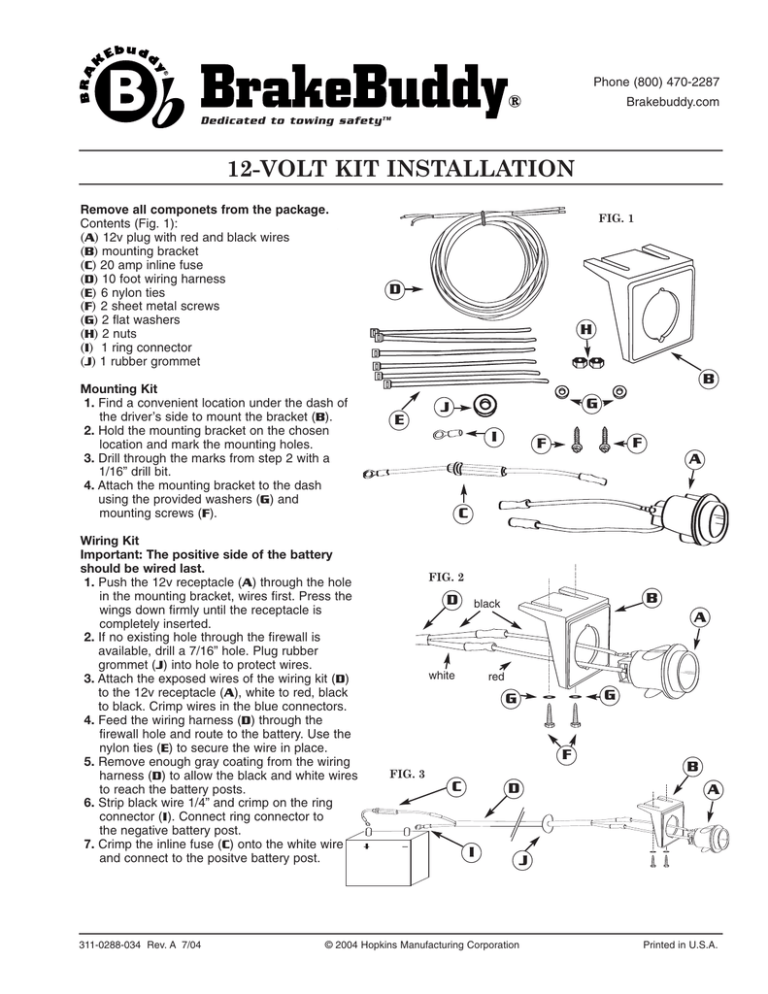
Phone (800) 470-2287 Brakebuddy.com Dedicated to towing safety TM 12-VOLT KIT INSTALLATION Remove all componets from the package. Contents (Fig. 1): (A) 12v plug with red and black wires (B) mounting bracket (C) 20 amp inline fuse (D) 10 foot wiring harness (E) 6 nylon ties (F) 2 sheet metal screws (G) 2 flat washers (H) 2 nuts (I) 1 ring connector (J) 1 rubber grommet Mounting Kit 1. Find a convenient location under the dash of the driver’s side to mount the bracket (B). 2. Hold the mounting bracket on the chosen location and mark the mounting holes. 3. Drill through the marks from step 2 with a 1/16” drill bit. 4. Attach the mounting bracket to the dash using the provided washers (G) and mounting screws (F). Wiring Kit Important: The positive side of the battery should be wired last. 1. Push the 12v receptacle (A) through the hole in the mounting bracket, wires first. Press the wings down firmly until the receptacle is completely inserted. 2. If no existing hole through the firewall is available, drill a 7/16” hole. Plug rubber grommet (J) into hole to protect wires. 3. Attach the exposed wires of the wiring kit (D) to the 12v receptacle (A), white to red, black to black. Crimp wires in the blue connectors. 4. Feed the wiring harness (D) through the firewall hole and route to the battery. Use the nylon ties (E) to secure the wire in place. 5. Remove enough gray coating from the wiring harness (D) to allow the black and white wires to reach the battery posts. 6. Strip black wire 1/4” and crimp on the ring connector (I). Connect ring connector to the negative battery post. 7. Crimp the inline fuse (C) onto the white wire and connect to the positve battery post. 311-0288-034 Rev. A 7/04 FIG. 1 D H B G J E I F F A C FIG. 2 D B black A white red G G FIG. 3 F C D I B A J © 2004 Hopkins Manufacturing Corporation Printed in U.S.A.
