installation of ambiance® hc-305
advertisement
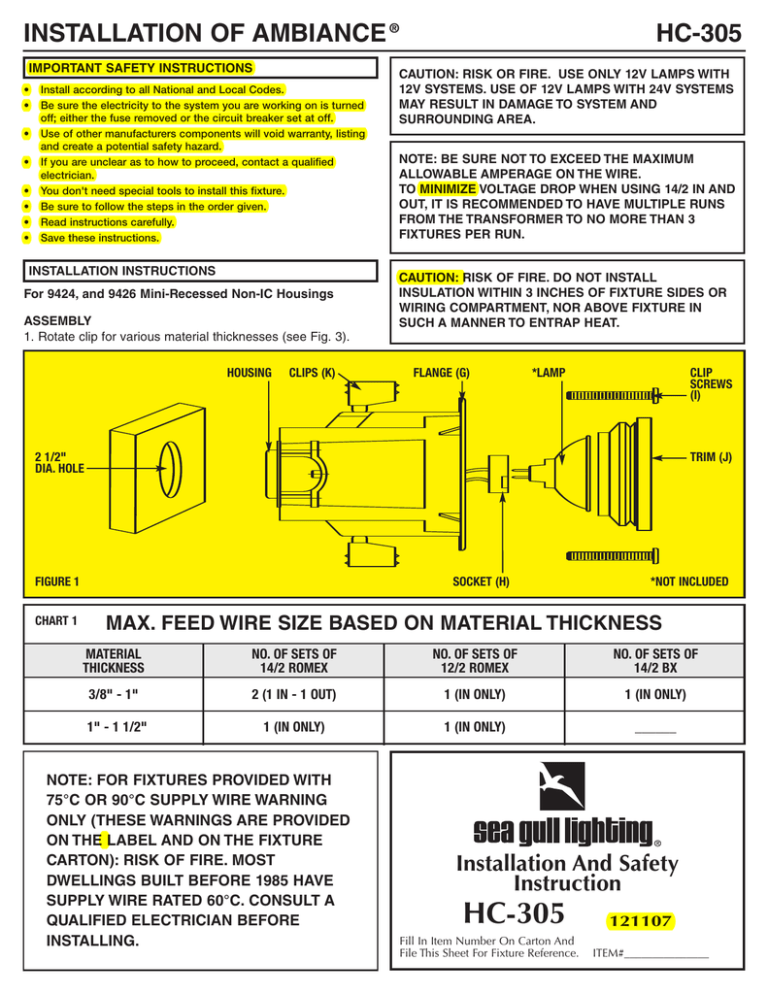
INSTALLATION OF AMBIANCE ® IMPORTANT SAFETY INSTRUCTIONS • • • • • • • • Install according to all National and Local Codes. Be sure the electricity to the system you are working on is turned off; either the fuse removed or the circuit breaker set at off. Use of other manufacturers components will void warranty, listing and create a potential safety hazard. If you are unclear as to how to proceed, contact a qualified electrician. You don't need special tools to install this fixture. Be sure to follow the steps in the order given. Read instructions carefully. Save these instructions. INSTALLATION INSTRUCTIONS For 9424, and 9426 Mini-Recessed Non-IC Housings ASSEMBLY 1. Rotate clip for various material thicknesses (see Fig. 3). HOUSING CLIPS (K) HC-305 CAUTION: RISK OR FIRE. USE ONLY 12V LAMPS WITH 12V SYSTEMS. USE OF 12V LAMPS WITH 24V SYSTEMS MAY RESULT IN DAMAGE TO SYSTEM AND SURROUNDING AREA. NOTE: BE SURE NOT TO EXCEED THE MAXIMUM ALLOWABLE AMPERAGE ON THE WIRE. TO MINIMIZE VOLTAGE DROP WHEN USING 14/2 IN AND OUT, IT IS RECOMMENDED TO HAVE MULTIPLE RUNS FROM THE TRANSFORMER TO NO MORE THAN 3 FIXTURES PER RUN. CAUTION: RISK OF FIRE. DO NOT INSTALL INSULATION WITHIN 3 INCHES OF FIXTURE SIDES OR WIRING COMPARTMENT, NOR ABOVE FIXTURE IN SUCH A MANNER TO ENTRAP HEAT. FLANGE (G) CLIP SCREWS (I) *LAMP 2 1/2" DIA. HOLE TRIM (J) FIGURE 1 CHART 1 SOCKET (H) *NOT INCLUDED MAX. FEED WIRE SIZE BASED ON MATERIAL THICKNESS MATERIAL THICKNESS NO. OF SETS OF 14/2 ROMEX NO. OF SETS OF 12/2 ROMEX NO. OF SETS OF 14/2 BX 3/8" - 1" 2 (1 IN - 1 OUT) 1 (IN ONLY) 1 (IN ONLY) 1" - 1 1/2" 1 (IN ONLY) 1 (IN ONLY) ______ NOTE: FOR FIXTURES PROVIDED WITH 75°C OR 90°C SUPPLY WIRE WARNING ONLY (THESE WARNINGS ARE PROVIDED ON THE LABEL AND ON THE FIXTURE CARTON): RISK OF FIRE. MOST DWELLINGS BUILT BEFORE 1985 HAVE SUPPLY WIRE RATED 60°C. CONSULT A QUALIFIED ELECTRICIAN BEFORE INSTALLING. Installation And Safety Instruction HC-305 Fill In Item Number On Carton And File This Sheet For Fixture Reference. 121107 ITEM#_______________ INSTALLATION HC-305 CONTINUED INSTALLATION NOTE: Built-in wiring compartment allows for: (see chart 1). 1. Drill a 2 1/2" diameter hole in mounting surface. CLIP DIRECTION FOR VARIOUS MATERIAL THICKNESSES 2. Bring feed wire (Not included) from transformer through installation hole. THREADED TUBE ON CLIP 3. Remove housing cover screw (A) and remove housing cover (B) (See Fig. 2). 4. Strip 1/4" of insulation from the supply wires. FROM 3/4" TO 1 1/2" THICK 5. Insert each stripped conductor into the terminal block (C). Secure in place by tightening screws on terminal block (C). 6. Secure supply wire to housing by placing supply wire on support (E), then place supply wire holder (D) on supply wire and secure in place by tightening small screws (F). FROM 1/4" TO 1" THICK CHANNEL ON HOUSING 7. Replace housing cover (B) and secure by reinstalling housing cover screw (A). FINAL INSTALLATION 1. Making sure that clips are flat against housing and threaded tube on clip is inserted into channel housing, push housing into hole until flange is against surface. 2. Align triangular ribs with a level if using a T-arm or shade that must be positioned properly (see Fig. 4). FIGURE 3 3. Tighten clip screws (I) to secure housing to surface. 4. Install lamp. (not included) For 9424 – MR11: 20w max. Install lamp. (not included) For 9426 – MRC11: 20w max. 5. Install trim (J). WIRING COMPARTMENT DETAIL DIMMING HALOGEN LAMPS GREATLY REDUCES LAMP LIFE TRIANGULAR RIBS FLANGE HOUSING COVER SCREW (A) HOUSING COVER (B) 90° FIGURE 4 TERMINAL BLOCK (C) SMALL SCREWS (F) SUPPLY WIRE HOLDER (D) SUPPLY WIRE SUPPORT (E) HOUSING FIGURE 2
