P499 Series Electronic Pressure Transducers
Product/Technical Bulletin
Code No. LIT-12011190
Part No. 24-7664-2659, Rev. F
P499xxx-x
Issued August 4, 2015
Refer to the QuickLIT Web site for the most up-to-date version of this document.
The P499 Series Electronic Pressure Transducers are
compact, economical, rugged, direct-mount pressure
transducers designed for use in commercial
refrigeration and air conditioning applications. These
transducers produce an analog signal based on the
sensed pressure.
The P499 Series transducers feature environmentally
protected electronics with stainless steel construction.
The digitally compensated P499 transducers are highly
accurate over a broad temperature range, resisting the
effects of wide ambient temperature swings, high
humidity, condensation, and icing.
The pressure port is machined from a solid piece of
17-4PH stainless steel. No O-rings, organic materials,
or welds are exposed to the pressure media, allowing
for a leak-proof, all-metal, sealed pressure system.
The P499 Series transducers operate with any
corrosive or non-corrosive pressure medium that is
compatible with 17-4PH stainless steel, including
water, condensate, carbon dioxide, glycol, most
refrigerants (including ammonia), and many other
compatible fluids and gases.
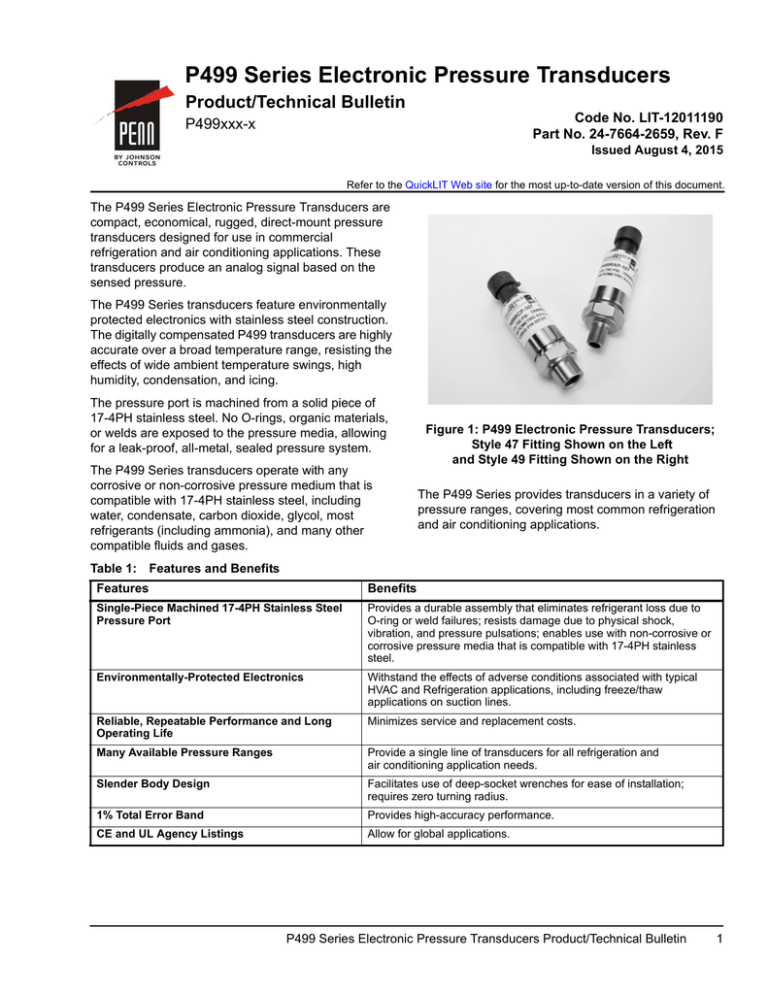
Figure 1: P499 Electronic Pressure Transducers;
Style 47 Fitting Shown on the Left
and Style 49 Fitting Shown on the Right
The P499 Series provides transducers in a variety of
pressure ranges, covering most common refrigeration
and air conditioning applications.
Table 1: Features and Benefits
Features
Benefits
Single-Piece Machined 17-4PH Stainless Steel
Pressure Port
Provides a durable assembly that eliminates refrigerant loss due to
O-ring or weld failures; resists damage due to physical shock,
vibration, and pressure pulsations; enables use with non-corrosive or
corrosive pressure media that is compatible with 17-4PH stainless
steel.
Environmentally-Protected Electronics
Withstand the effects of adverse conditions associated with typical
HVAC and Refrigeration applications, including freeze/thaw
applications on suction lines.
Reliable, Repeatable Performance and Long
Operating Life
Minimizes service and replacement costs.
Many Available Pressure Ranges
Provide a single line of transducers for all refrigeration and
air conditioning application needs.
Slender Body Design
Facilitates use of deep-socket wrenches for ease of installation;
requires zero turning radius.
1% Total Error Band
Provides high-accuracy performance.
CE and UL Agency Listings
Allow for global applications.
P499 Series Electronic Pressure Transducers Product/Technical Bulletin
1
IMPORTANT: The P499 Series Electronic
Pressure Transducer is intended to provide an input
to equipment under normal operating conditions.
Where failure or malfunction of the electronic
pressure transducer could lead to personal injury or
property damage to the controlled equipment or
other property, additional precautions must be
designed into the control system. Incorporate and
maintain other devices, such as supervisory or
alarm systems or safety or limit controls, intended to
warn of or protect against failure or malfunction of
the electronic pressure transducer.
IMPORTANT : Le P499 Series Electronic Pressure
Transducer est destiné à transmettre des données
entrantes à un équipement dans des conditions
normales de fonctionnement. Lorsqu'une défaillance
ou un dysfonctionnement du electronic pressure
transducer risque de provoquer des blessures ou
d'endommager l'équipement contrôlé ou un autre
équipement, la conception du système de contrôle
doit intégrer des dispositifs de protection
supplémentaires. Veiller dans ce cas à intégrer de
façon permanente d'autres dispositifs, tels que des
systèmes de supervision ou d'alarme, ou des
dispositifs de sécurité ou de limitation, ayant une
fonction d'avertissement ou de protection en cas de
défaillance ou de dysfonctionnement du electronic
pressure transducer.
P499 Electronic Pressure Transducers provide several
output options:
•
0.5 to 4.5 VDC ratiometric
•
0 to 10 VDC
•
4 to 20 mA
Typical applications include:
•
HVAC and refrigeration applications
•
chillers
•
fan speed controls
•
pumps and compressors
•
agricultural applications
•
industrial process control
Operation
Pressure applied to the P499 transducer acts on a
piezoresistive strain gauge, which is bonded with hightemperature glass onto a stainless steel diaphragm.
The strain gauge translates media pressure into an
electrical signal. An Application-Specific Integrated
Circuit (ASIC) conditions and amplifies the signal. The
output signal varies in direct linear proportion to the
sensed pressure.
Dimensions
See wire harness
ordering information.
FIG:P499dimen
Application
Packard Connector Plug
with Wire Harness
o
1/4 in. SAE 45 Flare Internal Thread
(7/16-20 UNF) with Depressor (Style 47)
2-11/16
(69)
1/2
(12)
Pressure connections are available in two standard
styles:
•
1/4 in. SAE 45° flare (7/16-20 UNF) internal thread
fitting with Schrader® valve depressor (Style 47)
•
1/8-27 NPT external thread fitting (Style 49)
Contact your local Johnson Controls/PENN®
representative for more information on options
available for high-volume orders with specific
application requirements, including 316L stainless steel
construction and pressure ranges up to
1,764 psi (120 bar).
2
5/16
Maximum
(8)
7/8 Hex
(22)
1/8 in. 27 NPT External Thread (Style 49)
Note: Transducer shown with Packard connectors.
Figure 2: Dimensions for P499 Electronic
Pressure Transducers and Wire Harness with
Packard Connectors, in. (mm)
P499 Series Electronic Pressure Transducers Product/Technical Bulletin
Installation
IMPORTANT: Locate pressure tap points on the
top side of the refrigerant lines to reduce risk of
equipment damage or malfunction caused by
accumulation of oil, liquids, or sediment in the
pressure chamber.
See Mounting and Wiring for information on installing
the P499 Series Electronic Pressure Transducers.
Parts Required
P499 transducers require wire harnesses for all models
that do not have an integral cable. Use Table 2 to
select a wire harness.
IMPORTANT: Avoid severe pressure pulsations on
high-side pressure connections by positioning the
transducer away from compressor discharge.
Table 2: Wire Harnesses with Packard
Connectors
Product Code Number1
Length
WHA-PKD3-200C
6-1/2 ft (2.0 m)
WHA-PKD3-400C
13 ft (4.0 m)
WHA-PKD3-600C
19-5/8 ft (6.0 m)
1.
Wire harnesses for P399 transducers and
P499 transducers are interchangeable.
To mount the P499 transducer:
1. Hand thread the P499 transducer to the pressure
tap point.
2. Tighten the connection using the wrench flats
provided to avoid damaging the transducer.
3. Perform a leak test on fittings and connections
before putting the system into operation.
Wiring
Mounting
The P499 transducer mounts directly to most
refrigeration equipment pressure tap ports.
!
CAUTION: Risk of Property Damage.
Mount the pressure control separately from
the electrical cabinet and seal all electrical
piping to prevent ammonia from migrating
to electrical components. Where there may
be exposure to ammonia, use only
ammonia-compatible control modules and
pressure connections. System shutdown
due to improper adjustment may cause
property damage.
MISE EN GARDE : Risque de dégâts
matériels.
Installer le régulateur de pression
séparément de l'armoire électrique et
étanchéifier tous les conduits électriques
afin d'éviter que de l'ammoniac n'entre en
contact avec des composants électriques.
En cas d'exposition potentielle à de
l'ammoniac, utiliser uniquement des
modules de régulation et des raccords de
pression compatibles avec la présence
d'ammoniac.- L'arrêt du système en raison
d'un réglage inapproprié risque de
provoquer des dégâts matériels.
IMPORTANT: When installing the
P499 transducers, observe all regulations governing
the handling and containment of hazardous or
regulated materials (refrigerants or lubricants).
!
CAUTION: Risk of Electric Shock.
Disconnect the power supply before
making electrical connections to avoid
electric shock.
MISE EN GARDE : Risque de décharge
électrique.
Débrancher l'alimentation avant de
réaliser tout raccordement électrique afin
d'éviter tout risque de décharge
électrique.
Follow the wiring guidelines given to avoid causing
damage to the P499 transducer and improper
equipment operation:
•
Ensure wiring conforms to the National Electrical
Code and local regulations.
•
Do not apply more than the maximum supply
voltage to the transducer. See Technical
Specifications.
•
Do not extend the wiring harness leads more than
250 ft (76 m). Use 22 AWG, 3-wire, shielded cable
to extend wiring harness leads.
•
Do not run low-voltage cable in conduit or wiring
troughs with high-voltage wires.
•
Ensure that the shielded cable is terminated
according to code and the control’s instructions.
P499 Series Electronic Pressure Transducers Product/Technical Bulletin
3
P499 transducers are UL Recognized for use in
Class I, Division 2 hazardous locations. Follow these
additional guidelines when wiring or servicing a
P499 transducer in a hazardous location.
•
P499 Series Pressure Transducer models do not
have provisions for field wiring. They are suitable
for factory installation only. P499 transducers must
be installed in a suitable enclosure.
!
WARNING: Risk of Explosion or Fire.
Do not disconnect the P499 Series
Electronic Pressure Transducer while its
circuit is energized, unless the area is
known to be nonhazardous. Disconnecting
the electronic pressure transducer in a
hazardous area while its electrical circuit is
energized may result in an explosion or fire,
and may cause serious injury or death.
AVERTISSEMENT : Risque de
explosion ou incendie.
Ne pas déconnecter le P499 Series
Electronic Pressure Transducer lorsque
son circuit est sous tension, sauf s'il est
avéré que la zone est non dangereuse. La
déconnexion du electronic pressure
transducer dans une zone dangereuse
alors que son circuit électrique est sous
tension risque d'entraîner une explosion ou
un incendie et de provoquer des blessures
graves, voire mortelles.
Figure 3 shows the wire designations for a P499
transducer used in 0.5 to 4.5 VDC and 0 to 10 VDC
applications.
Figure 4 shows the wire designations for a P499
transducer used in 4 to 20 mA applications.
Red Wire = Supply (+)
Black Wire = Output (-)
White Wire = Not Used
P499 Transducer
for 4 to 20 mA
Applications
Connect cable shield lead at one point only; typically
to Common (or ground) at the control.
Note: The white wire is not used with 4 to 20 mA
transducer models. Isolate and insulate the
white wire in 4 to 20 mA transducer applications.
Figure 4: Wire Designations for 4 to 20 mA
Transducer Applications
Figure 5 shows the wire colors for the wire terminations
in the Packard connector plug.
Red Wire
Termination
Black Wire
Termination
White Wire
Termination
Figure 5: Wire Terminations by Wire Color at
Packard Connector Plug on Wire Harness
Figure 6 show the pins in the Packard connector
socket on the P499 transducer and the associated wire
color the pins are connected to when the Packard
connector plug is connected to the socket.
Red Wire = Supply (+)
White Wire = Output
P499 Transducer
for 0.5 to 4.5 VDC
and 0 to 10 VDC
Applications
FIG:p499_vdc_wires
Red Wire
Termination
Black Wire = Common (-)
Connect cable shield lead at one point only; typically
to Common (or ground) at the control.
Black Wire
Termination
White Wire
Termination
Figure 6: Pin Terminations at P499 Packard
Connector Socket by Wire Color
Figure 3: Wire Designations for 0.5 to 4.5 VDC
and 0 to 10 VDC Transducer Applications
4
FIG:p499_4-20ma_wires
Wiring in Hazardous Locations
P499 Series Electronic Pressure Transducers Product/Technical Bulletin
IMPORTANT: The P499 transducer is a precision
sensing device and testing accuracy is typically
beyond the capability of field diagnostic tools.
Before applying power, check all wiring connections.
After applying power, operate controlled equipment
under normal conditions and use a reliable set of
pressure gauges to verify that the transducer and the
associated control are operating properly.
0.5 to 4.5 VDC Ratiometric Versions
The ratiometric versions of the P499 transducer
receive a constant 5 VDC (nominal) supply voltage and
vary the output signal voltage, based on the sensed
pressure. The output voltage varies from 10% to 90%
of the supply voltage, providing a 0.5 to 4.5 VDC
(nominal) signal.
IMPORTANT: The 0.5 to 4.5 VDC Ratiometric
Transducers are rated for 5.0 ±0.25 VDC, Safety
Extra-Low Voltage (SELV) or Class 2. Exceeding the
supply voltage rating can damage the transducer
and void any warranties.
To verify that the transducer is working properly:
1. With the transducer in place and the controlled
system pressure stabilized, measure the pressure
at the transducer with an accurate and reliable
gauge. This is the measured pressure (P).
2. Determine the maximum (Pmax) and minimum
(Pmin) pressure values for the transducer’s
pressure range. (See Table 3, Table 4, or Table 5.)
3. Measure the voltage between Supply (red) wire
and Common (black) wire. (See Figure 3.) Use this
in Step 3 as the measured supply voltage, Vs.
4. Use the equation in Figure 7 to determine the
calculated output voltage for the ratiometric
transducer.
P - (Pmin)
Vo = Calculated Output Voltage
Vs = Measured Supply Voltage
P = Measured Pressure
Pmax = Maximum Pressure Value
Pmin = Minimum Pressure Value
)] VDC
FIG:idl_ratiometric
Vo = Vs [0.1 + 0.8 (
5. Using your multimeter, measure the DC voltage
between the transducer Output (white) wire and
Common (black) wire. (See Figure 3.) This is the
measured output voltage.
6. Compare the calculated output voltage (Step 4)
and the measured output voltage (Step 5). If the
measured output voltage differs greatly from the
calculated output voltage, replace the transducer.
Note: It is normal for the transducer reading to differ
somewhat from pressure gauge readings due to
voltmeter and gauge tolerances, and other factors.
0 to 10 VDC Versions
To verify that the transducer is working properly:
1. With the transducer in place and the controlled
system pressure stabilized, measure the pressure
at the transducer with an accurate and reliable
gauge. This is the measured pressure (P).
2. Determine the maximum (Pmax) and minimum
(Pmin) pressure values for the transducer’s
pressure range. (See Table 6.)
3. Use the equation in Figure 8 to determine the
calculated output voltage for the 0 to 10 VDC
transducers.
Vo = 10 (
P - (Pmin)
) VDC
Vo = Calculated Output Voltage
P = Measured Pressure
Pmax = Maximum Pressure Value
Pmin = Minimum Pressure Value
FIG:idl_10V
Checking Transducer Operation
Figure 8: Voltage Calculation for 0 to 10 VDC
Transducers
4. Measure the voltage between the transducer
Output (white) wire and Common (black) wire with
a multimeter set to measure DC voltage. (See
Figure 3.) This is the measured output voltage.
5. Compare the calculated output voltage (Step 3)
and the measured output voltage (Step 4). If the
measured output voltage differs greatly from the
calculated output voltage, replace the transducer.
Note: It is normal for the transducer reading to differ
somewhat from pressure gauge readings due to
voltmeter and gauge tolerances, and other factors.
Figure 7: Voltage Calculation for 0.5 to 4.5 VDC
Ratiometric Transducers
P499 Series Electronic Pressure Transducers Product/Technical Bulletin
5
4 to 20 mA Versions
To verify that the transducer is working properly:
1. With the transducer in place and the controlled
system pressure stabilized, measure the pressure
at the transducer with an accurate and reliable
gauge. This is the measured pressure (P).
2. Determine the maximum (Pmax) and minimum
(Pmin) pressure values for the transducer’s
pressure range. (See Table 7.)
3. Use the equation in Figure 9 to determine the
calculated output current for the 4 to 20 mA
transducers.
(
P - (Pmin)
) mA
I = Calculated Output Current
P = Measured Pressure
Pmax = Maximum Pressure Value
Pmin = Minimum Pressure Value
FIG:idl_mA
I = 4 + 16
Figure 9: Current Calculation for 4 to 20 mA
Transducers
4. Measure the P499 transducer output current. To
measure the P499 Output current: Disconnect the
P499 Output (black) wire from the control input
terminal. Set your multimeter to milliamperes (mA).
Then connect the multimeter’s red test-lead to the
P499 Output (black) wire and the multimeter’s
black test-lead to the control input terminal. The
milliamperes (mA) reading on your multimeter is
the measured output current.
6
5. Compare the calculated output current (Step 3) to
the measured output current (Step 4). If the current
from measured output current differs greatly from
the calculated output current, replace the
transducer.
Note: It is normal for the transducer reading to differ
somewhat from pressure gauge readings due to
multimeter and gauge tolerances, and other factors.
Repair Information
Do not attempt to repair or recalibrate the P499 Series
Electronic Pressure Transducers. If a transducer does
not perform according to specifications, contact your
nearest Johnson Controls/PENN authorized distributor
or sales representative for a replacement.
Ordering
Figure 10 is a type identification matrix that identifies all
of the potential P499 Series electronic pressure
transducer types and product code numbers.
Note: Not all of the product code number
combinations (transducer types) that are possible in
Figure 10 are manufactured or available.
Contact your local Johnson Controls/PENN
representative for more information on options
available for high-volume models with specific
application requirements.
Table 3 through Table 7 provide ordering information
for standard P499 transducer models available through
most Johnson Controls/PENN authorized distributors.
See Table 2 on page 3 for ordering information for wire
harnesses with Packard connectors.
P499 Series Electronic Pressure Transducers Product/Technical Bulletin
Transducer Base Number
P499
Output Signal
A 4 to 20 mA
B 0 to 5 VDC
C 1 to 5 VDC
R 0.5 to 4.5 VDC
Ratiometric
V 0 to 10 VDC
Pressure Range
100 -10 to 100 psi
101 0 to 100 psi
102 0 to 200 psi
105 0 to 500 psi
107 0 to 750 psi
Packaging
C Individual
D Bulk
K Kit: transducer, cable, and literature
Pressure Mode
- Gauge
A Absolute (0.75% Accuracy)
S Sealed Gauge (0.75% Accuracy)
Pressure Connection
A 1/8 in. 27 NPT External Thread (Style 49)
B 1/4 in. SAE 45o Flare External Thread
o
C 1/4 in. SAE 45 Flare Internal Thread (7/16-20 UNF) with Depressor (Style 47)
D 1/4 in. 18 NPT External Thread
E 1/2 in. 20 UNF-2A SAE External Thread with O-ring
F 1/4 in. 18 NPTF External Thread
G M16 x 1.5 Ermeto External Thread
FIG:p499_order_matrix
Electrical Connection
A AMP (compatible with 174357-2 and 174358-7 connectors)
C Cable - Unshielded
H Hirschmann Form C with mating cable socket (DIN43650)
J Hirschmann Form A without mating cable socket (DIN43650)
P Packard
S Cable - Shielded
Figure 10: P499 Series Electronic Pressure Transducer Type Identification Matrix
Table 3: 0.5 to 4.5 VDC Ratiometric P499 Transducer Models with Packard Electrical Connections, PSIG
Product Code
Number
Pressure Connection
P499RAP-101C
1/8 in. 27 NPT External Thread (Style 49)
Pressure Range
Individual
or Kit1
Minimum
Pressure
(Pmin)
Maximum
Pressure
(Pmax)
0 psig (0 bar)
100 psig
(6.9 bar)
Individual
P499RAP-102C
0 psig (0 bar)
200 psig
(13.8 bar)
Individual
P499RAP-105C
0 psig (0 bar)
500 psig
(34.5 bar)
Individual
750 psig
(51.7 bar)
Individual
100 psig
(6.9 bar)
Individual
500 psig
(34.5 bar)
Individual
750 psig
(51.7 bar)
Individual
P499RAP-101K
P499RAP-105K
P499RAP-107C
0 psig (0 bar)
P499RAP-107K
P499RCP-101C
P499RCP-101K
1/4 in. SAE 45 Flare Internal Thread (7/16-20 UNF)
with Depressor (Style 47)
P499RCP-105C
0 psig (0 bar)
0 psig (0 bar)
P499RCP-105K
P499RCP-107C
P499RCP-107K
1.
0 psig (0 bar)
Kit
Kit
Kit
Kit
Kit
Kit
The Individual pack comes with a transducer only - you must order the wire harness separately (see Table 2). The Kit is
packaged with a transducer, 6-1/2 ft (2 m) wire harness, and technical documentation.
P499 Series Electronic Pressure Transducers Product/Technical Bulletin
7
Table 4: 0.5 to 4.5 VDC Ratiometric P499 Transducer Models with Packard Electrical Connections, PSIS
Product Code
Number
Pressure Connection
P499RAPS100C
1/8 in. 27 NPT External Thread (Style 49)
P499RAPS100K
P499RAPS102C
Pressure Range1
Minimum
Pressure
(Pmin)
Maximum
Pressure
(Pmax)
-10 psis
(-0.7 bar)
[20 in. Hg]
100 psis
(6.9 bar)
Individual
0 psis (0 bar)
200 psis
(13.8 bar)
Individual
-10 psis
(-0.7 bar)
[20 in. Hg]
100 psis
(6.9 bar)
Individual
0 psis (0 bar)
200 psis
(13.8 bar)
Individual
P499RAPS102K
P499RCPS100C
P499RCPS100K
1/4 in. SAE 45 Flare Internal Thread (7/16-20 UNF)
with Depressor (Style 47)
P499RCPS102C
P499RCPS102K
1.
2.
Individual
or Kit2
Kit
Kit
Kit
Kit
Transducer sealed and rated for IP67 harsh environments.
The Individual pack comes with a transducer only - you must order the wire harness separately (see Table 2). The Kit is
packaged with a transducer, 6-1/2 ft (2 m) wire harness, and technical documentation.
Table 5: 0.5 to 4.5 VDC Ratiometric P499 Transducer Models with Integral 2 m (6-1/2 ft) Shielded Cable,
PSIS
Product Code
Number
Pressure Connection
P499RCSS101C
1/4 in. SAE 45 Flare Internal Thread (7/16-20 UNF) with
Depressor (Style 47)
1.
Pressure Range1
Minimum
Pressure (Pmin)
Maximum
Pressure (Pmax)
0 psis (0 bar)
100 psis (6.9 bar)
Transducer sealed and rated for IP67 harsh environments.
Table 6: 0 to 10 VDC P499 Transducer Models with Packard Electrical Connections, PSIG
Product Code
Number
Pressure Connection
P499VAP-101C
1/8 in. 27 NPT External Thread (Style 49)
P499VAP-101K
P499VAP-105C
P499VAP-105K
P499VAP-107C
P499VAP-107K
P499VCP-101C
P499VCP-101K
P499VCP-105C
P499VCP-105K
P499VCP-107C
P499VCP-107K
1.
8
1/4 in. SAE 45 Flare Internal Thread (7/16-20 UNF) with
Depressor (Style 47)
Pressure Range
Individual
or Kit1
Minimum
Pressure
(Pmin)
Maximum
Pressure
(Pmax)
0 psig
(0 bar)
100 psig
(6.9 bar)
Individual
0 psig
(0 bar)
500 psig
(34.5 bar)
Individual
0 psig
(0 bar)
750 psig
(51.7 bar)
Individual
0 psig
(0 bar)
100 psig
(6.9 bar)
Individual
0 psig
(0 bar)
500 psig
(34.5 bar)
Individual
0 psig
(0 bar)
750 psig
(51.7 bar)
Individual
Kit
Kit
Kit
Kit
Kit
Kit
The Individual pack comes with a transducer only, you must order the wire harness separately (see Table 2). The Kit is
packaged with a transducer, 6-1/2 ft (2 m) wire harness, and technical documentation.
P499 Series Electronic Pressure Transducers Product/Technical Bulletin
Table 7: 4 to 20 mA P499 Transducer Models with Packard Electrical Connections, PSIG
Product Code
Number
Pressure Connection
Pressure Range
P499AAP-101C
1/8 in. 27 NPT External Thread (Style 49)
P499AAP-101K
P499AAP-105C
P499AAP-105K
P499AAP-107C
P499AAP-107K
P499ACP-101C
P499ACP-101K
1/4 in. SAE 45 Flare Internal Thread (7/16-20 UNF) with
Depressor (Style 47)
P499ACP-105C
P499ACP-105K
P499ACP-107C
P499ACP-107K
1.
Individual
or Kit1
Minimum
Pressure
(Pmin)
Maximum
Pressure
(Pmax)
0 psig
(0 bar)
100 psig
(6.9 bar)
Individual
0 psig
(0 bar)
500 psig
(34.5 bar)
Individual
0 psig
(0 bar)
750 psig
(51.7 bar)
Individual
0 psig
(0 bar)
100 psig
(6.9 bar)
Individual
0 psig
(0 bar)
500 psig
(34.5 bar)
Individual
0 psig
(0 bar)
750 psig
(51.7 bar)
Individual
Kit
Kit
Kit
Kit
Kit
Kit
The Individual pack comes with a transducer only, you must order the wire harness separately (see Table 2). The Kit is
packaged with a transducer, 6-1/2 ft (2 m) wire harness, and technical documentation.
Technical Specifications
P499 Series Electronic Pressure Transducers (Part 1 of 2)
Pressure Ranges
-10 to 100 psi, 0 to 100 psi, 0 to 200 psi, 0 to 500 psi, 0 to 750 psi
Maximum Working Pressure
2x Pressure Range; short duration; infrequent, abnormal condition
Burst Pressure
5x Pressure Range
Vacuum
30 microns (0.03 mm Hg); short term
Media Compatibility
All media compatible with 17-4PH stainless steel, including ammonia
Output Signal
0.5 to 4.5 VDC, 0 to 10 VDC, or 4 to 20 mA
Supply Voltage
0.5 to 4.5 VDC
Ratiometric Output
5.0 ±0.25 VDC, Safety Extra-Low Voltage (SELV) or Class 2
4 to 20 mA Output
9 to 30 VDC, SELV or Class 2
0 to 10 VDC Output
12 to 30 VDC, SELV or Class 2
Direct-Mount Pressure Connections
1/8in. -27 NPT External Thread (Style 49),
1/4 in. SAE 45 Flare Internal Thread (7/16-20 UNF) with Depressor (Style 47)
Temperature and
Humidity
Storage
-40 to 257F (-40 to 125C)
Operating
-40 to 185F (-40 to 85C)
Compensated Range
-4 to 185F (-20 to 85C)
Humidity
0 to 100% RH
Linearity
±0.25% Full Span Best Fit Straight Line
Accuracy
±1% Full Span (maximum) over compensated temperature range
Materials
Pressure Port
17-4PH stainless steel construction
Packard Connector
40% glass-filled Polyetherimide (PEI)
Vibration
20G, 20 to 200 Hz
Shock
200G / 11 ms
P499 Series Electronic Pressure Transducers Product/Technical Bulletin
9
P499 Series Electronic Pressure Transducers (Part 2 of 2)
Compliance
United States
UL Listed, File E29374, CCN NKPZ
UL Recognized for Use in Class I, Division 2 Hazardous Locations,
File E322274
Canada
UL Listed, File E29374, CCN NKPZ7
UL Recognized for Use in Class I, Division 2 Hazardous Locations,
File E322274
Europe
CE Mark – Johnson Controls, Inc., declares that this product is in compliance
with the essential requirements and other relevant provisions of the
EMC Directive 2004/108/EC
Australia/
New Zealand
C-Tick Mark, Emissions Compliant
The performance specifications are nominal and conform to acceptable industry standards. For application at conditions beyond these
specifications, consult Johnson Controls/PENN Refrigeration Application Engineering at 1-800-275-5676. Johnson Controls, Inc. shall not be
liable for damages resulting from misapplication or misuse of its products.
Building Efficiency
507 E. Michigan Street, Milwaukee, WI 53202
® Johnson Controls and PENN are registered trademarks of Johnson Controls, Inc. in the
United States of America and/or other countries. All other trademarks used herein are the property
of their respective owners. © Copyright 2015 by Johnson Controls, Inc. All rights reserved.
10
P499 Series Electronic Pressure Transducers Product/Technical Bulletin
Published in U.S.A.
www.johnsoncontrols.com

