Measurements of large optical surfaces with a laser tracker
Tom L. Zobrista, James H. Burgea,b, Warren B. Davisonb, Hubert M. Martinb
aCollege
of Optical Sciences, University of Arizona, Tucson, AZ 85721, USA
bSteward Observatory, University of Arizona, Tucson, AZ 85721, USA
GMT
Surface measurements represent a significant part of the cost for manufacturing large aspheric optics. Both polished and rough
Laser Tracker
ground surfaces must be measured with high precision and spatial resolution. We have developed a system that couples a
A laser tracker is a commercial device that measures the position
of a retroreflector in 3 dimensions by using a distance-measuring
interferometer (DMI) and two angular encoders. It is sensitive
to sub-micron displacements in the radial direction, and the
encoder accuracy is on the order of 1 arcsecond. It is capable of
measuring a mirror surface to sub-micron accuracy if the tracker
is located at the center of curvature, so angular errors do not
affect the surface measurement, and if rigid-body motion of the
mirror and tracker can be controlled during the course of the
measurement.
commercial laser tracker with an advanced calibration technique and a system of external references. This system was built to
measure the off-axis primary mirror segments for the Giant Magellan Telescope where it will guide loose abrasive grinding and
initial polishing. The system is further expected to corroborate the optical interferometric tests of the completed mirrors, in
several low-order aberrations. The design, analysis, calibration, and measured performance of this system will be presented.
A straightforward measurement of an optical surface with a commercial laser tracker at a distance of 22 m is expected to give an accuracy of 5-10 μm
rms per sample point. We have made two enhancements to the laser tracker measurements that should improve the accuracy by a significant factor. The
first is the addition of stability references in the form of distance-measuring interferometers staring at fixed retroreflectors at the edge of the mirror. Part
of each reference beam is also reflected to a position sensing detector that measures lateral displacement of the interferometer beam relative to the
mirror. The second improvement is a calibration of the tracker in a geometry that matches the measurement geometry used for testing our mirrors.
Laser Tracker Custom Calibration
SMR: (sphere-mounted
retroreflector)
Laser Tracker &
Interferometers
Laser Tracker
Laser and Remote Receivers
PSD
0.030
Radial Calibration
0.020
0.010
0.000
-0.010
-0.020
-0.030
-0.040
-0.050
We calibrate the measurement of radial displacement by measuring
a small reference sphere from its center of curvature. The
measurement is insensitive to angular errors, allowing a
determination of the repeatable portion of the radial error. A
150 mm diameter f / 1.6 spherical mirror was selected, covering a
larger solid angle than the f / 2.6 cone that an 8.4 m mirror
subtends from the tracker. Additionally, the size of the mirror
allows it to be installed for in situ calibration of the laser tracker
while it is mounted in the tower.
Zernike Coefficient
The RMS error introduced into each Zernike polynomial due to the radial
errors in the laser tracker. The plot is based on 30 separate measurements
of the surface, where the curve represents the mean for each Zernike
coefficient and the error bars represent the uncertainty given an average of
any 5 of the 30 measurements. The magnitude of the error bar is ± s/√ 5.
Retroreflector for interferometer
and PSD (position sensing detector)
Assemblies in 4 places at edge of mirror
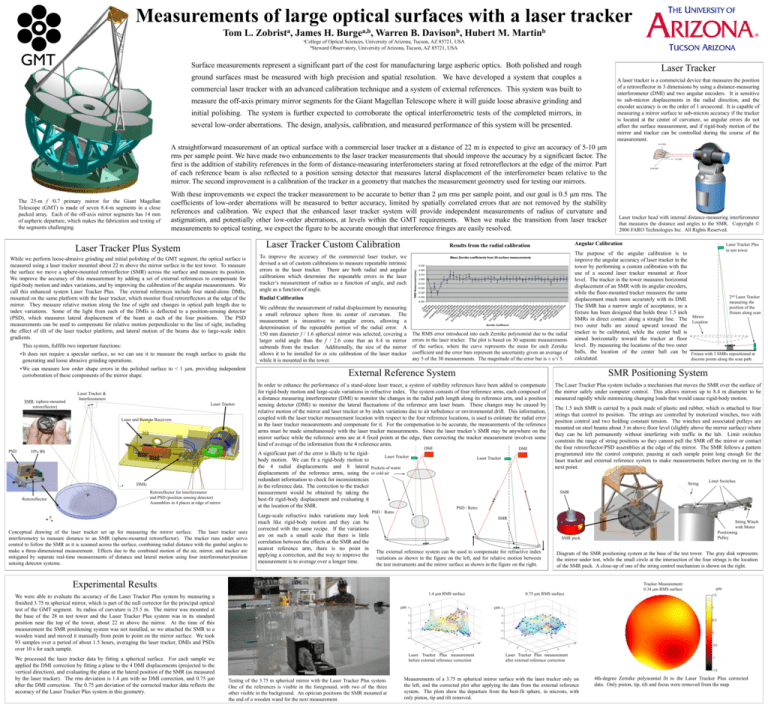
Conceptual drawing of the laser tracker set up for measuring the mirror surface. The laser tracker uses
interferometry to measure distance to an SMR (sphere-mounted retroreflector). The tracker runs under servo
control to follow the SMR as it is scanned across the surface, combining radial distance with the gimbal angles to
make a three-dimensional measurement. Effects due to the combined motion of the air, mirror, and tracker are
mitigated by separate real-time measurements of distance and lateral motion using four interferometer/position
sensing detector systems.
Mirror
Location
Fixture with 3 SMRs repositioned at
discrete points along the scan path.
In order to enhance the performance of a stand-alone laser tracer, a system of stability references have been added to compensate
for rigid-body motion and large-scale variations in refractive index. The system consists of four reference arms, each composed of
a distance measuring interferometer (DMI) to monitor the changes in the radial path length along its reference arm, and a position
sensing detector (DMI) to monitor the lateral fluctuations of the reference arm laser beam. These changes may be caused by
relative motion of the mirror and laser tracker or by index variations due to air turbulence or environmental drift. This information,
coupled with the laser tracker measurement location with respect to the four reference locations, is used to estimate the radial error
in the laser tracker measurements and compensate for it. For the compensation to be accurate, the measurements of the reference
arms must be made simultaneously with the laser tracker measurements. Since the laser tracker’s SMR may be anywhere on the
mirror surface while the reference arms are at 4 fixed points at the edge, then correcting the tracker measurement involves some
kind of average of the information from the 4 reference arms.
The Laser Tracker Plus system includes a mechanism that moves the SMR over the surface of
the mirror safely under computer control. This allows mirrors up to 8.4 m diameter to be
measured rapidly while minimizing changing loads that would cause rigid-body motion.
Large-scale refractive index variations may look
much like rigid-body motion and they can be
corrected with the same recipe. If the variations
are on such a small scale that there is little
correlation between the effects at the SMR and the
nearest reference arm, there is no point in
applying a correction, and the way to improve the
measurement is to average over a longer time.
DMI
Laser Tracker
Laser Tracker
Pockets of warm
or cold air
The 1.5 inch SMR is carried by a puck made of plastic and rubber, which is attached to four
strings that control its position. The strings are controlled by motorized winches, two with
position control and two holding constant tension. The winches and associated pulleys are
mounted on steel beams about 3 m above floor level (slightly above the mirror surface) where
they can be left permanently without interfering with traffic in the lab. Limit switches
constrain the range of string positions so they cannot pull the SMR off the mirror or contact
the four retroreflector/PSD assemblies at the edge of the mirror. The SMR follows a pattern
programmed into the control computer, pausing at each sample point long enough for the
laser tracker and external reference system to make measurements before moving on to the
next point.
String
Limit Switches
SMR
PSD / Retro
PSD / Retro
SMR
String Winch
with Motor
Positioning
Pulley
SMR puck
The external reference system can be used to compensate for refractive index
variations as shown in the figure on the left, and for relative motion between
the test instruments and the mirror surface as shown in the figure on the right.
Diagram of the SMR positioning system at the base of the test tower. The gray disk represents
the mirror under test, while the small circle at the intersection of the four strings is the location
of the SMR puck. A close-up of one of the string control mechanism is shown on the right.
Experimental Results
1.4 mm RMS surface
We were able to evaluate the accuracy of the Laser Tracker Plus system by measuring a
finished 3.75 m spherical mirror, which is part of the null corrector for the principal optical
test of the GMT segment. Its radius of curvature is 25.5 m. The mirror was mounted at
the base of the 28 m test tower and the Laser Tracker Plus system was in its standard
position near the top of the tower, about 22 m above the mirror. At the time of this
measurement the SMR positioning system was not installed, so we attached the SMR to a
wooden wand and moved it manually from point to point on the mirror surface. We took
93 samples over a period of about 1.5 hours, averaging the laser tracker, DMIs and PSDs
over 10 s for each sample.
We processed the laser tracker data by fitting a spherical surface. For each sample we
applied the DMI correction by fitting a plane to the 4 DMI displacements (projected to the
vertical direction), and evaluating the plane at the lateral position of the SMR (as measured
by the laser tracker). The rms deviation is 1.4 μm with no DMI correction, and 0.75 μm
after the DMI correction. The 0.75 μm deviation of the corrected tracker data reflects the
accuracy of the Laser Tracker Plus system in this geometry.
2nd Laser Tracker
measuring the
position of the
fixture along scan
SMR Positioning System
A significant part of the error is likely to be rigidbody motion. We can fit a rigid-body motion to
the 4 radial displacements and 8 lateral
displacements of the reference arms, using the
redundant information to check for inconsistencies
in the reference data. The correction to the tracker
measurement would be obtained by taking the
best-fit rigid-body displacement and evaluating it
at the location of the SMR.
DMIs
The purpose of the angular calibration is to
improve the angular accuracy of laser tracker in the
tower by performing a custom calibration with the
use of a second laser tracker mounted at floor
level. The tracker in the tower measures horizontal
displacement of an SMR with its angular encoders,
while the floor-mounted tracker measures the same
displacement much more accurately with its DMI.
The SMR has a narrow angle of acceptance, so a
fixture has been designed that holds three 1.5 inch
SMRs in direct contact along a straight line. The
two outer balls are aimed upward toward the
tracker to be calibrated, while the center ball is
aimed horizontally toward the tracker at floor
level. By measuring the locations of the two outer
balls, the location of the center ball can be
calculated.
Laser Tracker Plus
in test tower
External Reference System
DMI
10% BS
Retroreflector
Mean Zernike coefficients from 30 surface measurements
T Pi
sti T il t ston
gm il 0at t 90 de g
A
is sti
gm m 0 de g
-d
at
is P e g
Tr m ow
e f 45- er
C oil 0 de g
o
C ma -de
Tr oma 0- g
2n
d T e fo 90 de g
A et il -d
s
2n P tigmr af 30- e g
d r im a oil de
A a ti 0- g
st r sm d
ig y
eg
Te mat Sph 0-d
tr ism e r eg
a
ic
P foi 45 al
2n e nt l 22 -de
d afo .5- g
2n Tr e i l 0 deg
2n d C foil -de
2n d C om 0-d g
d om a 0 e g
T
Pe r ef a 9 deg
nt oil 0-d
af 3 e
3r 2nd He x oi l 0-d g
d T a 18 e g
A e t fo -d
sti ra il eg
3r
gm fo 0-d
d
A 2 ati il 0- eg
2n sti n sm de
d gm d S 0 g
Te a p -d
tr tis he r e g
a m i
H foil 45 c al
e x 2 -d
2
2n He afo .5- e g
d pt il 1 de
P a 5 g
3r ent foi l -de
d af 0- g
T o
3r re il 0 deg
3r d C foil -de
g
3 d C om 0-d
2n rd om a 0 eg
T
d
H P e re f a 9 -de g
e p n oi 0ta taf l 3 de
fo oi 0- g
i l l de
2n O 12. 18-d g
d c ta 857 eg
4t 3rd H ex foil -d
h T a 0 eg
As et fo -d
tig r a il 0 eg
4t
m foi -d
h
at l 0 e g
A
i
3r stig 3rd sm -de
d m S 0- g
T a p d
2n etr ti sm her eg
d afo 4 ica
H
O ex il 22 5-d l
c t af .5 eg
af oi oi l 1 de
l1 5 g
1. -de
25 g
-d
eg
While we perform loose-abrasive grinding and initial polishing of the GMT segment, the optical surface is
measured using a laser tracker mounted about 22 m above the mirror surface in the test tower. To measure
the surface we move a sphere-mounted retroreflector (SMR) across the surface and measure its position.
We improve the accuracy of this measurement by adding a set of external references to compensate for
rigid-body motion and index variations, and by improving the calibration of the angular measurements. We
call this enhanced system Laser Tracker Plus. The external references include four stand-alone DMIs,
mounted on the same platform with the laser tracker, which monitor fixed retroreflectors at the edge of the
mirror. They measure relative motion along the line of sight and changes in optical path length due to
index variations. Some of the light from each of the DMIs is deflected to a position-sensing detector
(PSD), which measures lateral displacement of the beam at each of the four positions. The PSD
measurements can be used to compensate for relative motion perpendicular to the line of sight, including
the effect of tilt of the laser tracker platform, and lateral motion of the beams due to large-scale index
gradients.
This system, fulfills two important functions:
•It does not require a specular surface, so we can use it to measure the rough surface to guide the
generating and loose abrasive grinding operations.
•We can measure low order shape errors in the polished surface to < 1 µm, providing independent
corroboration of these components of the mirror shape.
To improve the accuracy of the commercial laser tracker, we
devised a set of custom calibrations to measure repeatable intrinsic
errors in the laser tracker. There are both radial and angular
calibrations which determine the repeatable errors in the laser
tracker’s measurement of radius as a function of angle, and each
angle as a function of angle.
A
Laser Tracker Plus System
Laser tracker head with internal distance-measuring interferometer
that measures the distance and angles to the SMR. Copyright ©
2006 FARO Technologies Inc. All Rights Reserved.
Angular Calibration
Results from the radial calibration
RMS Measurement [um]
The 25-m f /0.7 primary mirror for the Giant Magellan
Telescope (GMT) is made of seven 8.4-m segments in a close
packed array. Each of the off-axis mirror segments has 14 mm
of aspheric departure, which makes the fabrication and testing of
the segments challenging
With these improvements we expect the tracker measurement to be accurate to better than 2 μm rms per sample point, and our goal is 0.5 μm rms. The
coefficients of low-order aberrations will be measured to better accuracy, limited by spatially correlated errors that are not removed by the stability
references and calibration. We expect that the enhanced laser tracker system will provide independent measurements of radius of curvature and
astigmatism, and potentially other low-order aberrations, at levels within the GMT requirements. When we make the transition from laser tracker
measurements to optical testing, we expect the figure to be accurate enough that interference fringes are easily resolved.
0.75 mm RMS surface
mm
mm
mm
m
Laser Tracker Plus measurement
before external reference correction
Testing of the 3.75 m spherical mirror with the Laser Tracker Plus system.
One of the references is visible in the foreground, with two of the three
other visible in the background. An optician positions the SMR mounted at
the end of a wooden wand for the next measurement.
Tracker Measurement:
0.34 mm RMS surface
m
Laser Tracker Plus measurement
after external reference correction
Measurements of a 3.75 m spherical mirror surface with the laser tracker only on
the left, and the corrected plot after applying the data from the external reference
system. The plots show the departure from the best-fit sphere, in microns, with
only piston, tip and tilt removed.
4th-degree Zernike polynomial fit to the Laser Tracker Plus corrected
data. Only piston, tip, tilt and focus were removed from the map.


