Tables -- Autofit to Contents
advertisement
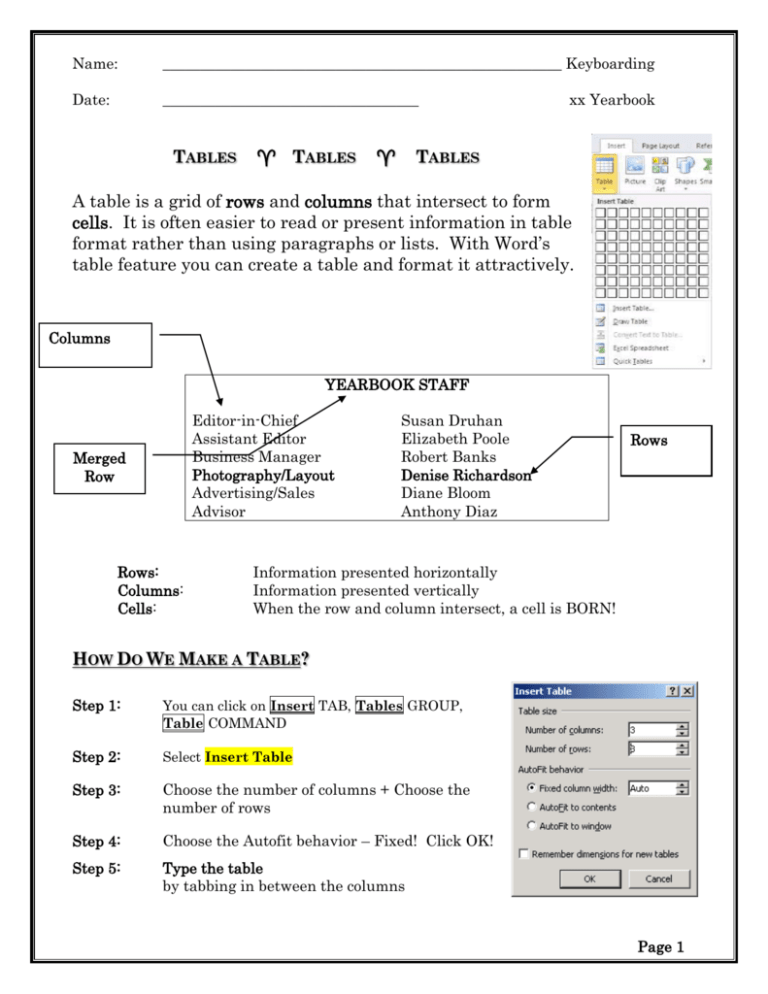
Name: _____________________________________________________ Keyboarding Date: __________________________________ TABLES TABLES xx Yearbook TABLES A table is a grid of rows and columns that intersect to form cells. It is often easier to read or present information in table format rather than using paragraphs or lists. With Word’s table feature you can create a table and format it attractively. Columns YEARBOOK STAFF Editor-in-Chief Assistant Editor Business Manager Photography/Layout Advertising/Sales Advisor Merged Row Rows: Columns: Cells: Susan Druhan Elizabeth Poole Robert Banks Denise Richardson Diane Bloom Anthony Diaz Rows Information presented horizontally Information presented vertically When the row and column intersect, a cell is BORN! HOW DO WE MAKE A TABLE? Step 1: You can click on Insert TAB, Tables GROUP, Table COMMAND Step 2: Select Insert Table Step 3: Choose the number of columns + Choose the number of rows Step 4: Choose the Autofit behavior – Fixed! Click OK! Step 5: Type the table by tabbing in between the columns Page 1 HOW DO WE MOVE AROUND IN A TABLE XX TABLE DEMO Once you create the table, moving around is simple. See below: To Go To: The Next Cell The Previous Cell The Next Row The Previous Row Press: Tab or Right Arrow Shift + Tab or Left Arrow Down Arrow or Tab Up Arrow Open the xx Table Demo below from the classroom server: MY ANIMALS 2014 Colors Animals Age Gold Fish One Brown Bear Five White Rabbit Ten Grey Whale six How many rows do you see? ______________________________ How many columns do you see? ______________________________ What is different about Rows 1 and 2? ______________________________ How is the text justified in the columns? ______________________________ Page 2 Name: _____________________________________________________ Keyboarding Date: __________________________________ TABLES TABLES xx School_Table TABLES A table is a grid comprised of horizontal rows and vertical columns into which you can enter data. Example: Name John Grismer Ashley Leigh Robert Manascalci School Ivy League Northshore Montessori Parkshores Grade Kindergarten Pre-K First Grade Row Column A cell is the point of intersection between a column and a row. This is in rectangular form. A column is a vertical series of cells in a table. A row is the horizontal series of cells in a table. How Do We Create a Table? Try it Now: 1. You can click on Insert TAB, Tables GROUP, Table COMMAND 2. Select Insert Table Enter the number of columns and rows you want – 3 columns and 6 rows 4. 5. 6. 7. Keep Fixed Column Width (which is the default) Enter the data exactly as shown – Font: Times New Roman 12 points. Use tab or arrow keys to move around. Do not Press Enter at the end of the Row – press TAB! NAME Ben Phillippe Tracy Tzounis Nicole Washington Lizzie McGuire Shane Sunil Mrs. Lisa Kropsky TITLE President Vice President Treasurer Secretary Press Secretary Faculty Advisor PHONE NUMBER OOPs! 555-5034 555-7123 555-6999 555-8382 You forgot to create enough 555-8765 rows. Just simply press tab 555-3502 key and a new row will be added at the END. Page 3 How Do We Format the Table? Try it Now: 1. Format the table. You can click on TABLE Select button 2. With the entire table selected, press CTRL D and change your font to Georgia 9. Select just the first row, and change the font to Arial Black 12pts. (Select the first row by positioning your cursor to the left of the first row. The arrow is pointing to the right. Click once.) 10. Save as xx School Table OTHER PARTS OF A TABLE Borders and gridlines By default, tables have a black ½-pt, single-line, solid-line border that will be printed. If you remove this border, you will still see the gridlines that form the cell boundaries. Gridlines are not printed. End marks End-of-cell and end-of-row marks are nonprinting characters that, like gridlines, appear only on the screen. Table move handle and resize handle Use the table move handle to move the table to another place on a page, and use the table resize handle to change the size of a table. DELETE THE TABLE 1. Open xx School Table. 2. Move your cursor in the table until you locate the Table Move Handle. Click once on it. 3. Note the entire table is selected. 4. On the Table Tools tabs, select Layout 5. In the Rows & Columns Group, Click Delete command 6. Select Delete Table This is a quick and easy way to delete an entire table. 7. Press Ctrl Z to undo it. Page 4 INSERT CELLS, COLUMNS AND ROWS 1. With xx School table still opened, let’s practice adding rows to the table. 2. If you want to add a new row at the end, position your cursor in the last cell of the last row and press TAB. 3. If you want to insert a row in the middle, you must a. Select a row, or rows. b. Click on Table Tools, Layout c. In the Rows & Columns Group d. Choose: (Insert Above, Insert Below) Tip: To select a row, use the selection bar on the left side of your screen. Your arrow will be pointing to the right 4. Position your cursor in the row with Ms. Lisa Kropsky and highlight the entire row. 5. Insert two rows ABOVE and add the following text: Chris Russell Public Relations 555-9090 Benjie Feinstein Public Relations 555-7858 6. Select the first column (remember to position your cursor above the first column and wait until you get a solid black down pointing arrow ) and insert a column to the left. In the Layout TAB, Choose the Rows & Columns Group, Choose Insert LEFT 7. Enter the following information in the new column: HR TEACHER Miss Abigail Mr. Torrino Ms. November Mrs. Rolenta Mr. Jobin Mr. Scarieta Miss Lewin FORMAT CELLS, COLUMNS AND ROWS 1. Position your cursor on top of column four—Phone Number. Click once to highlight. 2. Press Ctrl E or click the Center button on the Formatting toolbar. 3. Be careful what text you choose to center. It should look right. Page 5 Name: ________________________________________ Keyboarding Date: __________________________________ xx Table_football Table Feature Create the following using Microsoft Word’s Table Feature. Assignment 1 1. Make sure your left and right margins are set at 1” inch— not 1.25”. Make sure your font is Times New Roman 12 points 2. Click on Insert Table, Choose 2 columns and 4 rows. 3. Keep the Auto FIT behavior set at Fixed Column Width. 4. Type the following using all the presets for now. 5. Use the tab to go to the next cell. New York Giants San Francisco 49er’s Washington Redskins Dallas Cowboys Pittsburgh Steelers New York Jets Miami Dolphins Denver Broncos 5. Highlight both columns using the black down pointing arrow. Select Table Tools, Layout TAB, 6. In the Table Group, choose Properties or Right click and select Table Properties and Select the tab for Column. Change the width of the columns to 2” from the 3.33” setting. 7. 8. 9. New York Giants San Francisco 49er’s Washington Redskins Dallas Cowboys Pittsburgh Steelers New York Jets Miami Dolphins Denver Broncos Page 6 Assignment 2 1. Select the entire table. 2. Click on Table Properties in the LAYOUT tab, stay on the Tables tab and change the horizontal alignment to Center. 3. Highlight row one only. 4. Insert, Row Above. This will give you a new row at the top. Make sure it is now Row One. 5. Highlight the new Row. 6. Click on LAYOUT tab, choose the MERGE group, and choose the MERGE CELLS command. This will make it one cell. 7. Type and center the title text within the cell. Frankie’s Football Picks 8. Make it bold and make the font size bigger 16pts. Change to Monotype Corsiva which is a SCRIPT font. 9. Save. Frankie’s Football Picks New York Giants San Francisco 49er’s Washington Redskins Dallas Cowboys Pittsburgh Steelers New York Jets Miami Dolphins Denver Broncos *** Select the TABLE using the TABLE Select ALL button! *** Pick any one of the Table Styles in the Design Tab. Page 7 Name: ______________________ Keyboarding Date: _______________________ xx Xbox360 Inserting Rows and Columns Directions: 1. Create a table. 3 columns and 5 rows. 2. Enter the data below. Bold and Italicize where shown. Title Developer Mass Effect 2 EA/Bioware Red Dead Redemption Rockstar Gears of War 2 Microsoft Halo: Reach Microsoft Fallout 3 Bethesda Call of Duty 4 Activision 3. Insert one new rows after the Fallout 3 row and add: As Low As $23.44 $36.04 $19.99 $46.04 $13.50 $31.95 a. Fight Night Round 3, EA, $24.97 4. Insert a new column between Developer and As Low As, Insert the following: a. Rating – (Column Heading) Three Stars Four Stars Four Stars Four Stars Three Stars Four Stars Four Stars 5. DoubleClick the border between Col A & B to resize the width of column A. Do the same for the border between Col C & D. Resize column C to make it fit on one line. 6. Change the font of the Column Headings to make it stand out. Bold it too! 7. Change the color of the text in the TITLE column 8. Insert a new row at the top of the table. 9. Merge the cells. Center and type the title in Bauhaus 93 18 pts. X-Box 360 Games Page 8 Name: _____________________________________________ Keyboarding Date: __________________________________ xx Table actress Tables -- Autofit to Contents Assignment Click on INSERT tab, TABLES group, TABLE command. Select Insert Table, Choose 2 columns and 5 rows. Change the AutoFit behavior to AUTOFIT TO CONTENTS Complete the following table. Nana’s Favorite Actresses Demi Moore Jodi Foster Megan Ryan Sandra Bullock Melanie Griffith Meryl Streep Nicole Kidman Julia Roberts Some Tips: 1. Change the font to a sans serif. (Berlin Sans FB) 2. Change the title row to Bold, Centered and MERGED. 3. Center the table horizontally. Nana’s Favorite Actresses Demi Moore Jodi Foster Megan Ryan Sandra Bullock Melanie Griffith Meryl Streep Nicole Kidman Julia Roberts 4. Save as xx Table actress Page 9 Name: _____________________________________ Keyboarding Date: _______________________ xx Schedule TABLES TABLES 1. Create a table. 3 columns and 5 rows. 2. Enter the data below Course Name Location Word 1 Conference Room A Word 2 Conference Room A Excel 3 Conference Room B Intro to the Internet Media Lab 3. Insert two new rows after Word 2 and add: a. Word 3, Conference Room A, 8:30 – 11:45 b. Excel 2, Conference Room B, 3:00 – 4:30 4. TABLES Time 8:30 – 11:45 1:30 – 3:30 8:30 – 11:45 1:30 – 3:30 Insert another new row on top of Course Name a. Merge Cells b. Enter: Fall Semester Schedule 5. Insert a new column between Location and Time, Insert the following: a. Days Monday, Wednesday Monday, Wednesday Tuesday, Thursday Tuesday, Thursday Tuesday, Thursday Monday, Wednesday Friday 6. Adjust the column width according to the text. Make it look NICE! 7. Center all text in Columns B, C, D. 8. Change the font of the Heading and Title to make it stand out. 9. Change the color of the column, TIME; you don’t want to be late for class. HOW DO YOU TAB INSIDE OF A CELL??? Set the Tab first Use Ctrl + TAB Page 10
