File
advertisement
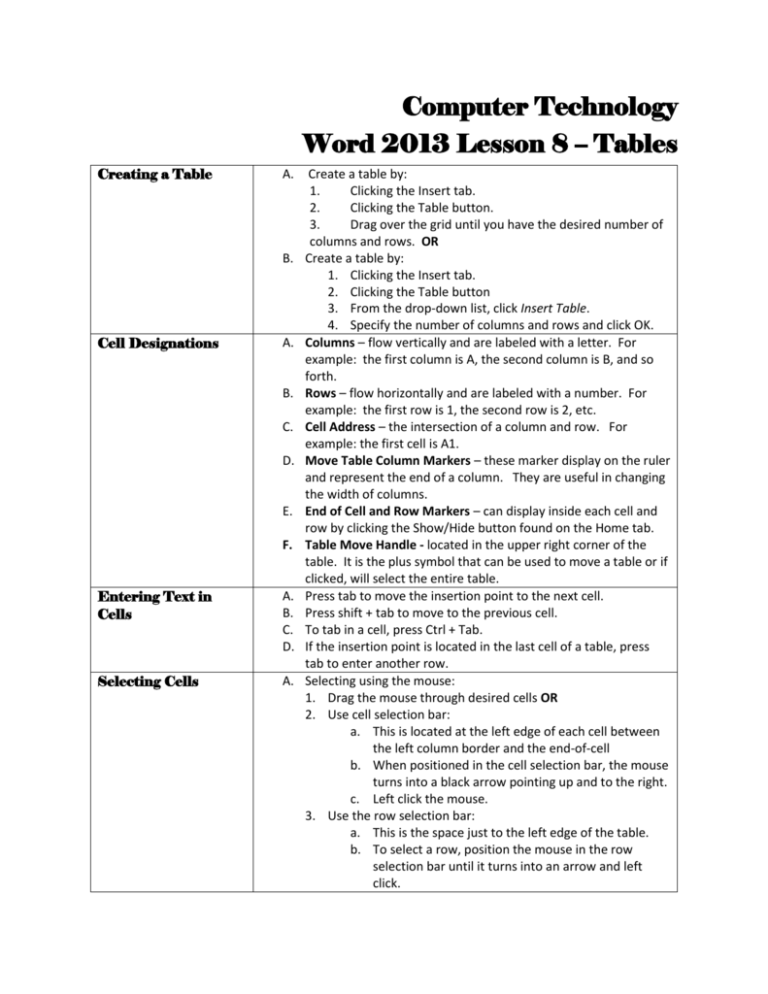
Computer Technology Word 2013 Lesson 8 – Tables Creating a Table A. B. Cell Designations A. B. C. D. E. F. Entering Text in Cells A. B. C. D. Selecting Cells A. Create a table by: 1. Clicking the Insert tab. 2. Clicking the Table button. 3. Drag over the grid until you have the desired number of columns and rows. OR Create a table by: 1. Clicking the Insert tab. 2. Clicking the Table button 3. From the drop-down list, click Insert Table. 4. Specify the number of columns and rows and click OK. Columns – flow vertically and are labeled with a letter. For example: the first column is A, the second column is B, and so forth. Rows – flow horizontally and are labeled with a number. For example: the first row is 1, the second row is 2, etc. Cell Address – the intersection of a column and row. For example: the first cell is A1. Move Table Column Markers – these marker display on the ruler and represent the end of a column. They are useful in changing the width of columns. End of Cell and Row Markers – can display inside each cell and row by clicking the Show/Hide button found on the Home tab. Table Move Handle - located in the upper right corner of the table. It is the plus symbol that can be used to move a table or if clicked, will select the entire table. Press tab to move the insertion point to the next cell. Press shift + tab to move to the previous cell. To tab in a cell, press Ctrl + Tab. If the insertion point is located in the last cell of a table, press tab to enter another row. Selecting using the mouse: 1. Drag the mouse through desired cells OR 2. Use cell selection bar: a. This is located at the left edge of each cell between the left column border and the end-of-cell b. When positioned in the cell selection bar, the mouse turns into a black arrow pointing up and to the right. c. Left click the mouse. 3. Use the row selection bar: a. This is the space just to the left edge of the table. b. To select a row, position the mouse in the row selection bar until it turns into an arrow and left click. Page 2 of 5 Deleting a Table A. B. Changing Column Width A. B. C. D. E. Changing Row Height A. B. 4. You can select a column by positioning the mouse on the uppermost horizontal gridline of the table in the appropriate column. When the mouse turns into a downward arrow, left click to select the column. 5. To select all cells within a table: a. Click the table move handle. To delete text and leave the gridlines: 1. Select the table. 2. Press the delete key. To delete text and gridlines: 1. Select the table. 2. Press the backspace key. Changing column width using the ruler: 1. Position mouse on a move table column marker (looks like a grid) until it turns into a left-and-right pointing arrow. 2. Hold the left mouse button and drag to desired column width. (To get a specific measurement, hold down the Alt Key while dragging.) Changing column width using the mouse: 1. Position mouse on a gridline separating columns until insertion point turns into left-and-right pointing arrow with a vertical double line between. 2. Drag the gridline to desired location. (To get a specific measurement, hold down the Alt Key while dragging.) Changing column width using Cell Size Group Buttons: 1. Position insertion point in column you wish to change the size of. 2. From the Contextual Table Tools tab, click the Layout tab. 3. In the Cell Size group, use the Table Column Width text box to enter the measurement for the cell size. OR 4. Click the Cell Size Quick Launcher, choose the Column tab, and enter in desired measurement in the Preferred Width text box. Double clicking a vertical gridline will automatically size the column to fit the contents. To equally distribute the width of selected columns: 1. Select the columns you want to distribute equally. 2. From the Table Tools Layout tab in the Cells Size group, click the Distribute Columns button. Changing row height using the mouse: 1. Position mouse on a horizontal gridline until it turns into a top-and-down pointing arrow. 2. Hold the left mouse button and drag to desired height. Changing row height using Cell Size Group Buttons: 1. Position insertion point in the row you wish to change the size. Page 3 of 5 C. Aligning Text in Cells A. B. Inserting Rows and Columns C. D. E. F. G. Deleting Cells, Rows, or Columns A. 2. Click the Contextual Table Tools tab and the Layout tab. 3. In the Cell Size group, use the Table Row Height text box to enter the measurement for the row height. OR 4. Click the Cell Size Quick Launcher, choose the Row tab, and enter in desired measurement in the Specify Height text box. To distribute equally the height of selected rows: 1. Select the rows you desire to change the height. 2. From the Table Tools Layout tab in the Cells Size group, click the Distribute Rows button. Use the Alignment group on the Table Tools Layout tab to change the horizontal and vertical alignment of text in cells. Notice there are nine different alignment choices for text. To change the direction of text in a cell: 1. Place your insertion point in the cell. 2. From the Alignment group on the Table Tools Layout tab, click the Text Direction button. A row or column can be inserted by positioning insertion point in the desired row or column, right clicking, selecting Insert, and making desired choices from the side menu. You can insert rows and columns by using Rows & Columns Group buttons: 1. Position insertion point in desired locations. 2. Click the Contextual Table Tools tab and the Layout tab. 3. Use buttons found in the Rows & Columns Group to add Rows and Columns. A row can be inserted at the end of the table by positioning the insertion point in the last cell in the table and pressing the tab key. To insert a row using the row insert icon: 1. Display the insert row icon by positioning the mouse just outside the left border of the table at the desired row border. 2. When the insert row icon displays (looks like a blue plus symbol in a circle with a border line), click the icon and a row is inserted below. To insert a column using the column insert icon: 1. Display the column insert icon by positioning the mouse above desired column directly above a vertical gridline. 2. When the column insert icon appears, click the icon and a new column will insert to the left of the insert column icon border line. You can delete rows or columns by using choices found on the delete button in the Rows and Columns Group: 1. Position insertion point in desired row or column. 2. Click the Contextual Table Tools tab and the Layout tab. 3. Use the delete button options found in the Rows and Columns Group. OR Page 4 of 5 B. You can delete row or columns by right clicking in desired location. From the shortcut menu, choose Delete cells and select desired options. A. Select cells or to be joined. B. Click the Table Tools Layout tab. C. From the Merge Group, click the Merge Cells button Merging Cells OR A. B. A. B. C. Splitting Cells Select cells to be joined and right click. From the shortcut menu, select Merge Cells. Position insertion point in the cells to split. Click the Table Tools Layout tab. From the Merge Group, click the Split Cells button. OR Borders Aligning a Table Horizontally A. Position insertion point in cell to split and right click. B. From the shortcut menu, select Split Cells and make desired choices from the Split Cells dialog box. A. Borders can be customized to selected cells or the entire table. To customize borders using border styles and border painter: 1. From the Borders group found on the Table Tools Design tab, click the Border Styles drop down. 2. Select a Theme border choice. This will activate the Border painter icon. 3. Choose a pen color and a line weight. 4. Using the border painter, click on a border line or drag through multiple border lines to apply formatting. 5. When finished, click the border painter icon to turn it off. B. To customize borders from the borders dialog box: 1. Click the Table Tools tab. 2. Click the Design tab. 3. Make choices using the Borders button drop down located in the Table Styles Group. C. Shading can be added to a table or selected cells: 1. Use choices found in the Borders and Shading dialog box. (Click the Borders drop down. The Borders and Shading option is found at the bottom of the list.) OR 2. Use choices found from the Shading button located in the Table Styles group found in the Table Tools and Design tab. A. By default a table aligns at the left margin. B. To change the horizontal alignment: 1. Select the table and right click. 2. From the Short Cut menu, choose Table Properties. 3. From the Table Properties dialog box, choose the Table tab. 4. Choose an appropriate alignment option such as center or right. OR Page 5 of 5 Table Styles A. Header Row A. B. Quick Tables A. B. 3. From the Table Tools and Table Layout tab, choose the Properties button found in the Table Group. 4. From the Table Properties dialog box, choose the Table tab and choose an appropriate alignment option. Predesigned table style can be used to format a table and add visual interest. To add a table style: 1. Place the insertion point somewhere in the table. 2. Make the Table Tools Design tab active. 3. In the Table Styles Options group, make sure the Header and Banded Rows check boxes are checked and that all other check boxes are unchecked. 4. Click on any of predesigned choice in the Table Styles group. 5. Click the More button that displays at the right side of the Table Styles group to see additional styles. If a table is divided between pages, add a header row to the other pages of the table. This helps the reader identify the topic of the column on each page. To add a header row: a. Click in the header row or select desired rows. b. Click Tables Tools Layout tab. c. From the Data group, click the Repeat Header Rows icon. Quick Tables insert a predesigned table format in a document. To insert at Quick Table: 1. Click the Insert tab. 2. Click the Table button 3. From the drop-down menu, click Quick Tables. 4. Select from the choices given.
