MEM23061A Test Mechanical Engineering Materials
advertisement
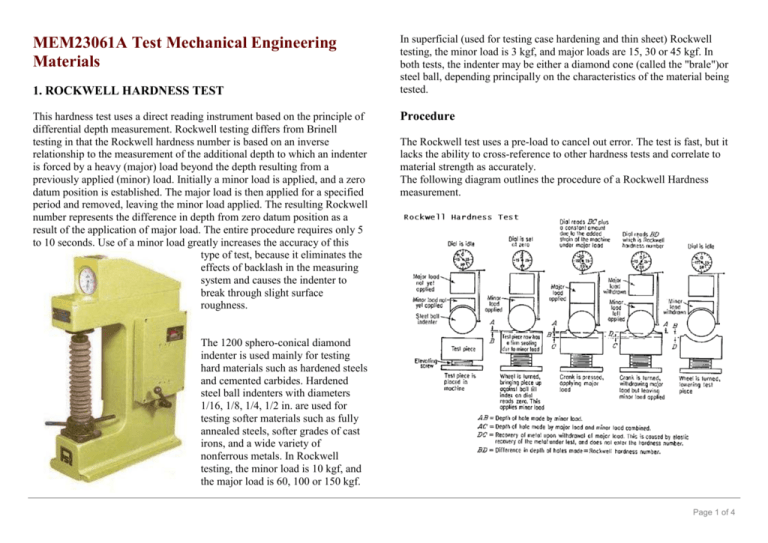
MEM23061A Test Mechanical Engineering Materials 1. ROCKWELL HARDNESS TEST This hardness test uses a direct reading instrument based on the principle of differential depth measurement. Rockwell testing differs from Brinell testing in that the Rockwell hardness number is based on an inverse relationship to the measurement of the additional depth to which an indenter is forced by a heavy (major) load beyond the depth resulting from a previously applied (minor) load. Initially a minor load is applied, and a zero datum position is established. The major load is then applied for a specified period and removed, leaving the minor load applied. The resulting Rockwell number represents the difference in depth from zero datum position as a result of the application of major load. The entire procedure requires only 5 to 10 seconds. Use of a minor load greatly increases the accuracy of this type of test, because it eliminates the effects of backlash in the measuring system and causes the indenter to break through slight surface roughness. In superficial (used for testing case hardening and thin sheet) Rockwell testing, the minor load is 3 kgf, and major loads are 15, 30 or 45 kgf. In both tests, the indenter may be either a diamond cone (called the "brale")or steel ball, depending principally on the characteristics of the material being tested. Procedure The Rockwell test uses a pre-load to cancel out error. The test is fast, but it lacks the ability to cross-reference to other hardness tests and correlate to material strength as accurately. The following diagram outlines the procedure of a Rockwell Hardness measurement. The 1200 sphero-conical diamond indenter is used mainly for testing hard materials such as hardened steels and cemented carbides. Hardened steel ball indenters with diameters 1/16, 1/8, 1/4, 1/2 in. are used for testing softer materials such as fully annealed steels, softer grades of cast irons, and a wide variety of nonferrous metals. In Rockwell testing, the minor load is 10 kgf, and the major load is 60, 100 or 150 kgf. Page 1 of 4 How it Works: The key to the process is the uses of pre-loading and measurements taken before and after the big load is applied. This cancels out elastic effects which includes elasticity in the tester itself, and in the job. The leverage system: also includes a dashpot (damper) to let the load down smoothly. Page 2 of 4 Choosing a Test Location on the Part Rockwell Hardness Scales There are 30 different Rockwell scales, defined by the combination of the indenter and minor and major loads. The majority of applications are covered by the Rockwell C (hard materials) and B (medium materials) scales for testing steel, brass, and other materials. If indentation is placed too close to the edge of specimen, the workpiece edge will bulge, and the hardness number will decrease accordingly. Rockwell Scales and their Applications The distance from the center of the indentation to the edge of the specimen must be at least two and one-half diameters. An indentation hardness test cold works the surrounding material. If another indentation is placed within this cold worked area, the reading usually will be higher than the real value. Generally, the softer the material, the more critical the spacing of indentations becomes. Must also be five diameters from another test location. Specimen thickness must be at least 10 times the indentation depth. Page 3 of 4 Laboratory A selection of parts are to be measured using the Rockwell Hardness tester. Record you results, including any mis-readings and "off-scale" measurements (these occur when the wrong scale is used) 1. Choose the appropriate scale to suit the material to be tested (probably B or C) 2. Check the machine - especially after the indenter has been changed and has not "seated" yet. Use a calibrated block. 3. Select a location for the test (see notes). Remove oil or dirt, but the surface does not need to be polished etc. 4. Make sure the part can be held securely. Use the "V" anvil for round parts. 5. Raise the needle according to instructions 6. Apply the load and wait 7. Remove the load 8. Take a reading. The C scale should be between 20 and 70. A and B scales may be 0 to 100. Report 1. Write a short report on the Rockwell results. Each component must have at least 3 tests, include the part name. The standard way to write Rockwell hardness of 45 on the C scale would be 45 HRC. 2. Using the BRINELL test, an approximate relationship between the hardness and the tensile strength (of steel) is, TS(Mpa)=3.55*HB (HB=<175) else 3.38*HB (HB>175) where HB is the Brinnell Hardness of the material, as measured with a standard indenter and a 3000 kgf load. For Rockwell it is not so simple. Convert the Rockwell numbers to an approximate tensile strength: Link: http://www.unified-eng.com/scitech/hardness/hardness.html Another Hardness conversion link; http://icrank.com/cgibin/pageman/pageout.cgi?path=/data/hardness/hardness.html&t=2 3. Explain how the leverage system works with the aid of a diagram (sketch). Page 4 of 4

