CCNA Security
Chapter 8 Lab C (Optional), Configuring a Remote Access VPN Server
and Client Instructor Version
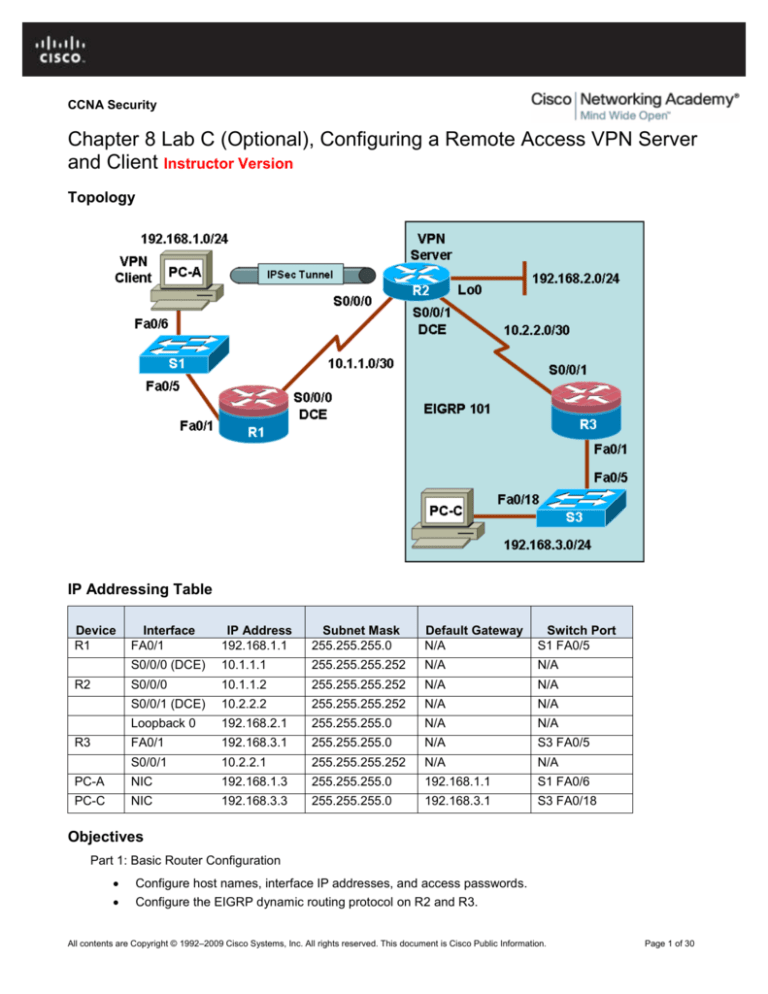
Topology
IP Addressing Table
Device
R1
Interface
FA0/1
IP Address
192.168.1.1
Subnet Mask
255.255.255.0
Default Gateway
N/A
Switch Port
S1 FA0/5
S0/0/0 (DCE)
10.1.1.1
255.255.255.252
N/A
N/A
S0/0/0
10.1.1.2
255.255.255.252
N/A
N/A
S0/0/1 (DCE)
10.2.2.2
255.255.255.252
N/A
N/A
Loopback 0
192.168.2.1
255.255.255.0
N/A
N/A
FA0/1
192.168.3.1
255.255.255.0
N/A
S3 FA0/5
S0/0/1
10.2.2.1
255.255.255.252
N/A
N/A
PC-A
NIC
192.168.1.3
255.255.255.0
192.168.1.1
S1 FA0/6
PC-C
NIC
192.168.3.3
255.255.255.0
192.168.3.1
S3 FA0/18
R2
R3
Objectives
Part 1: Basic Router Configuration
Configure host names, interface IP addresses, and access passwords.
Configure the EIGRP dynamic routing protocol on R2 and R3.
All contents are Copyright © 1992–2009 Cisco Systems, Inc. All rights reserved. This document is Cisco Public Information.
Page 1 of 30
CCNA Security
Part 2: Configuring a Remote Access VPN
Configure a router to support an Easy VPN server using SDM.
Configure the Cisco VPN client on PC-A and connect to R2.
Verify the configuration.
Test VPN functionality.
Background
VPNs can provide a secure method of transmitting data over a public network, such as the Internet. A
common VPN implementation is used for remote access to a corporate office from a telecommuter location
such as a small office or home office (SOHO).
In this lab, you build a multirouter network and configure the routers and hosts. You configure a remote
access IPsec VPN between a client computer and a simulated corporate network. You use SDM to configure
a Cisco Easy VPN server on the corporate edge gateway router and configure the Cisco VPN client on a host.
You then connect to the corporate network through a simulated ISP router.
The Cisco VPN client allows organizations to establish end-to-end, encrypted (IPsec) VPN tunnels for secure
connectivity for mobile employees or teleworkers. It supports Cisco Easy VPN, which allows the client to
receive security policies upon a VPN tunnel connection from the central site VPN device (Cisco Easy VPN
Server), minimizing configuration requirements at the remote location. This is a scalable solution for remote
access deployments where it is impractical to individually configure policies for multiple remote PCs.
Note: The router commands and output in this lab are from a Cisco 1841 with Cisco IOS Release 12.4(20)T
(Advanced IP image). Other routers and Cisco IOS versions can be used. See the Router Interface Summary
table at the end of the lab to determine which interface identifiers to use based on the equipment in the lab.
Depending on the router model and Cisco IOS version, the commands available and output produced might
vary from what is shown in this lab.
Note: Make sure that the routers and the switches have been erased and have no startup configurations.
Instructor Note: Instructions for erasing switches and routers are provided in the Lab Manual, located on
Academy Connection in the Tools section.
Required Resources
3 routers with SDM 2.5 installed (Cisco 1841 with Cisco IOS Release 12.4(20)T1 or comparable)
Note: This lab requires that R2 have a comparable IOS and hardware characteristics to R1 and R2 in
order for it to play the role of the VPN server.
2 switches (Cisco 2960 or comparable)
PC-A (Windows XP or Vista, with Cisco VPN Client)
PC-C (Windows XP or Vista)
Serial and Ethernet cables as shown in the topology
Rollover cables to configure the routers via the console
Instructor Notes:
Host PC-A is connected to R1, which simulates an ISP router. R1 is connected to R2, the corporate edge
gateway router. Router R2 connects to R3 to represent a multirouter internal corporate network. Routers R2 and
R3 are configured with EIGRP. The ISP router, R1, does not participate in the EIGRP process. PC-A is used to
connect to R2 through R1 to configure R2 as a VPN server.
Although switches are shown in the topology, students can omit the switches and use crossover cables between
the PCs and routers R1 and R3.
All contents are Copyright © 1992–2009 Cisco Systems, Inc. All rights reserved. This document is Cisco Public Information.
Page 2 of 30
CCNA Security
The version of the Cisco VPN Client used in this lab is 4.8.02.0010 for use with Windows XP. You must have a
valid CCO account and service contract to download the file.
The basic running configs for all three routers are captured after Part 2 of the lab is completed. All configs are
found at the end of the lab.
Part 1: Basic Router Configuration
In Part 1 of this lab, you set up the network topology and configure basic settings, such as the interface IP
addresses, dynamic routing, device access, and passwords.
Note: Perform all tasks on routers R1, R2, and R3. The procedure for R1 is shown here as an example.
Step 1: Cable the network as shown in the topology.
Attach the devices shown in the topology diagram, and cable as necessary.
Step 2: Configure basic settings for each router.
a. Configure host names as shown in the topology.
b. Configure the physical interface IP addresses as shown in the IP addressing table.
c.
Configure the logical loopback 0 interface on R2. This simulates the network from which the remote
access clients receive addresses (192.168.2.0/24). It is not necessary to use the no shutdown
command because loopback interfaces are up by default.
R2(config)#interface Loopback 0
R2(config-if)#ip address 192.168.2.1 255.255.255.0
d. Configure a clock rate for the serial router interfaces with a DCE serial cable attached.
R1(config)#interface S0/0/0
R1(config-if)#clock rate 64000
Step 3: Disable DNS lookup.
To prevent the router from attempting to translate incorrectly entered commands, disable DNS lookup.
R1(config)#no ip domain-lookup
Step 4: Configure the EIGRP routing protocol on R2 and R3.
Note: R2 and R3 exchange routes in EIGRP AS 101. R1 is acting as an ISP router and does not
participate in the EIGRP routing process.
a. On R2, use the following commands.
R2(config)#router eigrp 101
R2(config-router)#network 10.1.1.0 0.0.0.3
R2(config-router)#network 10.2.2.0 0.0.0.3
R2(config-router)#network 192.168.2.0 0.0.0.255
R2(config-router)#no auto-summary
b. On R3, use the following commands.
R3(config)#router eigrp 101
R3(config-router)#network 192.168.3.0 0.0.0.255
R3(config-router)#network 10.2.2.0 0.0.0.3
R3(config-router)#no auto-summary
All contents are Copyright © 1992–2009 Cisco Systems, Inc. All rights reserved. This document is Cisco Public Information.
Page 3 of 30
CCNA Security
Step 5: Configure a static default route on R2.
Router R1 represents a connection to the Internet. A default route is configured on R2 for all traffic whose
destination network does not exist in the R2 routing table.
Note: Without the default route configured on R2, R2 cannot respond to the SDM HTTP connection from
PC-A later in the lab. Because R1 is not part of the EIGRP domain and is not advertising the PC-A LAN,
R2 does not know about the 192.168.1.0/24 network.
a. Configure a static default route on R2 that points to the R1 S0/0/0 interface IP address.
R2(config)#ip route 0.0.0.0 0.0.0.0 10.1.1.1
b. Redistribute the static default into EIGRP so that R3 also learns the route.
R2(config)#router eigrp 101
R2(config-router)#redistribute static
Step 6: Configure PC host IP settings.
a. Configure a static IP address, subnet mask, and default gateway for PC-A, as shown in the IP
addressing table.
b. Configure a static IP address, subnet mask, and default gateway for PC-C, as shown in the IP
addressing table.
Step 7: Verify basic network connectivity.
a. Ping from PC-A to the R2 S0/0/0 interface at IP address 10.1.1.2. Are the results successful? Yes.
If the pings are not successful, troubleshoot the basic device configurations before continuing.
Note: PC-A should be able to ping external R2 interface S0/0/0 but is not able to ping any of the internal
EIGRP network IP addresses on R2 and R3.
b. Ping from R2 to PC-C on the R3 LAN. Are the results successful? Yes.
If the pings are not successful, troubleshoot the basic device configurations before continuing.
Note: If you can ping from R2 to PC-C, you have demonstrated that the EIGRP routing protocol is
configured and functioning correctly. If you cannot ping but the device interfaces are up and IP addresses
are correct, use the show run and show ip route commands to help identify routing protocol-related
problems.
Step 8: Configure a minimum password length.
Note: Passwords in this lab are set to a minimum of 10 characters but are relatively simple for the benefit
of performing the lab. More complex passwords are recommended in a production network.
Use the security passwords command to set a minimum password length of 10 characters.
R1(config)#security passwords min-length 10
Step 9: Configure the basic console and vty lines.
a. Configure a console password and enable login for router R1. For additional security, the exectimeout command causes the line to log out after 5 minutes of inactivity. The logging
synchronous command prevents console messages from interrupting command entry.
Note: To avoid repetitive logins during this lab, the exec-timeout can be set to 0 0, which prevents
it from expiring. However, this is not considered a good security practice.
All contents are Copyright © 1992–2009 Cisco Systems, Inc. All rights reserved. This document is Cisco Public Information.
Page 4 of 30
CCNA Security
R1(config)#line console 0
R1(config-line)#password ciscoconpass
R1(config-line)#exec-timeout 5 0
R1(config-line)#login
R1(config-line)#logging synchronous
b. Configure the password on the vty lines for router R1.
R1(config)#line vty 0 4
R1(config-line)#password ciscovtypass
R1(config-line)#exec-timeout 5 0
R1(config-line)#login
c.
Repeat these configurations on both R2 and R3.
Step 10: Encrypt clear text passwords.
a. Use the service password-encryption command to encrypt the console, aux, and vty
passwords.
R1(config)# service password-encryption
b. Issue the show run command. Can you read the console, aux, and vty passwords? Why or why
not?
No, the passwords are now encrypted
c.
Repeat this configuration on both R2 and R3.
Step 11: Save the basic running configuration for all three routers.
Save the running configuration to the startup configuration from the privileged EXEC prompt.
R1#copy running-config startup-config
All contents are Copyright © 1992–2009 Cisco Systems, Inc. All rights reserved. This document is Cisco Public Information.
Page 5 of 30
CCNA Security
Part 2: Configuring a Remote Access VPN
In Part 2 of this lab, you configure a remote access IPsec VPN. R2 is configured as an Easy VPN server
using SDM, and the Cisco VPN client is configured on PC-A. The PC-A host simulates an employee
connecting from home over the Internet. Router R1 simulates an Internet ISP router.
Task 1: Prepare R2 for SDM Access and Easy VPN Server Setup
Step 1: Configure the enable secret password and HTTP router access prior to starting SDM.
a. From the CLI, configure the enable secret password for use with SDM on R2.
R2(config)#enable secret cisco12345
b. Enable the HTTP server on R2.
R2(config)#ip http server
c.
Create an admin account on R2 with privilege level 15 for use with AAA.
R2(config)#username admin privilege 15 password 0 cisco12345
Step 2: Access SDM and set command delivery preferences.
a. Run the SDM application or open a browser on PC-A and start SDM by entering the R2 S0/0/0 IP
address 10.1.1.2 in the address field.
b. Log in with no username and the enable secret password cisco12345.
c.
In the Authentication Required dialog box, enter cisco12345 in the Password field and click Yes.
d. If the Cisco IOS IPS login dialog box displays, enter the enable secret password of cisco12345.
e. Select Edit > Preferences to configure SDM to allow you to preview the commands before sending
them to the router. In the User Preferences window, check the Preview commands before
delivering to router check box and click OK.
Task 2: Use the SDM VPN Wizard to Configure the Easy VPN Server
Step 1: Launch the Easy VPN server wizard and configure AAA services.
a. Click the Configure button at the top of the SDM home screen.
b. Click the VPN button under Tasks to view the VPN configuration page.
c.
Select Easy VPN Server from the main VPN window, and then click Launch Easy VPN Server
Wizard.
d. The Easy VPN Server wizard checks the router configuration to see if AAA is enabled. If not, the
Enable AAA window displays. AAA must be enabled on the router before the Easy VPN Server
configuration starts. Click Yes to continue with the configuration.
e. If prompted to deliver the configuration to the router, click Deliver.
f.
In the Command Delivery Status window, click OK. When the message “AAA has been successfully
enabled on the router” displays, click OK.
g. Now that AAA is enabled, you can start the Easy VPN Server wizard by clicking the Launch Easy
VPN Server Wizard button. Read through the descriptions of the tasks that the wizard guides you
through.
All contents are Copyright © 1992–2009 Cisco Systems, Inc. All rights reserved. This document is Cisco Public Information.
Page 6 of 30
CCNA Security
All contents are Copyright © 1992–2009 Cisco Systems, Inc. All rights reserved. This document is Cisco Public Information.
Page 7 of 30
CCNA Security
How does the client receive the IPsec policies? They are centrally managed and pushed to the client by
the server.
How does the Easy VPN remote server configuration differ from the site-to-site? Both configure IKE
polices and IPsec transforms. The remote access server configures a virtual template interface and
authentication, group policy lookup and user authentication, among others.
h. Click Next when you are finished answering the above questions.
Step 2: Configure the virtual tunnel interface and authentication
a. Select the interface on which the client connections terminate. Click the Unnumbered to radio
button, and select the Serial0/0/0 interface from the pull-down menu.
b. Select Pre-shared Keys for the authentication type and click Next to continue.
All contents are Copyright © 1992–2009 Cisco Systems, Inc. All rights reserved. This document is Cisco Public Information.
Page 8 of 30
CCNA Security
Step 3: Select the IKE proposal.
a. In the Internet Key Exchange (IKE) Proposals window, the default IKE proposal is used for R2.
All contents are Copyright © 1992–2009 Cisco Systems, Inc. All rights reserved. This document is Cisco Public Information.
Page 9 of 30
CCNA Security
What is the encryption method used with the default IKE policy? 3DES
What is the hash algorithm used to ensure that the keys have not been tampered with? SHA_1
b. Click Next to accept the default IKE policy.
Note: Configurations on both sides of the tunnel must match exactly. However, the Cisco VPN client
automatically selects the proper configuration for itself. Therefore, no IKE configuration is necessary on
the client PC.
Step 4: Select the transform set.
a. In the Transform Set window, the default SDM default transform set is used. What is the ESP
encryption method used with the default transform set? ESP_3DES
All contents are Copyright © 1992–2009 Cisco Systems, Inc. All rights reserved. This document is Cisco Public Information.
Page 10 of 30
CCNA Security
b. Click Next to accept the default transform set.
Step 5: Specify group authorization and group policy lookup.
a. In the Group Authorization and Group Policy Lookup window, select the Local option because a
RADIUS server is not available.
All contents are Copyright © 1992–2009 Cisco Systems, Inc. All rights reserved. This document is Cisco Public Information.
Page 11 of 30
CCNA Security
b. Click Next to create a new AAA method list for the group policy lookup that uses the local router
database.
Step 6: Configure User Authentication (XAuth)
a. In the User Authentication (XAuth) window, you can specify to store user information on an external
server, such as a RADIUS server or a local database or both. Check the Enable User
Authentication check box and accept the default of Local Only.
All contents are Copyright © 1992–2009 Cisco Systems, Inc. All rights reserved. This document is Cisco Public Information.
Page 12 of 30
CCNA Security
Where does the router look for valid user account and passwords to authenticate remote VPN users
when they attempt to log in? The local router user database. If the username is not locally defined on
R2, user cannot log in.
b. Click the Add User Credentials button. In the User Accounts window, you can view currently defined
users or add new users. What is the name of the user currently defined, and what is the user privilege
level? admin, privilege level 15.
How was this user defined? During the initial Cisco IOS CLI configuration
c.
In the User Accounts window, click the Add button to add another user. Enter the username user01
with a password of user01pass, and select the check box for encrypting the password using the MD5
hash algorithm. Leave the privilege level at 1.
What is the range of privilege levels that can be set for a user? 0 through 15
All contents are Copyright © 1992–2009 Cisco Systems, Inc. All rights reserved. This document is Cisco Public Information.
Page 13 of 30
CCNA Security
d. Click OK to accept the user01 entries, and then click OK to close the User Accounts window.
e. In the User Authentication (XAuth) window, click Next to continue.
Step 7: Specify group authorization and user group policies.
a. In the Group Authorization and User Group Policies window, you must create at least one group
policy for the VPN server.
All contents are Copyright © 1992–2009 Cisco Systems, Inc. All rights reserved. This document is Cisco Public Information.
Page 14 of 30
CCNA Security
b. Click Add to create a group policy.
c.
In the Add Group Policy window, enter VPN-Access as the name of this group. Enter a new preshared key of cisco12345 and then re-enter it.
d. Leave the Pool Information box checked. Enter a starting address of 192.168.2.101, an ending
address of 192.168.2.150, and a subnet mask of 255.255.255.0.
e. Enter 50 for the Maximum Connections Allowed.
f.
Click OK to accept the entries.
g. An SDM warning message displays indicating that the IP addresses in the pool and the IP address of
the Loopback0 interface are in the same subnet. Click Yes to confirm.
Why use an IP network for the VPN clients pool that is associated with a loopback interface? R2 will
advertise the entire loopback network 192.168.2.0/24 to other routers as one full subnet and not
simply host routes for VPN clients. This significantly increases stability throughout the EIGRP routing
domain.
How does R3 route traffic to the VPN clients? R3 learns the subnet used by R2’s loopback interface
as advertised through EIGRP. Therefore, R3 sends traffic destined for VPN clients to a next hop of
R2.
h. When you return to the Group Authorization window, check the Configure Idle Timer check box and
enter one hour (1). This disconnects idle users if there is no activity for one hour and allows others to
connect. Click Next to continue.
All contents are Copyright © 1992–2009 Cisco Systems, Inc. All rights reserved. This document is Cisco Public Information.
Page 15 of 30
CCNA Security
i.
When the Cisco Tunneling Control Protocol (cTCP) window displays, do not enable cTCP. Click Next
to continue.
Step 8: Review the configuration summary and deliver the commands.
a. Scroll through the commands that SDM will send to the router. Do not select the check box Test VPN
connectivity. Click Finish.
b. If prompted to deliver the configuration to the router, click Deliver.
All contents are Copyright © 1992–2009 Cisco Systems, Inc. All rights reserved. This document is Cisco Public Information.
Page 16 of 30
CCNA Security
c.
In the Command Delivery Status window, click OK. How many commands were delivered? 44 with
SDM 2.5
Step 9: Test the VPN server.
a. You are returned to the main VPN window with the Edit Easy VPN Server tab selected. Click the
Test VPN Server button in the bottom right corner of the screen.
b. In the VPN Troubleshooting window, click the Start button.
Your screen should look similar to the one below. Click OK to close the information window. Click
Close to exit the VPN Troubleshooting window.
All contents are Copyright © 1992–2009 Cisco Systems, Inc. All rights reserved. This document is Cisco Public Information.
Page 17 of 30
CCNA Security
Task 3: Use the Cisco VPN Client to Test the Remote Access VPN
Step 1: (Optional) Install the Cisco VPN client.
If not already installed, install Cisco VPN client software on host PC-A. If you do not have the Cisco VPN client
software, contact your instructor.
Instructor Notes: The version of the Cisco VPN Client used in this lab is 4.8.02.0010 for use with Windows XP.
You must have a valid CCO account and service contract to download the file. Extract the .exe or .zip file and
begin the installation. Accept the defaults as prompted. Click Finish when the VPN Client has been successfully
installed. Click Yes to restart the computer for the configuration changes to take effect.
All contents are Copyright © 1992–2009 Cisco Systems, Inc. All rights reserved. This document is Cisco Public Information.
Page 18 of 30
CCNA Security
Step 2: Configure PC-A as a VPN client to access the R2 VPN server.
a. Start the Cisco VPN client and select Connection Entries > New or click the New icon.
b. Enter the following information to define the new connection entry. Click Save when you are finished.
Connection Entry: VPN-R2
Description: Connection to R2 internal network
Host: 10.1.1.2 (IP address of the R2 S0/0/0 interface)
Group Authentication Name: VPN-Access (Defines the address pool configured in Task 2)
Password: cisco12345 (Pre-shared key configured in Task 2)
Confirm Password: cisco12345
All contents are Copyright © 1992–2009 Cisco Systems, Inc. All rights reserved. This document is Cisco Public Information.
Page 19 of 30
CCNA Security
Note: The group authentication name and password are case-sensitive and must match the ones
created on the VPN server.
Step 3: Test access from PC-A without a VPN connection.
Open a command prompt on PC-A, and ping the PC-C IP address at 192.168.3.3 on the R3 LAN. Are the
pings successful? Why or why not? The pings failed because PC-A still has an IP address (192.168.1.3)
that is outside the EIGRP domain. PC-A cannot access the internal PC-C host in the EIGRP network
192.168.3.0/24 without an address within the EIGRP domain (from the VPN access group associated with
the 192.168.2.0/24 network).
Note: After creating a VPN connection entry, you must activate it. Currently, the VPN tunnel is not up.
Step 4: Establish a VPN connection and login
a. Select the newly created connection VPN-R2 and click the Connect icon. You can also double-click
the connection entry.
All contents are Copyright © 1992–2009 Cisco Systems, Inc. All rights reserved. This document is Cisco Public Information.
Page 20 of 30
CCNA Security
b. Enter the username admin created previously on the VPN router, and enter the password
cisco12345.
c.
Click OK to continue. The VPN Client window minimizes to a lock icon in the tools tray of the taskbar.
When the lock is closed, the VPN tunnel is up. When it is open, the VPN connection is down.
Task 4: Verify the VPN Tunnel between the Client, Server, and Internal Network
Step 1: Check the VPN Client status.
Double-click the VPN lock icon to expand the VPN Client window.
What does it say about the connection status at the top of the window? Status: Connected
Step 2: Check the tunnel statistics
a. Select Status > Statistics to display the Tunnel Details tab.
All contents are Copyright © 1992–2009 Cisco Systems, Inc. All rights reserved. This document is Cisco Public Information.
Page 21 of 30
CCNA Security
b. What is the Client IP address obtained from the VPN server? Answers will vary but can range from
192.168.2.101 through 192.168.2.150. The pool of addresses was defined in Task 2.
Note: Each time you disconnect and reconnect to the VPN server, you receive a new IP address until
the limit is reached.
c.
What is the VPN server address? 10.1.1.2
d. How many packets have been encrypted? Answers will vary
e. What is the encryption method being used? 168-bit 3-DES
f.
What is the authentication being used? HMAC-SHA1
Step 3: Check the Cisco IOS messages on R2 when the tunnel is created.
Open the console connection for R2 and locate the message displayed indicating that the virtual interface
came up when the VPN Client connection was made.
R2#
*Feb 2 16:09:08.907: %LINEPROTO-5-UPDOWN: Line protocol on Interface
Virtual-Access2, changed state to up
R2#
Step 4: Verify the VPN connection.
a. From the PC-A command prompt, issue the ipconfig /all command to see the network
connections currently in use.
C:\>ipconfig /all
Windows IP Configuration
Host Name . . . . .
Primary Dns Suffix
Node Type . . . . .
IP Routing Enabled.
WINS Proxy Enabled.
.
.
.
.
.
.
.
.
.
.
.
.
.
.
.
.
.
.
.
.
.
.
.
.
.
.
.
.
.
.
.
.
.
.
.
:
:
:
:
:
PC-A
Hybrid
No
No
All contents are Copyright © 1992–2009 Cisco Systems, Inc. All rights reserved. This document is Cisco Public Information.
Page 22 of 30
CCNA Security
Ethernet adapter Local Area Connection:
Connection-specific
Description . . . .
Physical Address. .
Dhcp Enabled. . . .
IP Address. . . . .
Subnet Mask . . . .
Default Gateway . .
DNS
. .
. .
. .
. .
. .
. .
Suffix
. . . .
. . . .
. . . .
. . . .
. . . .
. . . .
.
.
.
.
.
.
.
:
:
:
:
:
:
:
Broadcom 570x Gigabit Controller
00-0B-DB-04-A5-CD
No
192.168.1.3
255.255.255.0
Ethernet adapter Local Area Connection 2:
Connection-specific
Description . . . .
Physical Address. .
Dhcp Enabled. . . .
IP Address. . . . .
Subnet Mask . . . .
Default Gateway . .
DNS
. .
. .
. .
. .
. .
. .
Suffix
. . . .
. . . .
. . . .
. . . .
. . . .
. . . .
.
.
.
.
.
.
.
:
:
:
:
:
:
:
Cisco Systems VPN Adapter
00-05-9A-3C-78-00
No
192.168.2.104
255.255.255.0
192.168.2.1
b. What is the configuration for the first local area connection?
IP Address: 192.168.1.3
Subnet Mask: 255.255.255.0
Default Gateway: None since the VPN tunnel is activated
Description: Broadcom 570x Gigabit Controller (Answers will vary)
c.
What is the configuration for Local Area Connection 2?
IP Address: 192.168.2.104 (answers will vary – 192.168.2.101-.150)
Subnet Mask: 255.255.255.0
Default Gateway: 192.168.2.1 (R2 Lo0 interface)
Description: Cisco Systems VPN Adapter
Step 5: Test the access from the client with the VPN connection.
With the VPN connection from computer PC-A to router R2 activated, open a command prompt on PC-A
and ping the PC-C IP address at 192.168.3.3 on the R3 LAN. Are the pings successful? Why or why not?
The pings are now successful because PC-A has an IP address (192.168.2.104 in this case) that was
assigned by the VPN server and is inside the EIGRP domain. PC-A can access the internal PC-C host in
the EIGRP network 192.168.3.0/24 now because it is in the VPN access group associated with the
192.168.2.0/24 network.
Step 6: Telnet to R2 from PC-A.
a. From the PC-A command prompt, telnet to R2 at the Lo0 IP address 192.168.2.1 Log in as admin
with the password cisco12345. What is the router command prompt and why is this? Because the
user admin was defined with privilege level 15 (the highest), the prompt defaults to privileged EXEC
mode (R2#).
b. Issue the show run command to view the various commands generated by SDM to configure the
VPN server.
c.
Issue the show users command to see the connections to router R2. What connections are
present? The console connection and the vty connection from PC-A by the user admin.
d. Exit the Telnet session with the quit or exit command.
e. Right-click the VPN Client icon in the tools tray and select Disconnect, or click the VPN-R2
connection and click the Disconnect icon.
All contents are Copyright © 1992–2009 Cisco Systems, Inc. All rights reserved. This document is Cisco Public Information.
Page 23 of 30
CCNA Security
f.
Open the VPN client connection again but this time log in as user01 with the password user01pass.
g. Telnet from PC-A to R2 again at the Lo0 IP address 192.168.2.1. Log in as user01 with the password
user01pass. What is the router command prompt and why is this? Because user user01 was defined
with privilege level 1 (the lowest), the prompt defaults to user EXEC mode (R2>).
Note: You could have telnetted to R2 from the first VPN session and logged in as user01, but this
process demonstrates the VPN disconnect and connect process and verifies that user01 is set up
properly.
Task 5: Reflection
Why is VPN a good option for remote users?
Answers will vary but should include: It is a flexible technology that is widely supported by equipment vendors.
Service is commonly available from ISPs. A VPN server can be set up independent of the ISP if desired. VPN
provides easy and secure access to internal LAN resources for remote workers and business partners. Any
authorized person with an Internet connection can access internal resources as if they were on the local LAN.
Router Interface Summary Table
Router Interface Summary
Router Model
Ethernet Interface
#1
Ethernet Interface
#2
Serial Interface
#1
Serial Interface
#2
1700
Fast Ethernet 0
(FA0)
Fast Ethernet 1
(FA1)
Serial 0 (S0)
Serial 1 (S1)
1800
Fast Ethernet 0/0
(FA0/0)
Fast Ethernet 0/1
(FA0/1)
Serial 0/0/0
(S0/0/0)
Serial 0/0/1
(S0/0/1)
2600
Fast Ethernet 0/0
(FA0/0)
Fast Ethernet 0/1
(FA0/1)
Serial 0/0 (S0/0)
Serial 0/1 (S0/1)
2800
Fast Ethernet 0/0
(FA0/0)
Fast Ethernet 0/1
(FA0/1)
Serial 0/0/0
(S0/0/0)
Serial 0/0/1
(S0/0/1)
Note: To find out how the router is configured, look at the interfaces to identify the type of router
and how many interfaces the router has. There is no way to effectively list all the combinations of
configurations for each router class. This table includes identifiers for the possible combinations of
Ethernet and Serial interfaces in the device. The table does not include any other type of interface,
even though a specific router may contain one. An example of this might be an ISDN BRI interface.
The string in parenthesis is the legal abbreviation that can be used in Cisco IOS commands to
represent the interface.
All contents are Copyright © 1992–2009 Cisco Systems, Inc. All rights reserved. This document is Cisco Public Information.
Page 24 of 30
CCNA Security
Router Configs
Router R1 after Part 2
R1#sh run
Building configuration...
Current configuration : 1238 bytes
!
version 12.4
service timestamps debug datetime msec
service timestamps log datetime msec
no service password-encryption
!
hostname R1
!
boot-start-marker
boot-end-marker
!
security passwords min-length 10
logging message-counter syslog
enable secret 5 $1$E8hT$nUCFVXkeliEFebRV6/OAY1
!
no aaa new-model
dot11 syslog
ip source-route
!
ip cef
no ip domain lookup
!
no ipv6 cef
multilink bundle-name authenticated
!
archive
log config
hidekeys
!
interface FastEthernet0/0
no ip address
shutdown
duplex auto
speed auto
!
interface FastEthernet0/1
ip address 192.168.1.1 255.255.255.0
duplex auto
speed auto
!
interface FastEthernet0/1/0
!
interface FastEthernet0/1/1
!
interface FastEthernet0/1/2
!
interface FastEthernet0/1/3
!
interface Serial0/0/0
All contents are Copyright © 1992–2009 Cisco Systems, Inc. All rights reserved. This document is Cisco Public Information.
Page 25 of 30
CCNA Security
ip address 10.1.1.1 255.255.255.252
clock rate 64000
!
interface Serial0/0/1
no ip address
shutdown
clock rate 2000000
!
interface Vlan1
no ip address
!
ip forward-protocol nd
ip http server
no ip http secure-server
!
control-plane
!
line con 0
exec-timeout 0 0
password ciscoconpass
logging synchronous
login
line aux 0
line vty 0 4
exec-timeout 5 0
password ciscovtypass
login
!
scheduler allocate 20000 1000
end
Router R2 after Part 2
R2#sh run
Building configuration...
Current configuration : 2700 bytes
!
version 12.4
service timestamps debug datetime msec
service timestamps log datetime msec
service password-encryption
!
hostname R2
!
boot-start-marker
boot-end-marker
!
security passwords min-length 10
logging message-counter syslog
enable secret 5 $1$T5rj$SdPauuFGQGqdqixl9y01S.
!
aaa new-model
!
!
aaa authentication login default local
aaa authentication login sdm_vpn_xauth_ml_1 local
All contents are Copyright © 1992–2009 Cisco Systems, Inc. All rights reserved. This document is Cisco Public Information.
Page 26 of 30
CCNA Security
aaa authorization exec default local
aaa authorization network sdm_vpn_group_ml_1 local
!
!
aaa session-id common
dot11 syslog
ip source-route
!
ip cef
no ip domain lookup
!
no ipv6 cef
multilink bundle-name authenticated
!
username admin privilege 15 password 7 01100F175804575D72181B
username user01 secret 5 $1$YmkE$DGJQzwBzH7Z45hVZz7lm10
archive
log config
hidekeys
!
crypto isakmp policy 1
encr 3des
authentication pre-share
group 2
!
crypto isakmp client configuration group VPN-Access
key cisco12345
pool SDM_POOL_1
max-users 50
netmask 255.255.255.0
crypto isakmp profile sdm-ike-profile-1
match identity group VPN-Access
client authentication list sdm_vpn_xauth_ml_1
isakmp authorization list sdm_vpn_group_ml_1
client configuration address respond
virtual-template 1
!
crypto IPsec transform-set ESP-3DES-SHA esp-3des esp-sha-hmac
!
crypto IPsec profile SDM_Profile1
set security-association idle-time 3600
set transform-set ESP-3DES-SHA
set isakmp-profile sdm-ike-profile-1
!
interface Loopback0
ip address 192.168.2.1 255.255.255.0
!
interface FastEthernet0/0
no ip address
shutdown
duplex auto
speed auto
!
interface FastEthernet0/1
no ip address
shutdown
duplex auto
speed auto
All contents are Copyright © 1992–2009 Cisco Systems, Inc. All rights reserved. This document is Cisco Public Information.
Page 27 of 30
CCNA Security
!
interface FastEthernet0/1/0
!
interface FastEthernet0/1/1
!
interface FastEthernet0/1/2
!
interface FastEthernet0/1/3
!
interface Serial0/0/0
ip address 10.1.1.2 255.255.255.252
no fair-queue
!
interface Serial0/0/1
ip address 10.2.2.2 255.255.255.252
clock rate 64000
!
interface Virtual-Template1 type tunnel
ip unnumbered Serial0/0/0
tunnel mode IPsec ipv4
tunnel protection IPsec profile SDM_Profile1
!
interface Vlan1
no ip address
!
router eigrp 101
redistribute static
network 10.1.1.0 0.0.0.3
network 10.2.2.0 0.0.0.3
network 192.168.2.0
no auto-summary
!
ip local pool SDM_POOL_1 192.168.2.101 192.168.2.150
ip forward-protocol nd
ip route 0.0.0.0 0.0.0.0 10.1.1.1
ip http server
no ip http secure-server
!
control-plane
!
line con 0
exec-timeout 0 0
password 7 05080F1C22434D061715160118
logging synchronous
line aux 0
exec-timeout 5 0
password 7 1511021F07252A313023343100
line vty 0 4
exec-timeout 5 0
password 7 110A1016141D1D181D3A2A373B
!
scheduler allocate 20000 1000
end
Router R3 after Part 2
R3#sh run
Building configuration...
All contents are Copyright © 1992–2009 Cisco Systems, Inc. All rights reserved. This document is Cisco Public Information.
Page 28 of 30
CCNA Security
Current configuration : 1303 bytes
!
version 12.4
service timestamps debug datetime msec
service timestamps log datetime msec
service password-encryption
!
hostname R3
!
boot-start-marker
boot-end-marker
!
security passwords min-length 10
logging message-counter syslog
!
no aaa new-model
dot11 syslog
ip source-route
!
ip cef
no ip domain lookup
!
no ipv6 cef
multilink bundle-name authenticated
!
archive
log config
hidekeys
!
interface FastEthernet0/0
no ip address
shutdown
duplex auto
speed auto
!
interface FastEthernet0/1
ip address 192.168.3.1 255.255.255.0
duplex auto
speed auto
!
interface FastEthernet0/1/0
!
interface FastEthernet0/1/1
!
interface FastEthernet0/1/2
!
interface FastEthernet0/1/3
!
interface Serial0/0/0
no ip address
shutdown
no fair-queue
clock rate 2000000
!
interface Serial0/0/1
ip address 10.2.2.1 255.255.255.252
!
All contents are Copyright © 1992–2009 Cisco Systems, Inc. All rights reserved. This document is Cisco Public Information.
Page 29 of 30
CCNA Security
interface Vlan1
no ip address
!
router eigrp 101
network 10.2.2.0 0.0.0.3
network 192.168.3.0
no auto-summary
!
ip forward-protocol nd
no ip http server
no ip http secure-server
!
control-plane
!
line con 0
exec-timeout 0 0
password 7 03075218050022434019181604
logging synchronous
login
line aux 0
line vty 0 4
exec-timeout 5 0
password 7 121A0C0411041A10333B253B20
login
!
scheduler allocate 20000 1000
end
All contents are Copyright © 1992–2009 Cisco Systems, Inc. All rights reserved. This document is Cisco Public Information.
Page 30 of 30

