1. PART ONE: PREPARE OFFICE 365 PACKAGE 1.1. DOWNLOAD
advertisement
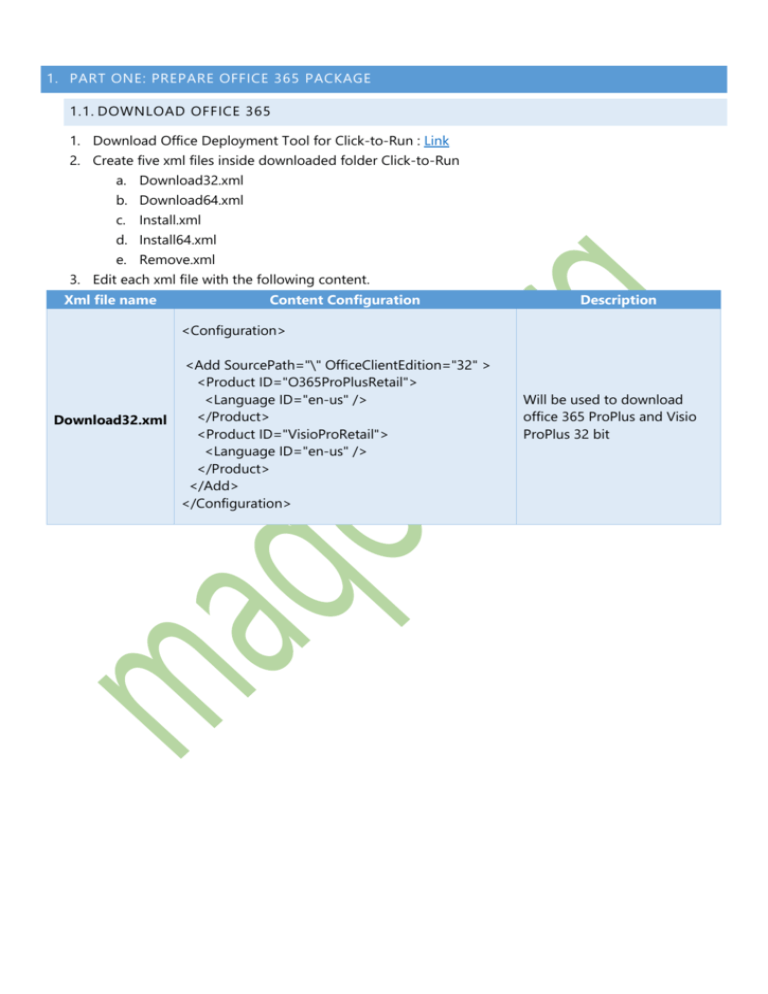
1. PART ONE: PREPARE OFFICE 365 PACKAGE 1.1. DOWNLOAD OFFICE 365 1. Download Office Deployment Tool for Click-to-Run : Link 2. Create five xml files inside downloaded folder Click-to-Run a. Download32.xml b. Download64.xml c. Install.xml d. Install64.xml e. Remove.xml 3. Edit each xml file with the following content. Xml file name Content Configuration Description <Configuration> <Add SourcePath="\" OfficeClientEdition="32" > <Product ID="O365ProPlusRetail"> <Language ID="en-us" /> </Product> Download32.xml <Product ID="VisioProRetail"> <Language ID="en-us" /> </Product> </Add> </Configuration> Will be used to download office 365 ProPlus and Visio ProPlus 32 bit <Configuration> <Add SourcePath="\" OfficeClientEdition="64" > <Product ID="O365ProPlusRetail"> <Language ID="en-us" /> </Product> Download64.xml <Product ID="VisioProRetail"> <Language ID="en-us" /> </Product> </Add> </Configuration> Will be used to download office 365 ProPlus and Visio ProPlus64 bit <Configuration> Install.xml <Add SourcePath="\" OfficeClientEdition="32" > <Product ID="O365ProPlusRetail"> <Language ID="en-us" /> </Product> <Product ID="VisioProRetail"> <Language ID="en-us" /> </Product> </Add> Will be used to install office 365 ProPlus and Visio ProPlus 32 bit <Display Level="None" AcceptEULA="TRUE" /> <Logging Path="%temp%" /> <Property Name="AUTOACTIVATE" Value="1" /> </Configuration> <Configuration> Install64.xml <Add SourcePath="\" OfficeClientEdition="64" > <Product ID="O365ProPlusRetail"> <Language ID="en-us" /> Will be used to install office 365 ProPlus and Visio ProPlus 64 bit </Product> <Product ID="VisioProRetail"> <Language ID="en-us" /> </Product> </Add> <Display Level="None" AcceptEULA="TRUE" /> <Logging Path="%temp%" /> <Property Name="AUTOACTIVATE" Value="1" /> </Configuration> <Configuration> <Remove All="TRUE"> Remove.xml </Remove> <Display Level="None" AcceptEULA="TRUE" /> <Logging Path ="%Windir%\temp\"/> Will be used to uninstall office 365 ProPlus 32 or 64 bit Silently </Configuration> 4. Start downloading office 365 package, Run CMD by elevating privilege, navigate to source file where the Click-to-Run located, and then write the installation commands to download office 365 “Setup.exe /configure ./download32.xml”, after download completed we will repeat the same steps for office 365 64 bit. 5. Start downloading office 365 package, Run CMD by elevating privilege, navigate to source file where the Click-to-Run located, and then write the installation commands to download office 365 “Setup.exe /configure ./download64.xml”, after download completed, we will proceed to prepare the package. 6. Reference for Click-to-Run configuration.xml file 2. PART TWO: PREPARE SCCM PACKAGE FOR DEPLOYMENT 2.1. CREATE OFFICE 365 PACKAGE 1. Open SCCM Console, click Software Library. 2. In the Software Library workspace, expand Application Management, and then click Applications. 3. On Folder tab, click Create New Folder, on Folder Name: “Microsoft Office 365”, and then click OK. 4. On Home tab, in the Create group, click Create Application. 5. On Create Application Wizard, at General, select “Manually specify the deployment type information”, and then click Next. 6. On General Information, Specify information about application as per the below figure, and then click Next. 7. On Application Catalog, Click Next. 8. On Deployment Types, click Add. 9. On Create Deployment Type Wizard, at General, select “Manually specify the deployment type information”, and then click Next. 10. On General Information, at Name: “Microsoft Office 365 Proplus Deployment”, and then click Next. 11. On the Content page of the Create Deployment Type Wizard, specify the following information: 11.1. Content location: Specify the location of the content for this deployment type. 11.2. Check “Persist Content in the client cache” 11.3. Check “Allow clients to share content with other clients on the same subnet”. 11.4. Installation program: Specify the name of the installation program and the required installation parameters “Setup.exe /configure install.xml” 11.5. Uninstall program: Specify the name of the uninstallation program and the required parameters “Setup.exe /configure Remove.xml” and then click Next. 12. On the Detection Method page of the Create Deployment Type Wizard, select Configure rules to detect the presence of this deployment type, and then click Add Clause. 13. In the Detection Rule dialog box, in the Setting type drop-down list, select the method that you want to use to detect the presence of the deployment type. You can choose from the following available methods: 13.1. File System: Use this method to detect whether a specified file exists on a client device, thus indicating that the application is installed. 13.2. Type: File. 13.3. Path: C:\Program Files\Microsoft Office 15\Clientx64 13.4. File or Folder Name: Integratedoffice.exe, then click OK. 14. In the Detection Method, click Next. 15. On the User Experience page of the Create Deployment Type Wizard, specify the following information: 15.1. Installation behavior: In the drop-down list, select one of the following options: 15.2. Install for System: The application is installed only once, and it is available to all users. Install for System if resource is device; otherwise install as user: If the application is deployed to a device, it will be installed for all users. If the application is deployed to a user, it will be installed for only that user. 15.3. Logon requirement: Specify the logon requirements for this deployment type from the following options: Only when a user is logged on. 15.4. Installation program visibility: Specify the mode in which the deployment type will run on client devices. Normal. 16. On the Requirements, click Next. 17. On the Dependencies, click Next. 18. On the Summary, click Next. 19. On Create Application wizard, at General, Deployments Types, Click Next. 20. On Summary, Click Next. 21. Finish the Wizard, and Click Close. 2.2. DISTRIBUITE THE APPLICATION TO DISTRIBUITION POINT 1. After the Package creation, on Home tab, in the deployment Group, Select Distribute Content. 2. On the General, Of the Distribute Content Wizard, click Next. 3. On the Content, click Next. 4. On the content distribution, click add, distribution point. 5. On Add Distribution point, select the desired distribution point and click OK. 6. On the Content Distribution, click Next. 7. Complete the wizard, and then click Close. 8. Navigate to Monitoring, Distribution status, content Status, make sure that application is successfully distributed. 2.3. DEPLOY SCCM PACKAGE TO DESIRED DEVICE COLLECTION 1. In the Configuration Manager console, click Software Library. 2. In the Software Library workspace, expand Application Management, and then click Applications. 3. In the Applications list, select the application that you want to deploy. Then, in the Home tab, in the Deployment group, click Deploy. 4. On the General page of the Deploy Software Wizard, specify the following information: a. Software – This displays the application to deploy. You can click Browse to select a different application to deploy. b. Collection – Click Browse to select the collection to deploy the application to. c. Automatically distribute content for dependencies – If this is enabled and any of the deployment types in the application contain dependencies, then the dependent application content will be also sent to distribution points. 5. On the Content page of the Wizard, click Next. 6. On the Deployment Settings page of the Deploy Software Wizard, specify the following information: a. Action: Install. b. Purpose: Available. 7. Click Next. 8. On the Scheduling page of the Deploy Software Wizard, configure when this application will be deployed or made available to client devices 9. On the User Experience page of the Deploy Software Wizard, specify information about how users can interact with the application installation, and then click Next. 10. On the Alerts page of the Deploy Software Wizard, configure how Configuration Manager and System Center Operations Manager will generate alerts for this deployment. You can configure thresholds for reporting alerts and turn off reporting for the duration of the deployment. 11. Click Next. 12. On the Summary page of the Deploy Software Wizard, review the actions that will be taken by this deployment, and then click Next to complete the Wizard. 13. Complete the wizard, and then click close. 3. PART THREE: TEST DEPLOYMENT ON CLIENT MACHINE 3.1. TEST OFFICE 365 INSTALLATION 1. Navigate to the client computer where it is a member of target device collection. 2. Open start menu, write software center, and then select office 365, and then click Install. 3. On installation status tab, check the status of the package. 4. After the installation is finished check the installation status on Installed Software. 5. Open start menu, and see the installed programs, you will find office packages installed successfully. 3.2. TEST OFFICE 365 UNINSTALLATION 1. Before uninstalling the program, make sure it is located in control panel, under Programs and Features. 2. Open start Menu, write software center, and then click Open. 3. On Installed software tab, click Uninstall on the down left corner. 4. Return pack to the control panel, all control panel items, open Program and Features, you will find that the program is uninstalled successfully. 5. Congratulation you can deploy and uninstall Office 365 ProPlus by SCCM Successfully.

