Microsoft®
PowerPoint
Quick Reference Tutorial
2007
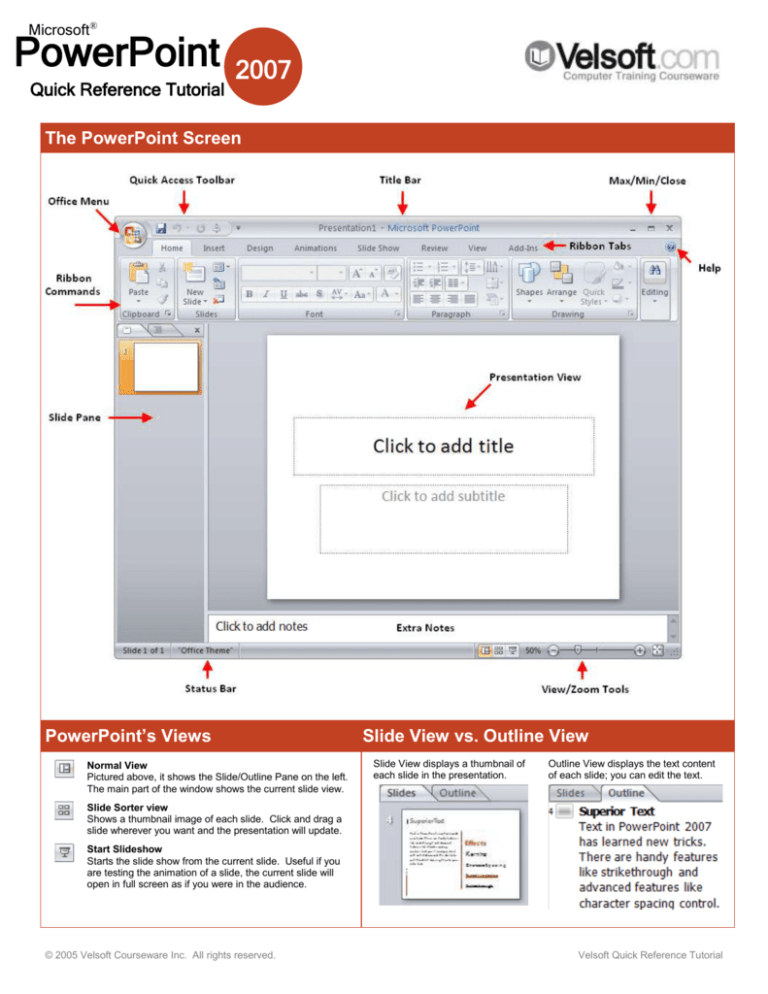
The PowerPoint Screen
PowerPoint’s Views
Normal View
Pictured above, it shows the Slide/Outline Pane on the left.
The main part of the window shows the current slide view.
Slide View vs. Outline View
Slide View displays a thumbnail of
each slide in the presentation.
Outline View displays the text content
of each slide; you can edit the text.
Slide Sorter view
Shows a thumbnail image of each slide. Click and drag a
slide wherever you want and the presentation will update.
Start Slideshow
Starts the slide show from the current slide. Useful if you
are testing the animation of a slide, the current slide will
open in full screen as if you were in the audience.
© 2005 Velsoft Courseware Inc. All rights reserved.
Velsoft Quick Reference Tutorial
The Quick Access Toolbar
Office 2007 has dispensed with all toolbars used
in previous versions. Instead, there is a Quick
Access Toolbar which is always located at the
top of your screen which can be used to add
any command you like.
Adding commands is easy. You can
click the pull-down icon to the right of
the toolbar and add a common
command, as shown on the right.
You can also right-click any command
in the ribbon and click Add to Quick
Access toolbar.
In PowerPoint options, you can further
customize such that when you open a
certain presentation, a custom toolbar
will appear just for that presentation.
Inserting a Basic Table
A table is a grid where each row and column
intersects to create a cell. Information of nearly
any type can be stored in a cell like text or
pictures.
The big advantage of a table is that you can
enter in as much information as you like, and the
table will still keep things neat and organized on
your slide.
Inserting a basic table is easy. Click the Insert
ribbon, and then click Table. Click the lowerrightmost cell of the table size you need.
At right, a 3x5 (column x row) is selected.
At far right, the table is inserted and preformatted to make data easier to read.
General Font Commands
Paragraph Formatting Commands
Click the pull-down arrow to choose a new font.
Choose a font size
Incrementally increases/decreases font size.
Removes any formatting applied to a font.
Makes text bold, italic, or underlined.
Inserts a bulleted/numbered list
Decrease/increase the indent of a paragraph.
Specify the space between lines of text.
Turn the text a degree of rotation.
Change how text is aligned in the text box.
Draws a line through text.
Draws a shadow underneath the text.
Adjusts space between each character.
Make a selected block of text all upper or lower
case.
Change the color of the font.
Using Find and Replace
Find will search the entire presentation for an instance of a word or phrase.
Replace (commonly called Find and Replace) will search, and then
substitute any matching text with text you have specified.
Change a list of information into a SmartArt diagram.
Aligns text to the left margin, the center of the
placeholder, or the right margin.
Aligns text to the left and right margins, equally spacing
out text.
Split a text area into two or more columns.
Using the Format Painter
The Format Painter is found in the Clipboard
chunk of the Home ribbon. It allows you to
copy the formatting of a block of text rather
than copy the text itself. If you decide to make
a formatting change that has to be done on
several slides, there is no easier way!
Highlight the source text, click Format Painter,
and then highlight the target text. The
formatting will be applied. Double-clicking the
command will let you ‘paste’ the formatting over
and over until you click the command a final
time to stop.
© 2005 Velsoft Courseware Inc. All rights reserved.
V
® Reference Tutorial
Velsoft Quick
Microsoft
PowerPoint
Quick Reference Tutorial
2007
Table Style Options
Adding a Special Character
A table can be as simple or as complex and you want to make it. Use
the Table Tools ribbon to add or remove the following style options for
the table, such as banded rows (easy to see when using a large table)
If you are adding a mathematical equation to a slideshow, you might want to use
special symbols to enhance your content. Click Insert Symbol to add one.
Performing Basic File Tasks
The My Places Toolbar
When using the My Computer dialogue box (Open & Save As
commands) you can perform basic file management tasks. Right-click
files and folders to Cut, Copy, Rename, and Delete:
The My Computer dialogue box contains a listing of different computer locations
on the left. Click any of these locations to be shown the contents of that folder:
My Recent Documents will list all of the
files, presentations etc. that have been
worked on recently. My Recent
Documents will display folders, how many
files are in the folders, and the individual
files.
This icon allows you to access all of the
items on your desktop.
My Documents is the default Windows
location for all folders and files.
You can also click and drag files into folders using this view. Finally,
use the My Computer toolbar at the top of the dialogue box for
navigation options:
My Computer gives you access to My
Documents as well as all drives in your
computer.
My Network Places will display all folders
shared by other computers. For example,
if you have a main server and have a
shared network, you can access files and
folders on the server via your workstation
computer with this shortcut.
Inserting a Simple Table
Saving in Different File Formats
Use the Save As command Save as type combo box to select a file type:
Insert Table, and then
hover over the size of table
you want to insert. Click in
the lower-rightmost corner
of your desired table size.
© 2005 Velsoft Courseware Inc. All rights reserved.
Velsoft Quick Reference Tutorial
Adding Animations
Navigating your Presentation
You can add emphasis to a presentation by animating titles, text,
objects, etc. Anything on a slide except for a sound clip and slide
background can be animated.
PowerPoint provides you with four very faint commands in the lower-left hand corner
of the presentation (when viewing in full screen). Hover your mouse over each icon
to use
Previous Slide
Click this to move back one slide in the presentation.
The Custom Animation task pane lets you select an object to
animate from the slide and then choose an animation. You can
animate objects so they appear on the slide, move in some way to
add emphasis, or move off the slide. You can also define a custom
animation path by drawing with your mouse directly on the slide:
Adding Movies and Sounds
Pen/Highlighter
You can use a virtual marker to emphasize points about
your presentation. Click the command and then choose a
pen style/color. When you have completed your slide
show, you have the option to save any markings you
made to the show.
Slide Show Menu
Click this command to see options about your show
(also accessible by right-clicking any slide):
Next Slide
Click to advance to the next slide. You can also
advance to the next slide by clicking on an empty area of
the slide, pressing the right or down arrows, or pressing
Enter.
Creating SmartArt
You can add a sound file, play a movie clip, or play a CD audio track SmartArt is a special type of diagram designed to show a flow-through or hierarchical
when giving a presentation. Click Insert Media Clip. You can also model. On the Insert ribbon, click the SmartArt command. Choose a category,
click the Media Clip icon in the text placeholder:
choose a style and click OK to insert.
When you add a clip, you will be prompted if you want to play the clip
automatically or when clicked.
If you click Insert Sound Record Sound, use a microphone to
record your voice to use when narrating an automated presentation.
You can also insert SmartArt by clicking the icon in a content placeholder:
Sound and video clips contain similar options which let you loop the
clip, play full screen (movie), and adjust the show volume.
Setting Auto Recover Interval
PowerPoint can automatically save your file on regular intervals.
Adjust this property in PowerPoint Options Save
Working with Text Boxes
Text Box manipulation is easy –
first select the text box by clicking
its border. Now you can move,
resize, delete, rotate (green
handle) and customize the look.
®
© 2005 Velsoft
Courseware Inc.
Microsoft
All rights reserved.
PowerPoint
Quick Reference Guide
Velsoft Quick Reference Tutorial.
2007
PowerPoint Viewer 2007
Linking and Embedding Files
If you plan to take your presentation on the road to a computer
that does not have PowerPoint installed, you can download
and use the PowerPoint Viewer.
PowerPoint lets you link (add content via a hyperlink connection to a file) or embed
(inserting a foreign file type) a file in your presentation. Linking means a smaller file
size, but if the presentation is moved you will have to re-establish links to make the
content work. Embedding means adding a foreign file type to your PowerPoint
presentation. This method lets you take supplementary information with the
presentation, but at a cost of large file sizes.
1.
Visit http://office.microsoft.com
2.
3.
Use the Search tool to find “PowerPoint Viewer”
Download and install the software on the
destination computer.
4.
Open the program by clicking Start All
Programs Microsoft PowerPoint Viewer 2007.
Browse your computer for any PowerPoint files
and click Open to view them.
5.
6.
Proceed through the slide show by clicking,
pressing Enter, or using the right arrow on the
keyboard.
7.
When the show is over, you will see the following
Once you end the show, you will be prompted to
open another file if you wish.
To link, copy the source information and click Paste Paste Special. When inserting
an object, click Insert Object. Both dialogue boxes look basically the same:
When linking, you can paste the information from the source file, such as text from a
Word document, or paste a link to the source file. When embedding, you can create a
new file type (and choose from a list, like above) or create from file. Creating from a file
essentially means inserting a file directly into the presentation. If the PowerPoint file
was 100KB, and a 500KB Excel spreadsheet was added, the PowerPoint file would
swell to 600KB to incorporate the Excel file completely.
PowerPoint 2007 Options
Add a Photo Album to a Presentation
Open PowerPoint options by clicking Office Menu
PowerPoint Options. Choose a category from the list on the
left, then modify the options in the main part of the window.
PowerPoint allows you to add a photo album to a presentation that can be used to
highlight a vacation, step-by-step visual instruction, or anywhere where structured
visuals might be helpful. Click Insert Photo Album to add content:
Popular
The Popular options are those that you
will use the most when modifying
PowerPoint. Change the color
scheme, change your user name, show
the Developer Ribbon.
Proofing
Modify the way that PowerPoint will
correct mistakes you have made and
adjust other formatting and
grammatical options. Click
AutoCorrect Options to modify these
options and more.
Save
Choose the default file format for
PowerPoint, set the interval when
AutoRecover will save your work for
you, store files in a temporary filer until
you are ready to publish, and more.
Advanced
Modify other misc. options with this tab.
Set display options like making the
ruler visible, adjust options to print your
file, adjust how your computer behaves
during a presentation, and more.
Customize
Add and remove commands from the
Quick Access toolbar with this tab.
Add-Ins
Manage any third-party software that is
compatible with PowerPoint.
After clicking Create, the content will be added to the current slide show. Each caption
and text box (if you chose to add them) will be positioned in the place you specified.
Each of the text boxes is a placeholder though, so you can customize each individually,
delete some of them, and move them around.
Trust Center
This tab contains information and
options relating to your personal
information and privacy when using
Microsoft software and services.
Once you are happy with the layout and content if the slide show, you can take the
presentation one step further by adding voice narration, automate the show, or package
the presentation to a CD for distribution.
Resources
This tab offers a portal to get updates
for PowerPoint, run a diagnostic check,
activate your copy of Office 2007, etc.
© 2005 Velsoft Courseware Inc. All rights reserved.
Call 1-800-730-7115 to order all of the Velsoft Quick Reference Guides
Types of Master Pages
Editing Masters
A master can be one of three things: a slide, a note, or a handout. A master
is like an ‘internal’ template; that is all slides, notes, and handouts created in
the presentation will contain the same formatting as the respective master.
To view a slide, note, or handout master, click View Slide (Note/Handout)
Master. This will open an editable template for the slide, note, or handout
master. An associated ribbon will appear for each master type. Each ribbon
contains similar commands:
Page Setup lets you orient and manage the master as a whole. You can add
and customize many slide masters, but only one note and handout master.
Placeholder options let you add/remove headers, footers, date/time, content,
etc if you wish.
The overall theme, as well as colors and fonts of a master can be modified
however you like. Select the placeholder or master element and make the
necessary changes. You can customize the background of any master to be
colored, or include a picture or gradient. The final button will close the view
of the master editing ribbon and return you to normal view.
Custom Slide Shows
Voice Narration
Imagine you have created a presentation to give to two different department
heads. Some of the information is the same for both executives, but some
information only concerns one executive. You can create two custom
shows from the main show and use only certain slides in each presentation.
If you plan on creating an automated presentation for kiosk usage, adding
voice narration to a slide is a useful feature. Combined with properly set up
slide timing and animations, you can create a very attractive show!
Click Slide Show Record Narration
Click Slide Show Custom Slide Show, click New, and choose the slides
to use from the main list. Name the presentation and save the slide outline.
You can adjust the microphone volume level and the sound quality from this
dialogue box. When you are happy with the settings, click OK. You will be
prompted if you want to start narration from the beginning of the show or the
current slide.
The slide show will begin, speak whatever narration you want to say for each
slide and then click, press Enter, or press the right arrow key to advance to
the next slide.
Repeat until you have finished the presentation, then press Escape. The
slide timings and narration files will be saved with the presentation (unless
Link is checked in the above diagram).
© 2005 Velsoft Courseware Inc. All rights reserved.
Call 1-800-730-7115 to order all of the Velsoft Quick Reference Guides.
Microsoft®
PowerPoint
Quick Reference Tutorial
2007
SharePoint Site Requirements
IE6.0 or later,
Internet
connection
SharePoint is built on Microsoft technology so
IE browser will give the best support. A highspeed Internet connection is strongly
recommended.
Login Info
A user name and password will be provided to
you from your system administrator. Keep your
password in a safe place.
System
Requirements
Your computer must have Windows
2000/XP/Vista installed, and at least 512
megabytes of memory (1 gigabyte for Vista).
The recommended amount of hard drive space
depends on how much data you intend to
transfer to and from the SharePoint site.
Creating a Macro
Click Developer Macros. Give the macro a name (description optional) and
click Create:
Smart Tags
Basics of the Visual Basic Editor
A Smart Tag is a feature built into the Office family of program that is
designed to recognize special types of data. Smart Tags can
recognize measurements, dates, financial symbols, and the names of
people who are in your Outlook address book.
Open the PowerPoint file you want to use a macro with. Click Developer
Macros, give the macro a name and click Create. The Visual Basic Editor will fill
in the basic code requirements.
Enable Smart Tags by opening PowerPoint Options in Proofing
Auto Correct Options Smart Tags tab:
When you type different object identifiers, the editor will automatically suggest a
number of attributes that can be used at the present time:
When you type a date like April 5, 2007, PowerPoint will add a dotted
line under the text as well as show the Smart Tag button. Click this
button for extra functionality:
Save the file and run the macro by clicking Run Run Sub/UserForm. If you
made any grammatical or logical errors, the macro will run until it encounters the
problem. You can then use the tools in the Debug menu to work out the problem
in the code.
Consult the Microsoft Development Network for many VBA code examples.
Accessing a SharePoint Workspace
The Developer Tab
All SharePoint sites that run on a SharePoint Server have the same
general address template.
In order to fully use macros in PowerPoint, you need to enable the Developer tab.
Do this by clicking Office Menu PowerPoint Options Popular tab. In the
Popular tab, check the Show Developer Tab checkbox.
http://sps.company.com will access the main page
http://sps.company.com:<port_num>/personal/<user>/<workspace>
will access your own page.
© 2005 Velsoft Courseware Inc. All rights reserved.
Velsoft Quick Reference Tutorials
Publishing a Presentation
Adding Macros to Quick AccessToolbar
PowerPoint has the ability to publish a presentation as an HTML file that
can be viewed in the Internet. When you have completed work on a
presentation, click Office Menu Save As. Make sure that the file type
is Web Page:
You can add individual macros to the Quick Access Toolbar and run them with a
single click. Open PowerPoint Options and click the Customize tab. Choose
Macros from the list of commands to add to the toolbar and then add the macros:
By default, the title of the Web Page will be the name of the file. You
can change the title by clicking Change Title (red arrow). The Publish
button will do the necessary conversions to the PowerPoint file and then
All macros will be displayed with the same icon as above. To avoid confusion
save it as an HTML file. The file can be viewed in most popular Web
over multiple macros, highlight a macro in the list and click the Modify button.
browsers, but will have the best functionality with Internet Explorer.
You can choose from a wide range of other symbols to use for your macro:
PowerPoint also creates a folder containing other supporting files. This
folder must be in the same directory as the HTML file in order to properly
display your page.
Digital Signatures
Restricting Permission to a Document
Just as you would sign off on a document, you can sign a digital
document with a signature that identifies you as you.
When employing Information Rights Management (IRM, see note below), click
Office Menu Prepare Restrict Permission and then select
Unrestricted/Restricted access or manage the credentials needed to view your
document:
The signature acts like a ‘lie detector’ which will tell the truth as long as
the document is not altered after being signed. If the document is
altered in any way, the signature will remain, but will become invalid.
Checking for invalid signatures (which PowerPoint does automatically)
helps ensure the source of a document.
If you click Manage Credentials, you will see the Permission dialogue box
appear. Enter the names of people who have permission to your document.
What is a COM Add-In?
What is Information Rights Management?
A COM Add-In is a third-party piece of software which is designed to
give extra functionality above and beyond what PowerPoint already
offers.
Information Rights Management lets you control which users have access to
what in your document. Permissions to read, write, and modify a document are
controlled by a central server on your network. You can specify which users will
be able to do what with a document and register those users on the server. The
users then have to enter their credentials to the server before being given
read/write access.
View current add-ins by clicking Office Menu PowerPoint Options
Add-Ins.
© 2005 Velsoft Courseware Inc. All rights reserved.
Velsoft Quick Reference Tutorials.

