Audacity Tutorial Additions
advertisement

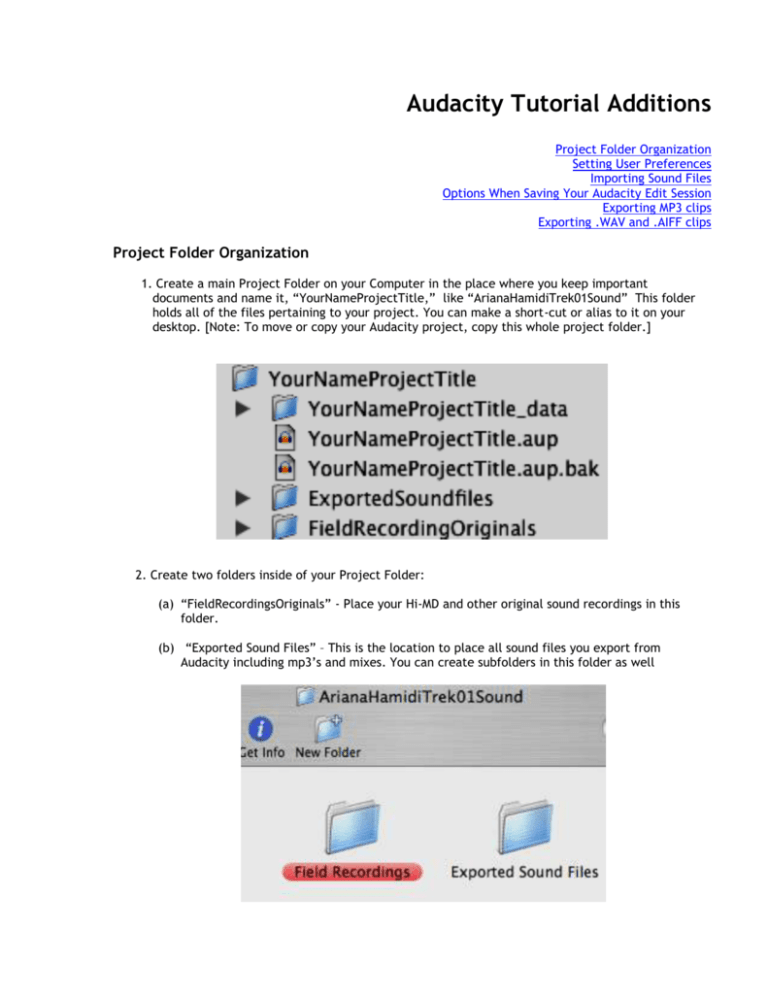
Audacity Tutorial Additions Project Folder Organization Setting User Preferences Importing Sound Files Options When Saving Your Audacity Edit Session Exporting MP3 clips Exporting .WAV and .AIFF clips Project Folder Organization 1. Create a main Project Folder on your Computer in the place where you keep important documents and name it, “YourNameProjectTitle,” like “ArianaHamidiTrek01Sound” This folder holds all of the files pertaining to your project. You can make a short-cut or alias to it on your desktop. [Note: To move or copy your Audacity project, copy this whole project folder.] 2. Create two folders inside of your Project Folder: (a) “FieldRecordingsOriginals” - Place your Hi-MD and other original sound recordings in this folder. (b) “Exported Sound Files” – This is the location to place all sound files you export from Audacity including mp3’s and mixes. You can create subfolders in this folder as well Setting User Preferences in Audacity 1. Launch Audacity. Under the “Audacity” menu at the top select, “Preferences” (a) In the Audio I/O tab, under “Playback Device,” select “internal” for Mac. For PC, select your sound card or your native sound driver. Select the same device under “Recording Device.” (b) In the Quality tab, under “Under Default sample rate,” select, “44100 Hz.” Under default sample format, select “32 bit local,” unless your computer is an older, slower model. In that case select, “16 bit.” (c) In the “File Formats” tab, check “Read Directly from the Original File” option. (The “Direct” mode assumes that you have a “safety” copy of your field recordings on CD-R or another copy on your drive. ) (d) In the “File Formats” tab, under “Uncompressed Export Format,” select “WAV [Microsoft 16 bit PCM] for XP or “AIFF (Apple/SGI) 16 bit PCM” for Mac. (d) In the “File Formats” tab, under “MP3 Export,” use pull-down menus to set Bit Rate to “192” and “Bit Depth” to “16.” (e) In the “File Formats” tab, click on “Find Library” button and navigate to the LameLib document you downloaded. (Its suggested that you store this component in the Audacity Application folder.) If you need to download LameLib here are the sites: [OS X] [Windows] Importing A Sound Recording Audacity supports a wide variety of sound formats for editing in stereo and mono. In doing so, it converts the file into its “native” format depending on what you selected in the preferences (Usually 32 bit wav for XP and 32 bit AIFF for Mac). This high resolution copy ensures highest quality digital handling of your material. 1. If you are running version 1.3.2, under the File menu heading, select, IMPORT -> Audio and navigate to your Field Recordings Folder and select one of your field recordings. If you are running v1.2.6. under the “Project” menu heading select “Import” and navigate to your Field Recordings Folder and select one of your field recordings.. 2. The sound file will open in a window that looks like this: Note some of the sound file’s features that can be ascertained in this window: (a) The sample rate of 44100 K in the waveform’s header (and that the Audacity session is set to the same sample rate in the lower left corner. (b) The Pan or the Balance between the left and right stereo channels defaults to the middle position. (c) The playback volume of the sound recording can be adjusted with a silder in the header of the waveform. (d) A Mute button to turn off the sound playback from a Track. (e) A Solo button that causes only the sound from a Track to be heard. (Other active Tracks cannot be heard while this button is selected). Options When Saving Your Audacity Edit Session Audacity doesn’t have an “Browser Window” list feature like Pro Apps to show the user all of the sound files that have been imported into a edit session to potentially be used in the edit. If you do group-select a number of sound files and import them at once, Audacity will place all of the files into separate tracks all starting at “00:00:00,” the start of the time line. If you want to keep these tracks handy for use but not hear them when you play the session, use the Track Mute buttons to turn off the sound playback on the Tracks you do not wish to hear. Saving your Audacity session will preserve all of these tracks for continued work. Audacity does support, the “Undo” feature so if you change your mind or make a mistake while editing, you can reverse your steps to return to the stage prior to your mistake. ( I’m not sure whether some of your recent steps are saved in your Audacity Session or not; I believe this feature has been under development.) It is important to save your Audacity Session regularly as you work and when you first save your session to make sure the Session doc “.AUP” is placed in the folder you created: 1. After importing your sound file, under the File menu, select “Save-As.” If you are running version 1.2.5 skip to step 2. In version 1.3.2, this window will open: If you click on “Copy Selected Audio Into Project,” your Audacity Edit document (with the extension “.aup” and a copy of all of the sound files in your session folder will saved your Project Folder, You’ll need to navigate to that location if you have not already done so. This a good way to make sure everything pertaining to a session is kept in your project folder, even sounds you grab from other locations on your computer! If you click on “Skip,” only the Audacity Edit document ( the “.aup” doc) will be saved in your Project Folder, You’ll need to navigate to that location if you have not already done so. This is a good choice when you do not want to use the additional hard drive space or when an edit or process is not crucial and could be easily repeated 2. In the save navigation window that opens, enter the name for your project such as, “YourNameProjectTitle.” In version 1.2.6, this step automatically creates two documents and one folder: (a) “YourNameProjectTitle.aup,” This is the doc you click on to continue work on your edit session and the one that contains all editing/changes you make. Think of this doc with the “aup” extension as your main “Session doc.” (b) “YourNameProjectTitle.aup.bak,” This is a back-up copy of the .aup doc that Audacity automatically makes. If you experience a “crash,” make a copy of this doc in the finder (Command +D) and use the copy to launch Audacity and return the state of your edit the last time your session was saved. (c) “YourNameProjectTitle_data” This folder will be created if you select. Note that you cannot avoid creating this folder in v1.2.6. It appears to be similar to the “_data” folder obtained by selecting, “Copy Selected Audio Into Project,” in v1.3.2. Exporting MP3 “Clips” If you haven’t done so already, check your Preferences as described above to set mp3 quality to “192.” 1. Use the Selector tool to click-drag-select the portion of the timeline you would like to export as an .mp3 sound file. Be sure to select both tracks for a stereo recording (left and right). 2. Under the File heading, select “Export Selection As MP3” 3. In the Save-As Navigation window that opens, navigate to the “ExportedSoundfiles” folder you created and name the sound file retaining the “.mp3” extension. Click SAVE. Exporting .WAV & .AIFF Clips MP3’s are preferred for web playback, but it is often a good idea to also save a high resolution version of your edit session before quitting. You can make further edits on it without quality loss and make additional mp3’s as needed. Full resolution versions are sometimes called, “masters.” 1. Use the Selector tool, to click-drag-select the portion of the timeline you would like to export as an .aiff or .wav sound file. 2. Under the File heading, select “Export Selection As AIFF” (or “.WAV” if you are working on a PC): 3. In the Save-As window that opens, navigate to the “ExportedSoundfiles” folder, name the sound file retaining the “.aiff” or “.wav” extension and click, SAVE. Rob Danielson & Steve Wetzel 2.2007


