WORK-BENCH™ASSEMBLY INSTRUCTIONS
COMPONENTS:
W3624 and WT3624
leg
2-Panel System
Available in Grid or Solid Top
(4) 24” legs
(4) Internal Stackers
Panels: (2) 2’x3’
Legs: (4) 12”
(4) 24”
Internal Stackers: (4)
(4) 12” legs
Step 1
Step 2
Step 3
Step 4
Step 3
Step 4
W4824 and WT4824
COMPONENTS:
2-Panel System
(6) 24” Legs
(6) Internal Stackers
(6) 12” Legs
Panels: (2) 2’x4’
Legs: (6) 12”
(6) 24”
Internal Stackers: (6)
Step 1
Step 2
W6624 and WT6624
COMPONENTS:
2-Panel System
(6) 12” legs
(6) Internal Stackers
(6) 24” legs
Panels: (2) 2’x5.5’
Legs: (6) 12”
(6) 24”
Internal Stackers: (6)
Step 1
Step 2
Step 4
Step 3
W9624 and WT9624
COMPONENTS:
2-Panel System
Panels: (2) 2’x8’
Legs: (8) 12”
(8) 24”
Internal Stackers: (8)
(8) 12” legs
Step 1
Step 1
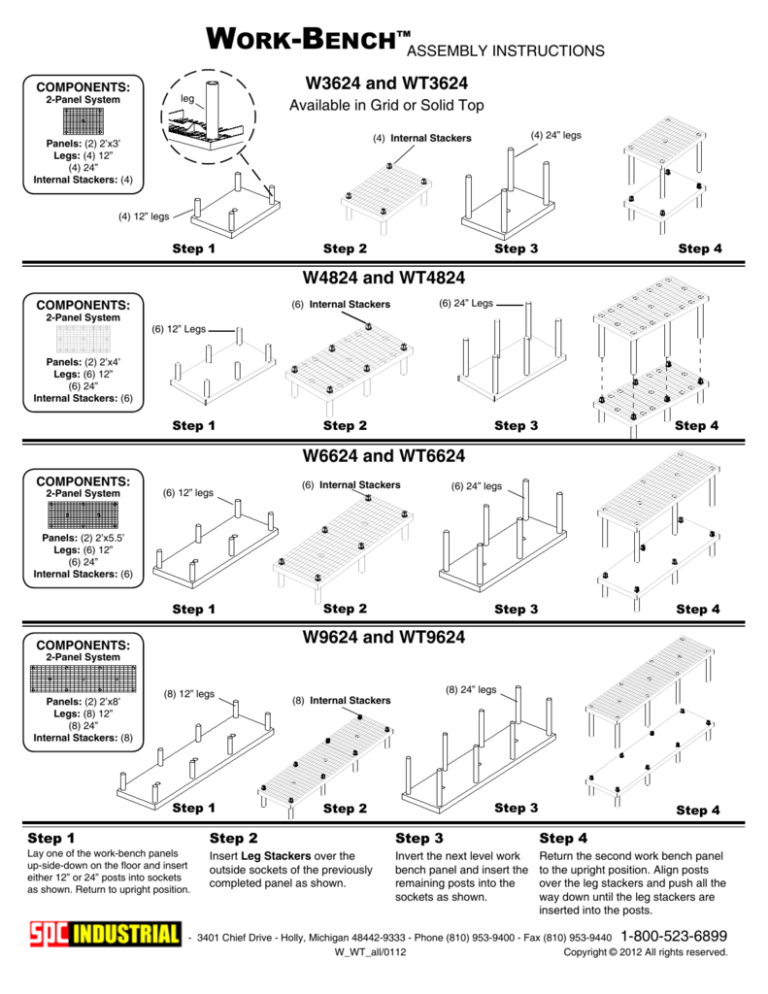
Lay one of the work-bench panels
up-side-down on the floor and insert
either 12” or 24” posts into sockets
as shown. Return to upright position.
(8) 24” legs
(8) Internal Stackers
Step 3
Step 2
Step 4
Step 2
Step 3
Step 4
Insert Leg Stackers over the
outside sockets of the previously
completed panel as shown.
Invert the next level work
bench panel and insert the
remaining posts into the
sockets as shown.
Return the second work bench panel
to the upright position. Align posts
over the leg stackers and push all the
way down until the leg stackers are
inserted into the posts.
- 3401 Chief Drive - Holly, Michigan 48442-9333 - Phone (810) 953-9400 - Fax (810) 953-9440 1-800-523-6899
Copyright © 2012 All rights reserved.
W_WT_all/0112
WORK-BENCH™ASSEMBLY INSTRUCTIONS
W3636 and WT3636
COMPONENTS:
Available in Grid or Solid Top
2-Panel System
Panels: (2) 3’x3’
Legs: (4) 12”
(4) 24”
Internal Stackers: (4)
(4) 12” legs
(4) 24” legs
(4) Internal Stackers
leg
Step 1
Step 2
Step 4
Step 3
W6636 and WT6636
COMPONENTS:
(6) 12” legs
2-Panel System
(6) Internal Stackers
(6) 24” legs
Panels: (2) 3’x5.5’
Legs: (6) 12”
(6) 24”
Internal Stackers: (6)
Step 1
Step 3
Step 2
Step 4
W9636 and WT9636
COMPONENTS:
(8) 12” legs
2-Panel System
(8) 24” legs
(8) Internal Stackers
Panels: (2) 3’x8’
Legs: (8) 12”
(8) 24”
Internal Stackers: (8)
Step 1
Step 1
Lay one of the work-bench panels
up-side-down on the floor and insert
either 12” or 24” posts into sockets
as shown. Return to upright position.
Step 3
Step 2
Step 4
Step 2
Step 3
Step 4
Insert Leg Stackers over the
outside sockets of the previously
completed panel as shown.
Invert the next level work
bench panel and insert the
remaining posts into the
sockets as shown.
Return the second work bench panel
to the upright position. Align posts
over the leg stackers and push all the
way down until the leg stackers are
inserted into the posts.
- 3401 Chief Drive - Holly, Michigan 48442-9333 - Phone (810) 953-9400 - Fax (810) 953-9440 1-800-523-6899
Copyright © 2012 All rights reserved.
W_WT_all/0112
ASSEMBLY INSTRUCTIONS
2- Options to Secure
Legs to Panels
Leg Collar
How to use the Leg Collar
First, place the collar over socket aligning teeth
of collar to fit through grids.
Teeth
Second, Leg is inserted into the leg collar.
Collar Placement
Leg Placement on
Collar
Internal Leg
Stacker
Prongs
How to use the Internal
Leg Stacker
First, Place the stacker over socket aligning the
prongs with the D-shaped holes, and push down.
Second, leg is inserted over the leg stacker.
Grid Opening
Internal Leg Stacker
Placement
Leg Placement on
Internal Leg Stacker
- 3401 Chief Drive - Holly, Michigan 48442-9333 - Phone (810) 953-9400 - Fax (810) 953-9440 1-800-523-6899
Copyright © 2011 All rights reserved.
stacker/collar addendum/0311

