Ch11 - Packet Tracer Skills Integration Challenge
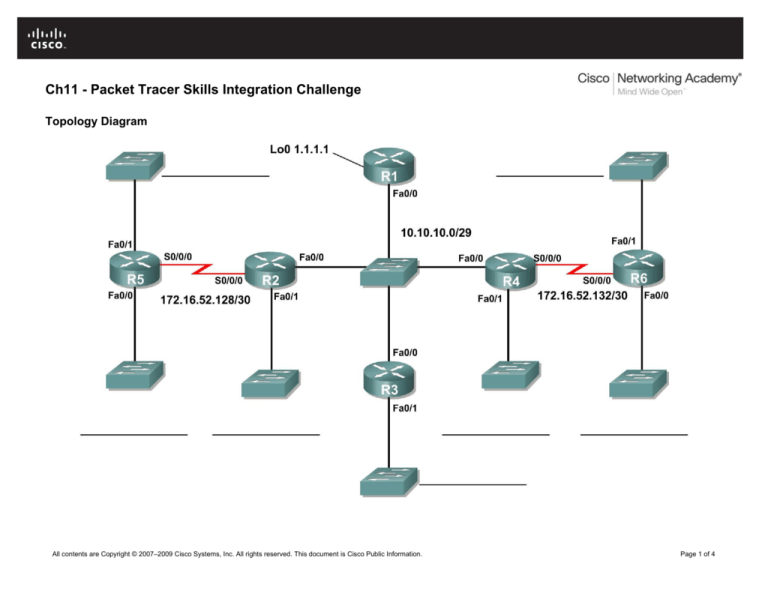
Topology Diagram
All contents are Copyright © 2007–2009 Cisco Systems, Inc. All rights reserved. This document is Cisco Public Information.
Page 1 of 4
CCNA Exploration
Routing Protocols and Concepts: OSPF
Ch11 - Packet Tracer Skills Integration Challenge
Addressing Table
Device
Interface
IP Address
Subnet Mask
Fa0/0
10.10.10.1
255.255.255.248
Loopback0
1.1.1.1
255.255.255.255
Fa0/0
10.10.10.2
255.255.255.248
10.10.10.3
255.255.255.248
10.10.10.4
255.255.255.248
172.16.52.133
255.255.255.252
172.16.52.129
255.255.255.252
172.16.52.134
255.255.255.252
R1
R2
Fa0/1
S0/0/0
Fa0/0
R3
Fa0/1
Fa0/0
R4
Fa0/1
S0/0/0
Fa0/0
R5
Fa0/1
S0/0/0
Fa0/0
R6
Fa0/1
S0/0/0
Learning Objectives:
•
•
•
•
•
•
Design and document an addressing scheme based on requirements.
Apply a basic configuration to the devices.
Configure a Routers Priority and RID's
Configure OSPF routing
Disable routing updates on appropriate interfaces.
Verify full connectivity between all devices in the topology.
All contents are Copyright © 2007–2009 Cisco Systems, Inc. All rights reserved. This document is Cisco Public Information.
Page 2 of 4
CCNA Exploration
Routing Protocols and Concepts: OSPF
Ch11 - Packet Tracer Skills Integration Challenge
Task 1: Design and document an addressing scheme
Use the 172.16.0.0/16 to create an efficient addressing scheme that meets the following requirements:
(Start with the largest network and move to the smallest. Address the WAN link from R5 to R2 first, then
the link between R4 to R6.)
Hostname
R2
R3
R4
R5
R5
R6
R6
Interface
Fa0/1
Fa0/1
Fa0/1
Fa0/1
Fa0/0
Fa0/1
Fa0/0
Number of Hosts
1000
400
120
6000
800
2000
500
NOTE: Interface Fa0/0 has been preconfigured on R1, R2, R3, and R4.
Task 2: Apply a basic configuration.
On each router use the following chart to complete the basic router configurations. Also, be sure to
configure addressing and hostnames. The first IP for each subnet should be assigned to the router
interface. (R5 gets the first IP in its link with R2 (DCE). R4 (DCE) gets the first IP in its link with R6.)
Console
Password
VTY
Password
cisco
cisco
Enable
Secret
Password
cisco
Clock rate (if
applicable)
56000
Task 3: Configure Single-Area OSPF routing
Step 1: Configure OSPF (process ID 1) routing on each Router.
Step 2: Verify that all routes were learned.
Task 4: Fine-tuning OSPF
Step 1: Use the following guidelines to set the OSPF priority:
• R1 will never participate in a DR/BDR election.
• R2 will always become the DR
• R3 and R4 will both have the same priority of 100.
• R4 Should always become the BDR
NOTE: ALL PRIORITIES SHOULD BE SET ON FA0/0
Step 2: Use Shutdown/No Shutdown on interfaces to force a BR/DR election.
All contents are Copyright © 2007–2009 Cisco Systems, Inc. All rights reserved. This document is Cisco Public Information.
Page 3 of 4
CCNA Exploration
Routing Protocols and Concepts: OSPF
Ch11 - Packet Tracer Skills Integration Challenge
Task 5: Configure a Loopback
Step 1: On R1 configure a loopback with a 1.1.1.1/32 address.
Step 2: Create a default route to the loopback using the local interface argument.
Step 3: Propagate the route within OSPF updates.
Task 6: View OSPF updates
Step 1: Enter Simulation mode
Step 2: Select only OSPF in the filter.
Step 3: View the updates
Note: There is a bug in Packet Tracer v5.1 that ignores the wildcard mask for both scoring this activity
and routing via OSPF. On actual routers, using an incorrect wildcard mask when configuring OSPF
creates routing problems.
All contents are Copyright © 2007–2009 Cisco Systems, Inc. All rights reserved. This document is Cisco Public Information.
Page 4 of 4

