LS 137-02 T1
advertisement
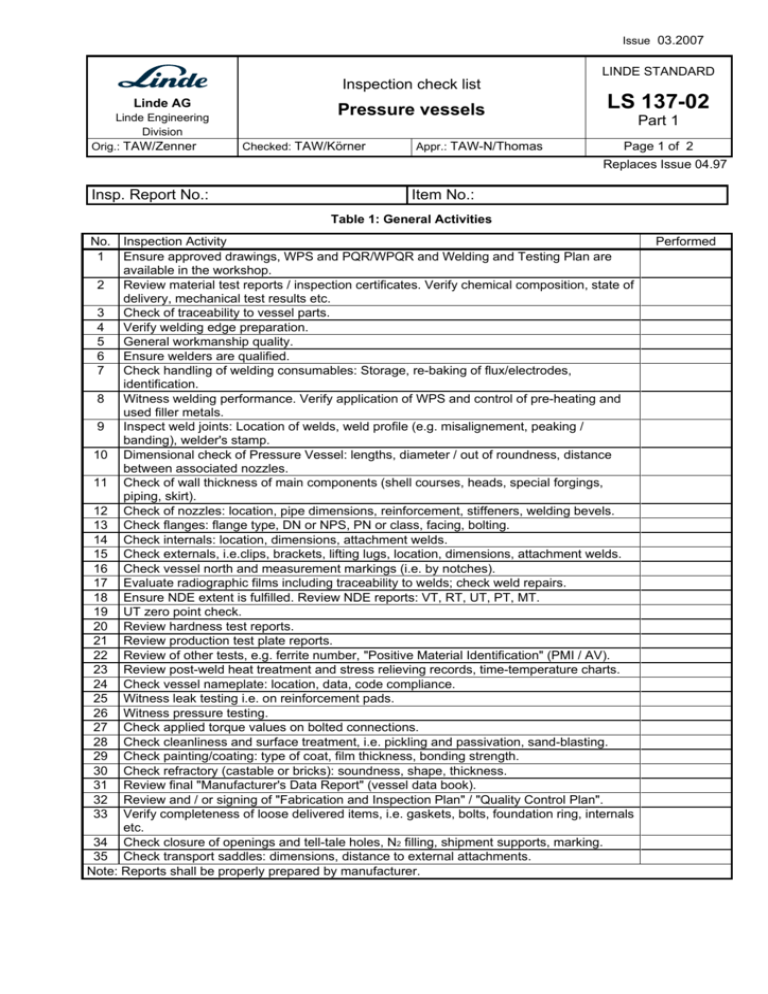
Issue 03.2007 LINDE STANDARD Inspection check list Linde AG Linde Engineering Division Orig.: TAW/Zenner Pressure vessels Checked: TAW/Körner Appr.: TAW-N/Thomas LS 137-02 Part 1 Page 1 of 2 Replaces Issue 04.97 Insp. Report No.: Item No.: Table 1: General Activities No. Inspection Activity 1 Ensure approved drawings, WPS and PQR/WPQR and Welding and Testing Plan are available in the workshop. 2 Review material test reports / inspection certificates. Verify chemical composition, state of delivery, mechanical test results etc. 3 Check of traceability to vessel parts. 4 Verify welding edge preparation. 5 General workmanship quality. 6 Ensure welders are qualified. 7 Check handling of welding consumables: Storage, re-baking of flux/electrodes, identification. 8 Witness welding performance. Verify application of WPS and control of pre-heating and used filler metals. 9 Inspect weld joints: Location of welds, weld profile (e.g. misalignement, peaking / banding), welder's stamp. 10 Dimensional check of Pressure Vessel: lengths, diameter / out of roundness, distance between associated nozzles. 11 Check of wall thickness of main components (shell courses, heads, special forgings, piping, skirt). 12 Check of nozzles: location, pipe dimensions, reinforcement, stiffeners, welding bevels. 13 Check flanges: flange type, DN or NPS, PN or class, facing, bolting. 14 Check internals: location, dimensions, attachment welds. 15 Check externals, i.e.clips, brackets, lifting lugs, location, dimensions, attachment welds. 16 Check vessel north and measurement markings (i.e. by notches). 17 Evaluate radiographic films including traceability to welds; check weld repairs. 18 Ensure NDE extent is fulfilled. Review NDE reports: VT, RT, UT, PT, MT. 19 UT zero point check. 20 Review hardness test reports. 21 Review production test plate reports. 22 Review of other tests, e.g. ferrite number, "Positive Material Identification" (PMI / AV). 23 Review post-weld heat treatment and stress relieving records, time-temperature charts. 24 Check vessel nameplate: location, data, code compliance. 25 Witness leak testing i.e. on reinforcement pads. 26 Witness pressure testing. 27 Check applied torque values on bolted connections. 28 Check cleanliness and surface treatment, i.e. pickling and passivation, sand-blasting. 29 Check painting/coating: type of coat, film thickness, bonding strength. 30 Check refractory (castable or bricks): soundness, shape, thickness. 31 Review final "Manufacturer's Data Report" (vessel data book). 32 Review and / or signing of "Fabrication and Inspection Plan" / "Quality Control Plan". 33 Verify completeness of loose delivered items, i.e. gaskets, bolts, foundation ring, internals etc. 34 Check closure of openings and tell-tale holes, N2 filling, shipment supports, marking. 35 Check transport saddles: dimensions, distance to external attachments. Note: Reports shall be properly prepared by manufacturer. Performed Linde AG - Linde Engineering Division Issue 03.2007 LS 137-02 Part 1 Page 2 of 2 Table 2: Supplementary Activities for Dryers, Filters, Separators, Spray Coolers No. Inspection Activity 50 Check support grid construction: gap between support ring and support grid, dimensions, flatness, welds. 51 Check sealing between support ring and support grid. 52 Check weir: overflow height, stiffeners, tightness. 53 Check diameter and height of riser pipes. 54 Check internal bolting, i.e. for gratings, manway covers, screen baskets: material and lock fastening (spring washer, double nut, tack welding). 55 Check wire meshing: mesh type and compactness, tightness to boundary shell. 56 Check that internal parts i.e. gratings / covers can be easily dismantled and handled. 57 Check for leaks on bolted connections where "fluid tight" condition is specified. 58 Check internal piping: NPS, flange connections, gaskets, supports (to allow free movement). 59 Check perforated plates: material, thickness, hole pitch. 60 Check vortex breaker: material and dimensions. 61 Check impingement plates: material and dimensions. 62 Check correct installation of filter elements: support, bolting, support for transport. 63 Check spare parts: filter elements, spray nozzles, etc. 64 65 66 67 68 69 Note: Reports shall be properly prepared by manufacturer. Revision: Totally revised Previous Issues: LS 137-02 (04.97) Replaces: LS 137-01 (10.90); LS 137-6 (08.81); LS 137-7 (08.81); LS 137-24 (08.81) Responsible department for the technical content: TAW LS-Class 1: Unrestricted publication Refer to protection notice ISO 16016 Performed
