Unit menu
Main menu
Equipment
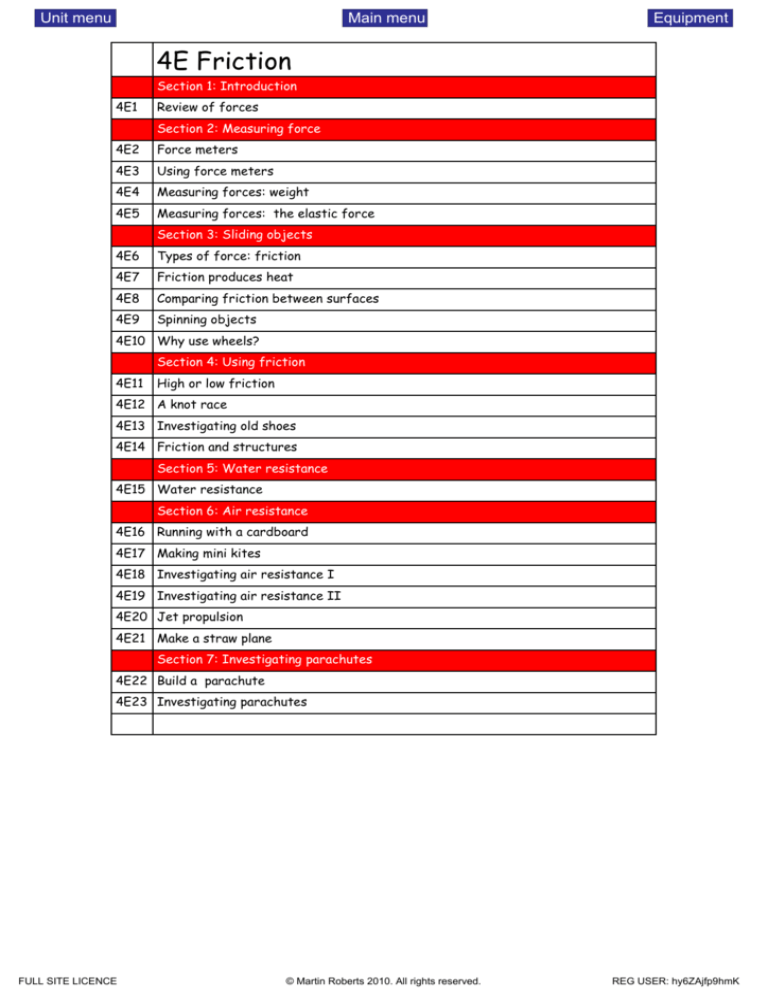
4E Friction
Section 1: Introduction
4E1
Review of forces
Section 2: Measuring force
4E2
Force meters
4E3
Using force meters
4E4
Measuring forces: weight
4E5
Measuring forces: the elastic force
Section 3: Sliding objects
4E6
Types of force: friction
4E7
Friction produces heat
4E8
Comparing friction between surfaces
4E9
Spinning objects
4E10 Why use wheels?
Section 4: Using friction
4E11
High or low friction
4E12 A knot race
4E13 Investigating old shoes
4E14 Friction and structures
Section 5: Water resistance
4E15 Water resistance
Section 6: Air resistance
4E16 Running with a cardboard
4E17 Making mini kites
4E18 Investigating air resistance I
4E19 Investigating air resistance II
4E20 Jet propulsion
4E21 Make a straw plane
Section 7: Investigating parachutes
4E22 Build a parachute
4E23 Investigating parachutes
FULL SITE LICENCE
© Martin Roberts 2010. All rights reserved.
REG USER: hy6ZAjfp9hmK
Unit menu
Main menu
Equipment
4E Equipment list
Specialised equipment
Digital thermometer
Force meters: set
Geometrical shapes: set
Slotted weight set
Weights
FULL SITE LICENCE
Recyclable
Collection of old shoes
Plastic bottle: 2l
Old plastic bags
Paper
© Martin Roberts 2010. All rights reserved.
Standard equipment/ household
Balloon
Block of wood
Board for rolling plasticene
Cotton thread
Duck tape
Elastic band
Glue
Heavy box
Hole punch
IWB
Large piece of card
Marker pen
Plastic straws: wide hole
Plastic straws: normal hole
Plasticene
Ruler
Scissors
Skateboard
Sticky tape
Stop watch
String
Thread
Tissue paper
Wooden block
Wooden board for ramp
REG USER: hy6ZAjfp9hmK
Unit menu
Main menu
Equipment
4E1 Review of forces
Retort
Print
and
stand
photocopy
set
worksheet
100 ml beaker IWBBeaker 250ml
Test tube 19mm
Test tube rack
Test tube rack
Test tube rack
For each photo above say whether PUSHING forces or PULLING forces are being used.
Now think of some other actions that involve pushing or pulling forces and fill in the table
below:
Action
Pushing forces?
Pulling forces?
Going up the stairs
FULL SITE LICENCE
© Martin Roberts 2010. All rights reserved.
REG USER: hy6ZAjfp9hmK
Unit menu
Main menu
Equipment
4E2 Force metres
Retort stand
Collection
of force
set meters
100 ml beaker
Print andBeaker
photocopy
250ml
worksheet
Test tube
(following
19mmpage)Test tube rack
Test tube rack
Test tube rack
Handle
1
Print, photocopy and hand out the
worksheets on the following page.
2
Introduce the force metre to the children,
pointing out the different parts and
explaining the function of each. As you do
this the children can label the parts on their
worksheet.
3
Point out that there are different coloured force
metres, some to measure weak forces others to
measure strong forces. Explain that each colour
tells you the size of the force it can measure.
Calibrator
Scale
Spring
Hook
Get the children to colour in the force metres on
their worksheet and write down the maximum
force that each will measure.
FULL SITE LICENCE
© Martin Roberts 2010. All rights reserved.
REG USER: hy6ZAjfp9hmK
Unit menu
Main menu
Equipment
4E2 Force metres
Label the different parts of the
force metre below:
Colour each force metre below and indicate
the maximum force it can measure.
Label the different parts of the
force metre below:
Colour each force metre below and indicate
the maximum force it can measure.
FULL SITE LICENCE
© Martin Roberts 2010. All rights reserved.
REG USER: hy6ZAjfp9hmK
Unit menu
Main menu
Equipment
4E3 Using force metres
Retort stand
Collection
of force
set meters
100 ml beaker
Collection
Beaker
of items
250ml
or devices
Testthat
tubecan
19mm
be pushed
Testortube
pulled
rack
Use your force metre to measure the
forces required in the various situations
listed below.
Test tube rack
Test tube rack
y
ar
im
e
Pr e n c
i
Sc
Your teacher has provided you with a number of situations in which you have to apply a force.
In each case decide which force metre is appropriate then measure the force required. Note
your measurements in the table below:
Situation
Force required
Open a drawer
Pull down a door handle
Drag a chair across the floor
Represent your information on a histogram.
FULL SITE LICENCE
© Martin Roberts 2010. All rights reserved.
REG USER: hy6ZAjfp9hmK
Unit menu
Main menu
Equipment
Opening a
drawer
Force required (Newtons)
Opening a
drawer
Force required (Newtons)
4E3 Using force metres
FULL SITE LICENCE
© Martin Roberts 2010. All rights reserved.
REG USER: hy6ZAjfp9hmK
Unit menu
Main menu
Equipment
4E4 Measuring forces: weight
Retort stand
Collection
of force
set meters
100 ml beaker
Collection
Beaker
of objects
250mlthat Test
can be
tube
lifted
19mm
by a force
Testmeter
tube rack
1
Calibrate the force metre.
Adjust the knob
until the indicator
corresponds to 0N
2
Test tube rack
Test tube rack
Measure the weight of
the objects supplied by
your teacher and note
down in the table below.
Make sure you chose the
correct colour force metre
for each object.
Remove any weights
Fill in the table below for the objects provided by your teacher:
Object
Mass (Kg)
Weight (N)
Object
Mass (Kg)
Weight (N)
In every day language the words WEIGHT and MASS are often considered to mean the same.
But in science they are NOT!
WEIGHT is a FORCE like friction or up thrust and is measured in ………………………………
MASS is a measure of the amount of matter (stuff) an object contains.
MASS is measured in ……………………………
FULL SITE LICENCE
© Martin Roberts 2010. All rights reserved.
REG USER: hy6ZAjfp9hmK
Unit menu
Main menu
Equipment
4E5 Measuring forces: the elastic force
Retortmeters
Force
stand set Elastic
100 band
ml beaker
RulerBeaker
Sticky
250ml
tape
Test tube 19mm
Test tube rack
Extend the elastic band
without stretching so that
the end coincides with 0cm.
2
Test tube rack
Stretch the elastic band in
intervals of 1cm and measure
the tension produced on the
force metre.
1
2
3
4
5
6
7
8
9
10
1
Test tube rack
Hold ruler with Sellotape
Write down the values of the tension produced in the elastic band verses the extension in the
table below.
Extension (cm)
0
1
2
3
4
5
6
7
8
9
10
Force in produced
elastic band (Newtons)
Tension [N]
Now plot the results on graph below:
10.0
5.0
1
2
3
4
5
6
7
8
9
Extension [cm]
FULL SITE LICENCE
© Martin Roberts 2010. All rights reserved.
REG USER: hy6ZAjfp9hmK
Unit menu
Main menu
Equipment
4E6 Types of force: friction
Retort stand
Wooden
blockset String
100 ml beaker
Slotted weight
Beaker
set
250ml
ForceTest
meter
tube 19mm
Block of wood with nail
and slotted weights
F
Test tube rack
Test tube rack
Test tube rack
1
Find the force required
to just make the block
move.
2
Repeat by sticking
different textures to
the block and table.
e.g. Sandpaper/sandpaper
3
Name the force that
prevents the object from
moving.
Pulling Force
When the object just starts to move in the experiment above what can you say about the two
forces acting on it?
F…………………………………………… = P………………………………………………
Use this to determine the force of friction produced by various surfaces :
Surface
Wood - Wood
Sandpaper - Wood
Sand paper - Sand Paper
Friction (N)
Why is the force of friction between sandpaper and sandpaper bigger than between wood and
wood? (hint: think about the texture of the surfaces!)
……………………………………………………………………………………………………………………………………………………………………………
……………………………………………………………………………………………………………………………………………………………………………
FULL SITE LICENCE
© Martin Roberts 2010. All rights reserved.
REG USER: hy6ZAjfp9hmK
Unit menu
Main menu
Equipment
4E7 Friction produces heat
Retort thermometer
Digital
stand set
100 Paper
ml beaker
Beaker 250ml
Test tube 19mm
Test tube rack
Test tube rack
Test tube rack
Very gently rub the tip of a probe
thermometer over a piece of paper
and note what happens to the
temperature. Then repeat the exercise
on a section of carpet and compare.
28.3ºC
What happens to the temperature as the probe is rubbed against the paper?………………………………
……………………………………………………………………………………………………………………………………………………………………………
Which produces the greatest change in temperature the paper or the carpet?
Which material produces post friction paper or carpet?
What causes the change in temperature? …………………………………
Why do you rub your hands together on cold winter mornings?…………………………………………………………
……………………………………………………………………………………………………………………………………………………………………………
FULL SITE LICENCE
© Martin Roberts 2010. All rights reserved.
REG USER: hy6ZAjfp9hmK
Unit menu
Main menu
Equipment
4E8 Comparing friction between surfaces
Retort stand
Collection
of different
set
100textured
ml beaker
surfaces
Beaker
(see250ml
below)
Test
Ruler
tube 19mm
WoodenTest
board
tube
for rack
ramp
Test
Blocktube
of wood
rack
Test tube rack
1
Your teacher has provided you with
a flat object [e.g. a wooden block]
and various textured surfaces.
H
2
Investigate the friction produced by
each surface by finding the height, H,
to which the ramp can be raised before
the object starts to fall.
Indicate the direction of the friction and the
pulling force in the diagram opposite.
When the object opposite is stationary what can
you say about the forces acting on it:
………………………… = ………………………
Note the results of your experiment in the table below:
Surface
Vinyl
Paper
Wood
Carpet
Sand Paper
Height
Which surface appears to produce the most friction?…………………………………………………………………………
How did you decide?………………………………………………………………………………………………………………………………………
……………………………………………………………………………………………………………………………………………………………………………
……………………………………………………………………………………………………………………………………………………………………………
FULL SITE LICENCE
© Martin Roberts 2010. All rights reserved.
REG USER: hy6ZAjfp9hmK
Unit menu
Main menu
Equipment
4E9 Spinning objects
Retort
A
collection
standof
set
geometrical
100 ml objects
beaker
1
Beaker 250ml
Test tube 19mm
Test tube rack
Test tube rack
Test tube rack
Your teacher has supplied
you with various geometric
shapes.
2
Try spinning the shapes on
your desk top or the floor
and see which spins for the
longest time.
What force stops the object from spinning? ………………………………………………
What two factors effect the friction between the spinning object and the floor?
1. …………………………………………………… ………………………………………………………
2. …………………………………………………… ………………………………………………………
The tyre pressure in racing bikes needs to be very high.
Why does this help the cyclist to travel faster?……………………………………………………………………………………
……………………………………………………………………………………………………………………………………………………………………………
……………………………………………………………………………………………………………………………………………………………………………
FULL SITE LICENCE
© Martin Roberts 2010. All rights reserved.
REG USER: hy6ZAjfp9hmK
Unit menu
Main menu
Equipment
4E10 Why use wheels?
Retort stand setHeavy100
Skateboard
box
ml beaker
Force meter
Beaker 250ml
1
2
Test tube 19mm
Make a heavy object by filling a
cardboard box with text books
for example.
Try pushing the box
with your finger.
Test tube rack
Test tube rack
Test tube rack
y
ar
m
i
e
Pr enc
i
c
S
y
ar
m
i
e
Pr enc
i
c
S
3
Place the box on a skateboard
and try pushing again. Note the
difference.
What was the force required to just make the object move:
a) Without wheels:………………………………
a) With wheels:………………………………
When you start to apply a pushing force on any object you will notice that, at first , it doesn’t
move. This is because it resists your push with an equal force acting in the opposite direction.
Write the name of the force in the diagram below:
Wheels were invented because they help to reduce which force? …………………………………
FULL SITE LICENCE
© Martin Roberts 2010. All rights reserved.
REG USER: hy6ZAjfp9hmK
Unit menu
Main menu
Equipment
4E11 High or low friction
Retort
Print
and
stand
photocopy
set
worksheet
100 ml beaker IWBBeaker 250ml
Test tube 19mm
Test tube rack
Test tube rack
Test tube rack
Friction can be wanted or unwanted by a designer, depending on the purpose of the object he
or she is designing.
Study the photos above and fill in the table below. Look around you and find a few more
objects that require or don’t require friction.
Object
Friction wanted
Friction unwanted
Bike tyre
Bike gears
Ice skate
Shoe laces
Match box
Screw driver handle
Shoe sole
Slide
FULL SITE LICENCE
© Martin Roberts 2010. All rights reserved.
REG USER: hy6ZAjfp9hmK
Unit menu
Main menu
Equipment
4E12 A knot race
Retort stand
Collection
of string
set or
100
cable
ml beaker
made fromBeaker
different
250ml
materials
Test
but
tube
more
19mm
or less Test
the same
tubethickness
rack
Test tube rack
1
Reef Knot: right over left
and under then left over
right and under.
2
3
Test tube rack
Tie a reef knot in various
samples of string or cable.
Use samples of similar thickness
but with different degrees of
friction.
For example normal string, wool,
insulated wire.
Organise a race to see who
can untie their knot first.
Get the pupils to explain the
outcome of the race in terms
of friction.
A knot relies on which type of force in order to work? ……………………………………
Explain why some knots in this experiment were far easier to untie than others:…………………………
……………………………………………………………………………………………………………………………………………………………………………
……………………………………………………………………………………………………………………………………………………………………………
FULL SITE LICENCE
© Martin Roberts 2010. All rights reserved.
REG USER: hy6ZAjfp9hmK
Unit menu
Main menu
Equipment
4E13 Investigating old shoes
Retort stand
Collection
of old
set shoes
100 mlWeights
beaker
Beaker
Force meters
250ml
Test tube 19mm
1
You are going to investigate the
frictional properties (grip) of a
number of different types of
shoe.
2
Take a sample shoe and add
some weights to it. If it is an
old shoe you could fill it with
chipping stones, for example.
Test tube rack
3
Test tube rack
Test tube rack
Find out what force is required
to just make the shoe start to
and make a note in the table
below.
Enter your measurements in the table below:
Shoe sample
Force required to just make it move
Trainer
Plimsoll
School shoe
Represent your results on a histogram using the graph paper provided.
Which type of shoe appears to offer the greatest friction? ……………………………………………………………
How did you insure that you carried out a fair test? ……………………………………………………………………………
……………………………………………………………………………………………………………………………………………………………………………
FULL SITE LICENCE
© Martin Roberts 2010. All rights reserved.
REG USER: hy6ZAjfp9hmK
Unit menu
Main menu
Equipment
4E13 Investigating old shoes
Friction, Newtons
Investigating grip on shoes
Type of shoe
FULL SITE LICENCE
© Martin Roberts 2010. All rights reserved.
REG USER: hy6ZAjfp9hmK
Unit menu
Main menu
Equipment
4E14 Structures and friction
Retort stand set
Pipils
Beaker 250ml
Test tube 19mm
Test tube rack
Test tube rack
Test tube rack
Get pupils to form structures
that require pushing and pulling
forces.
1
2
100 ml beaker
Help them to see that as long as
the structure is stationery then
the pushing and pulling forces must
be balanced.
3
Get pupils to see the role of
friction in keeping their structures
stable.
What would happen if the people above were wearing roller skates? ………………………………………………
What force do their feet make use of in order to keep the structure stable?………………………………
What supplies this force?……………………………………………………………………………………………………………………………
Name some activities where friction is unwanted: ………………………………………………………………………………
……………………………………………………………………………………………………………………………………………………………………………
FULL SITE LICENCE
© Martin Roberts 2010. All rights reserved.
REG USER: hy6ZAjfp9hmK
Unit menu
Main menu
Equipment
4E15 Water resistance
Retortplastic
Large
stand bottle
set
2l
100 mlPlasticene
beaker
Beaker
Board250ml
for rollingTest
plasticene
tube 19mm
Test tube rack
Test tube rack
Cut the top off of a large plastic
water bottle (1.5-2 litres) to make
a container and two/thirds fill with
water.
1
2
Test tube rack
Using the SAME AMOUNT of
plasticine make various shapes
as indicated opposite.
3
Test the shapes to see which moves
through the water fastest.
Try to record the times taken for each shape to reach the bottom:
Shape
Time (secs)
1
2
3
4
Draw the shape that has least water resistance:
FULL SITE LICENCE
© Martin Roberts 2010. All rights reserved.
REG USER: hy6ZAjfp9hmK
Unit menu
Main menu
Equipment
4E16 Running with a cardboard
Retortpiece
Large
standofset
card 100 ml beaker
Beaker 250ml
Test tube 19mm
Test tube rack
1
Get children to compare the difference
between running with and without large
pieces of card in front of them.
2
Ask them to find out if the same effect
is produced when they are walking slowly.
Test tube rack
Test tube rack
Why is it harder to run with a large piece of card in front of them?………………………………………………
……………………………………………………………………………………………………………………………………………………………………………
What is the name of the force that the card produces?……………………………………………………
Write its name in the box below:
pushing force
Name two factors that this force depend on:
…………………………………………………………………… and ……………………………………………………………………
FULL SITE LICENCE
© Martin Roberts 2010. All rights reserved.
REG USER: hy6ZAjfp9hmK
Unit menu
Main menu
Equipment
4E17 Making mini kites
Retort paper
Tissue
stand setPlastic
100straws
ml beakerduckBeaker
tape 250ml
Thread Test
Glue
tube 19mm
1
Test tube rack
Test tube rack
Test tube rack
Use the diagram on the following page
to make a number of card templates of
the kite and keel. Try cereal packets!
Get the children to use the templates
to cut out the kite shape and the keel
from different coloured tissue paper.
2
Cut two straws to lengths of 21cm
(vertical strut) and 19cm (horizontal
strut) and glue them to the kite.
Cut out the strut supports from duck
tape and position at for the four
corners of the kite.
Duck tape
19cm
21cm
Strengthen the central join between the
two struts by covering with an additional
section of duck tape.
3
Fold the keel where indicated then stick
the tab to the other side of the kite.
4
FULL SITE LICENCE
Stick some cotton thread to the
tip of the keel and go fly your kite!
© Martin Roberts 2010. All rights reserved.
Fold
19cm
REG USER: hy6ZAjfp9hmK
Unit menu
Main menu
Equipment
4E17 Making mini kites
FULL SITE LICENCE
© Martin Roberts 2010. All rights reserved.
REG USER: hy6ZAjfp9hmK
Unit menu
Main menu
Equipment
4E18 Investigating air resistance I
Retortofstand
Piece
scrapset
paper 100
A4 ml beaker
1
Beaker 250ml
Test tube 19mm
Take two pieces of A4 paper and roll
one of them into a ball. Then allow
both to fall to the ground from the
same height.
Test tube rack
2
Test tube rack
Test tube rack
Note which falls to the ground
first and explain why.
Name the two forces acting on the falling ball in the diagram below:
Explain why the paper falls faster when it is screwed up into a ball: ………………………………………………
……………………………………………………………………………………………………………………………………………………………………………
……………………………………………………………………………………………………………………………………………………………………………
FULL SITE LICENCE
© Martin Roberts 2010. All rights reserved.
REG USER: hy6ZAjfp9hmK
Unit menu
Main menu
Equipment
4E19 Investigating air resistance II
Retortofstand
Piece
scrapset
paper 100
A4 ml Stop
beaker
watchBeaker 250ml
Test tube 19mm
Test tube rack
Test tube rack
Test tube rack
You are going to investigate how the air resistance of a falling object depends on its area.
Tip: Count the timer in by
saying...”three,two,one,drop.”
1
Start with a piece of A4 paper and release
it from a high point. You may need to stand
on a chair. Record the time for the paper
to hit the ground and repeat two more times.
2
Fold the paper in half and repeat step 1
above. Repeat the experiment, folding the
paper in half each time, until you cannot
fold it any more (probably about six folds).
Write down your results in the table below:
Number of
folds
Time to fall
Reading 1
Reading 2
Reading 3
Middle reading
0
1
2
3
4
5
6
Put your middle reading in the last column and then make a histogram to show your results
(see following page).
What happens to the air resistance pushing on an object as its area increases?
……………………………………………………………………………………………………………………………………………………………………………
……………………………………………………………………………………………………………………………………………………………………………
FULL SITE LICENCE
© Martin Roberts 2010. All rights reserved.
REG USER: hy6ZAjfp9hmK
Unit menu
Main menu
Equipment
4E19 Investigating air resistance II
Time to fall (seconds)
Investigating air resistance
0
1
2
3
5
6
Number of folds
FULL SITE LICENCE
© Martin Roberts 2010. All rights reserved.
REG USER: hy6ZAjfp9hmK
Unit menu
Main menu
Equipment
4E20 Jet propulsion
Retort straw
Plastic
stand set String
100ormlthread
beaker
1
Scissors
Beaker 250ml
BalloonTestSticky
tube 19mm
tape
Cut a small section from a
plastic drinking straw.
2
3
Test tube rack
Test tube rack
Test tube rack
Thread some string through the straw
section and connect it between two
secure points in the classroom so that
it is quite tight.
Blow up the balloon (but don´t tie
a knot) and attach it to the plastic
straw using tape. Then release it!
What pushes the balloon along the string? ……………………………………………………………………………………………
……………………………………………………………………………………………………………………………………………………………………………
How could you increase the speed of the balloon?
Rocket balloons are long and thin (expt 6E36). Why might these be abetter design than
conventional egg shaped balloons?
Try using nylon fishing line instead of string. You should find that the balloon goes faster.
Why is this? ……………………………………………………………………………………………………………………………………………………
FULL SITE LICENCE
© Martin Roberts 2010. All rights reserved.
REG USER: hy6ZAjfp9hmK
Unit menu
Main menu
Equipment
4E21 Make a straw plane
Retort straws
Plastic
stand set
(big hole,
100see
ml beaker
below)
Beaker 250ml
Normal
sized plastic
Test
straw
tube 19mm
Light card
Testand
tube
paper
rack
1
Use a plastic straw with a wide
diameter. The ones sold in a famous
hamburger outlet are great for this.
2
Seal one end of the straw using glue.
A glue gun is best. If you use PVA
glue you will have to wait some time
for the glue to dry.
3
4
Glue
Test tube
Sticky
rack
tape Test tube rack
u
Gl
e
Use some light weight card to cut out
your wings. Some concepts are shown
below that you may like to try. Stick
the wings to the straw with sticky tape.
Insert a smaller, normal sized, straw
into your straw plane and blow. See
how far the plane will travel.
Make a competition to see whose
straw plane travels furthest or stays
in the air longest.
FULL SITE LICENCE
© Martin Roberts 2010. All rights reserved.
REG USER: hy6ZAjfp9hmK
Unit menu
Main menu
Equipment
4E22 Build a parachute
Retort
Print
and
stand
photocopy
set
template
100 ml beaker
provided Beaker
Old 250ml
plastic bags
Test tube
Hole19mm
punch
2
Cut out the hexagon.
m
ar
ke
r
1
Draw a hexagon on a section of old
cotton sheet or plastic bag using the
template provided.
Test
Marker
tube
pen
rack Cotton
Testthread
tube rack Wooden
Test block
tube rack
and hook
3
4
Tie equal lengths of string from each
of the holes in the parachute and unite
them at a small metal washer.
Now hang a small object such as
a small wooden block from the
washer using an eyelet hook.
FULL SITE LICENCE
Use a hole punch to make a
hole near to each vertex of
the parachute.
Small washer
Eyelet hook
© Martin Roberts 2010. All rights reserved.
REG USER: hy6ZAjfp9hmK
Unit menu
Main menu
Equipment
4E23 Investigating parachutes
Retort stand
Parachute
(previous
set
expt)
100 ml beaker
Stop watch
Beaker 250ml
Test tube 19mm
Test tube rack
Test tube rack
Test tube rack
1
Investigate the parachutes
you made in the previous
experiment.
2
Working in pairs find out
how the area of the
parachute effects the time
taken to reach the ground.
Record your results in the table below:
Parachute
area
Time to fall
Reading 1
Reading 2 Reading 3
Middle reading
100% area
75% area
50% area
Represent your readings as a histogram on the graph provided.
Is there a relationship between the time taken to fall and the area of the
parachute? ……………………………………………………………………………………………………………………………
…………………………………………………………………………………………………………………………………………………
Explain your results in terms of air resistance: ……………………………………………………………
…………………………………………………………………………………………………………………………………………………
FULL SITE LICENCE
© Martin Roberts 2010. All rights reserved.
REG USER: hy6ZAjfp9hmK
Unit menu
Main menu
Equipment
4E23 Investigating parachutes
Area=75%
Area=100%
Area=50%
FULL SITE LICENCE
© Martin Roberts 2010. All rights reserved.
REG USER: hy6ZAjfp9hmK
Unit menu
Main menu
Equipment
4E23 Investigating parachutes
Investigating parachutes
Time to fall (seconds)
Time to fall (seconds)
Investigating parachutes
100%
50%
25%
Area of parachute
FULL SITE LICENCE
© Martin Roberts 2010. All rights reserved.
100%
50%
25%
Area of parachute
REG USER: hy6ZAjfp9hmK


