AR
C
O
I
D
U
SPY A
Ages 8 and Up
70210
Requires 2 9V (6LR61)
batteries, not included.
TM
E
G VEHICL
NIN
CK LISTE
PULL-BA
Important: Please save this instruction sheet.
It contains valuable product information.
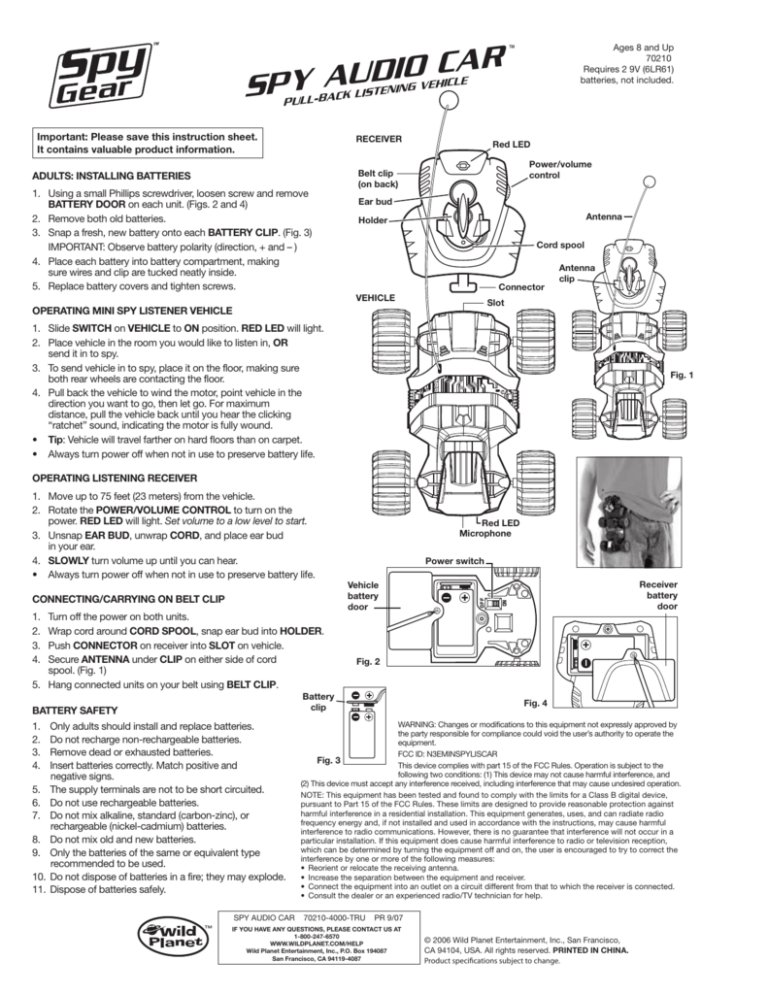
RECEIVER
ADULTS: INSTALLING BATTERIES
1. Using a small Phillips screwdriver, loosen screw and remove
BATTERY DOOR on each unit. (Figs. 2 and 4)
2. Remove both old batteries.
3. Snap a fresh, new battery onto each BATTERY CLIP. (Fig. 3)
IMPORTANT: Observe battery polarity (direction, + and – )
4. Place each battery into battery compartment, making
sure wires and clip are tucked neatly inside.
5. Replace battery covers and tighten screws.
Red LED
Power/volume
control
Belt clip
(on back)
Ear bud
Antenna
Holder
Cord spool
Connector
VEHICLE
Antenna
clip
Slot
OPERATING MINI SPY LISTENER VEHICLE
1. Slide SWITCH on VEHICLE to ON position. RED LED will light.
2. Place vehicle in the room you would like to listen in, OR
send it in to spy.
3. To send vehicle in to spy, place it on the floor, making sure
both rear wheels are contacting the floor.
4. Pull back the vehicle to wind the motor, point vehicle in the
direction you want to go, then let go. For maximum
distance, pull the vehicle back until you hear the clicking
“ratchet” sound, indicating the motor is fully wound.
• Tip: Vehicle will travel farther on hard floors than on carpet.
• Always turn power off when not in use to preserve battery life.
Fig. 1
OPERATING LISTENING RECEIVER
1.
2.
3.
4.
Turn off the power on both units.
Wrap cord around CORD SPOOL, snap ear bud into HOLDER.
Push CONNECTOR on receiver into SLOT on vehicle.
Secure ANTENNA under CLIP on either side of cord
spool. (Fig. 1)
5. Hang connected units on your belt using BELT CLIP.
BATTERY SAFETY
1. Only adults should install and replace batteries.
2. Do not recharge non-rechargeable batteries.
3. Remove dead or exhausted batteries.
4. Insert batteries correctly. Match positive and
negative signs.
5. The supply terminals are not to be short circuited.
6. Do not use rechargeable batteries.
7. Do not mix alkaline, standard (carbon-zinc), or
rechargeable (nickel-cadmium) batteries.
8. Do not mix old and new batteries.
9. Only the batteries of the same or equivalent type
recommended to be used.
10. Do not dispose of batteries in a fire; they may explode.
11. Dispose of batteries safely.
SPY AUDIO CAR
TM
Power switch
Vehicle
battery
door
Receiver
battery
door
ON
CONNECTING/CARRYING ON BELT CLIP
Red LED
Microphone
OFF
1. Move up to 75 feet (23 meters) from the vehicle.
2. Rotate the POWER/VOLUME CONTROL to turn on the
power. RED LED will light. Set volume to a low level to start.
3. Unsnap EAR BUD, unwrap CORD, and place ear bud
in your ear.
4. SLOWLY turn volume up until you can hear.
• Always turn power off when not in use to preserve battery life.
Fig. 2
Battery
clip
Fig. 4
WARNING: Changes or modifications to this equipment not expressly approved by
the party responsible for compliance could void the user’s authority to operate the
equipment.
FCC ID: N3EMINSPYLISCAR
Fig. 3
This device complies with part 15 of the FCC Rules. Operation is subject to the
following two conditions: (1) This device may not cause harmful interference, and
(2) This device must accept any interference received, including interference that may cause undesired operation.
NOTE: This equipment has been tested and found to comply with the limits for a Class B digital device,
pursuant to Part 15 of the FCC Rules. These limits are designed to provide reasonable protection against
harmful interference in a residential installation. This equipment generates, uses, and can radiate radio
frequency energy and, if not installed and used in accordance with the instructions, may cause harmful
interference to radio communications. However, there is no guarantee that interference will not occur in a
particular installation. If this equipment does cause harmful interference to radio or television reception,
which can be determined by turning the equipment off and on, the user is encouraged to try to correct the
interference by one or more of the following measures:
• Reorient or relocate the receiving antenna.
• Increase the separation between the equipment and receiver.
• Connect the equipment into an outlet on a circuit different from that to which the receiver is connected.
• Consult the dealer or an experienced radio/TV technician for help.
70210-4000-TRU
PR 9/07
IF YOU HAVE ANY QUESTIONS, PLEASE CONTACT US AT
1-800-247-6570
WWW.WILDPLANET.COM/HELP
Wild Planet Entertainment, Inc., P.O. Box 194087
San Francisco, CA 94119-4087
© 2006 Wild Planet Entertainment, Inc., San Francisco,
CA 94104, USA. All rights reserved. PRINTED IN CHINA.
Product specifications subject to change.

