Restore Active Directory on Windows 2003
advertisement
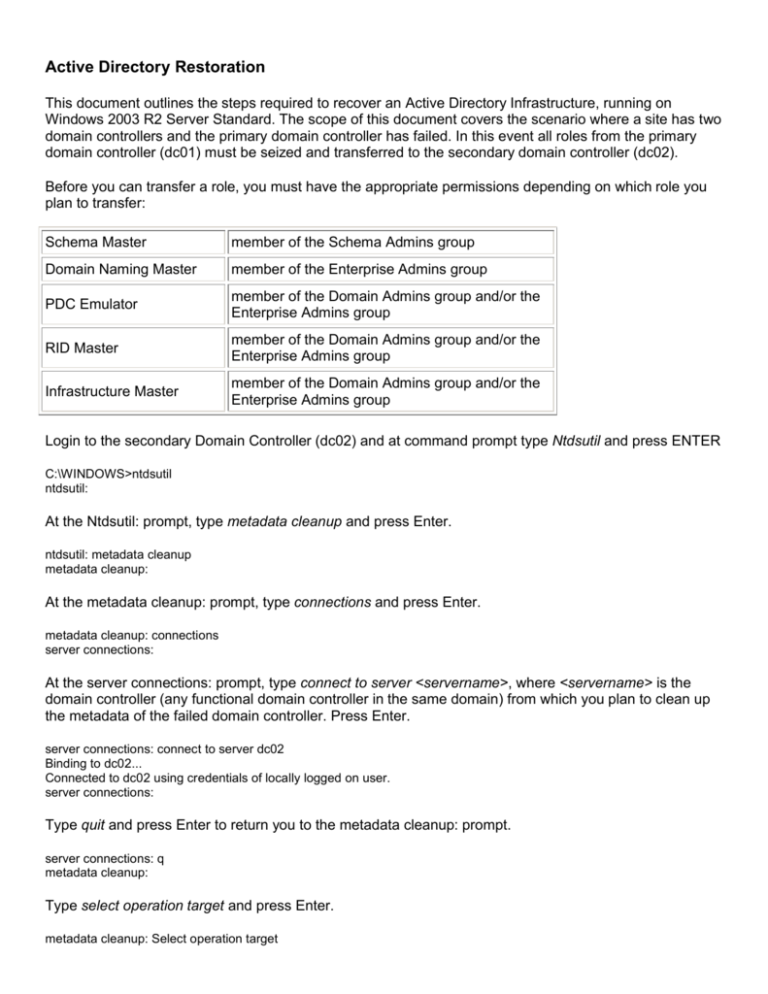
Active Directory Restoration This document outlines the steps required to recover an Active Directory Infrastructure, running on Windows 2003 R2 Server Standard. The scope of this document covers the scenario where a site has two domain controllers and the primary domain controller has failed. In this event all roles from the primary domain controller (dc01) must be seized and transferred to the secondary domain controller (dc02). Before you can transfer a role, you must have the appropriate permissions depending on which role you plan to transfer: Schema Master member of the Schema Admins group Domain Naming Master member of the Enterprise Admins group PDC Emulator member of the Domain Admins group and/or the Enterprise Admins group RID Master member of the Domain Admins group and/or the Enterprise Admins group Infrastructure Master member of the Domain Admins group and/or the Enterprise Admins group Login to the secondary Domain Controller (dc02) and at command prompt type Ntdsutil and press ENTER C:\WINDOWS>ntdsutil ntdsutil: At the Ntdsutil: prompt, type metadata cleanup and press Enter. ntdsutil: metadata cleanup metadata cleanup: At the metadata cleanup: prompt, type connections and press Enter. metadata cleanup: connections server connections: At the server connections: prompt, type connect to server <servername>, where <servername> is the domain controller (any functional domain controller in the same domain) from which you plan to clean up the metadata of the failed domain controller. Press Enter. server connections: connect to server dc02 Binding to dc02... Connected to dc02 using credentials of locally logged on user. server connections: Type quit and press Enter to return you to the metadata cleanup: prompt. server connections: q metadata cleanup: Type select operation target and press Enter. metadata cleanup: Select operation target select operation target: Type list domains and press Enter. This lists all domains in the forest with a number associated with each. select operation target: list domains Found 1 domain(s) 0 - DC=acorp,DC=local select operation target: Type select domain <number>, where <number> is the number corresponding to the domain in which the failed server was located. Press Enter. select operation target: Select domain 0 No current site Domain - DC=acorp,DC=local No current server No current Naming Context select operation target: Type list sites and press Enter. select operation target: List sites Found 1 site(s) 0 - CN=Default-First-Site1 – CN=Secondary-Site Name,CN=Sites,CN=Configuration,DC=acorp,DC=local select operation target: Type select site <number>, where <number> refers to the number of the site in which the domain controller was a member. Press Enter. select operation target: Select site 0 Site - CN=Default-First-Site-Name,CN=Sites,CN=Configuration,DC=acorp,DC=local Domain - DC=acorp,DC=local No current server No current Naming Context select operation target: Type list servers in site and press Enter. This will list all servers in that site with a corresponding number. select operation target: List servers in site Found 2 server(s) 0 - CN=DC01,CN=Servers,CN=Default-First-Site-Name,CN=Sites,CN=Configuration, DC=acorp,DC=local Type select server <number> and press Enter, where <number> refers to the domain controller to be removed. select operation target: Select server 0 Site - CN=Default-First-Site-Name,CN=Sites,CN=Configuration,DC=acorp,DC=local Domain - DC=acorp,DC=local Server - CN=DC01,CN=Servers,CN=Default-First-Site-Name,CN=Sites,CN=Configuration, DC=acorp,DC=local DSA object - CN=NTDS Settings,CN=DC01,CN=Servers,CN=Default-First-Site-Name,CN=Sites,CN=Configuration, DC=acorp,DC=local DNS host name – dc01.acorp.local Computer object - CN=DC01,OU=Domain Controllers, DC=acorp,DC=local No current Naming Context select operation target: Type quit and press Enter. The Metadata cleanup menu is displayed. select operation target: q metadata cleanup: Type remove selected server and press Enter. You will receive a warning message. Read it, and if you agree, press Yes. After Metadata Cleanup a series of prompts will appear asking whether the FSMO roles should be transferred from DC01 to DC02. Click ‘Yes’ to all prompts, but in the event of failure, follow the procedures below to reassign FSMO roles. Use AD Snap-ins to find FSMO Roles Active Directory Users and Computers Use this snap-in to find out where the domain level FSMO roles are located (PDC Emulator, RID Master, Infrastructure Master), and also to change the location of one or more of these 3 FSMO roles. Open Active Directory Users and Computers, Right click on the domain you want to view the FSMO roles for and click "Operations Masters". A dialog box (below) will open with three tabs, one for each FSMO role. Click each tab to see what server that role resides on. To change the server roles, you must first connect to the domain controller you want to move it to. Do this by right clicking "Active Directory Users and Computers" at the top of the Active Directory Users and Computers snap-in and choose "Connect to Domain Controller". Once connected to the DC, go back into the Operations Masters dialog box, choose a role to move and click the Change button. When you do connect to another DC, you will notice the name of that DC will be in the field below the Change button (not in this graphic). Active Directory Domains and Trusts Use this snap-in to find out where the Domain Naming Master FSMO role is and to change its location. The process is the same as it is when viewing and changing the Domain level FSMO roles in Active Directory Users and Computers, except you use the Active Directory Domains and Trusts snap-in. Open Active Directory Domains and Trusts, right click "Active Directory Domains and Trusts" at the top of the tree, and choose "Operations Master". When you do, you will see the dialog box below. Changing the server that houses the Domain Naming Master requires that you first connect to the new domain controller, and then click the Change button. You can connect to another domain controller by right clicking "Active Directory Domains and Trusts" at the top of the Active Directory Domains and Trusts snap-in and choosing "Connect to Domain Controller". Active Directory Schema This snap-in is used to view and change the Schema Master FSMO role. Changing the server the Schema Master resides on requires you first connect to another domain controller, and then click the Change button. You can connect to another domain controller by right clicking "Active Directory Schema" at the top of the Active Directory Schema snap-in and choosing "Connect to Domain Controller". Active Directory Sites and Services Drill down the Sites > Server and right click on NTDS settings. If a server is to be a global catalog server tick the box on the main tab. Currently Dc02 is the global catalog server. What will happen if the Operations master roles are not available on the network? FSMO Role Loss implications Schema The schema cannot be extended. However, in the short term no one will notice a missing Schema Master unless you plan a schema upgrade during that time. Domain Naming Unless you are going to run DCPROMO, then you will not miss this FSMO role. Therefore this role is required to be available to recover a single server. RID Chances are good that the existing DC will have enough unused RIDs to last some time, unless it’s expected to build hundreds of users or computer object per week. PDC Emulator Will be missed soon. There will be no time synchronization in the domain, it will probably not be possible to change or troubleshoot group policies. Password changes will become a problem. Infrastructure Group memberships may be incomplete but as there is only one domain, then there will be no impact. Add Server to the Domain Log onto the new server as the local administrator using “password” as the password. Click ‘Start’ and then right click ‘My Computer’ and select ‘Properties’ Select the ‘Computer Name’ tab and click the ‘Change Button In the dialog box select the ‘Domain’ radio button and enter ‘Acorp’ and press OK When prompted enter the domain administrator name and password and select ‘OK’ A dialog box will be shown when the server has successfully been added to the domain. Promote to a Domain Controller 1. From the desktop select ‘Start’ and ‘Run’ 2. Type ‘DCPROMO’ 3. This will bring up a wizard. Follow this wizards directions to promote the server to being a Domain Controller 4. When the wizard has completed, you will be prompted to re-start the system. Install DNS and DHCP DNS is also an internet protocol and is known as Domain Name Server or Domain Name Service. Its purpose is to translate domain names into IP addresses. Whenever we use a domain name, then a service is used for translating domain names into IP addresses and is known as DNS. DHCP is a protocol known as Dynamic Host Configuration Protocol. Its main purpose is to assign different IP addresses to devices on a network. DNS and DHCP are essential to the acorp network setup. DNS entries are integrated into AD, DHCP runs a standalone database, this needs to be restored from a backup. Install DFS using Start > Control Panel > Add/Remove Programs > Add/Remove Components Install DNS and DHCP using Start > Control Panel > Add/Remove Programs > Add/Remove Components Highlight the Network Services options and click the Details to get more options Select DNS and DHCP and click OK Click Next to install DNS will replicate with the existing domain controller to get all the zones. Backup/Restore DNS There is a DNS utility called: dnsdump.cmd: http://www.anandhacorp.co.uk/itresources/dnsdump.cm which can be used to perform backups and restores of DNS settings in the event of corruption or accidental deletions of records. Backup: Restore: dnsdump export d:\dnsdump dnsdump import d:\dnsdump Backup/Restore DHCP There is a builtin DHCP utility called: netsh to before backup and restore which can be used to perform backups and restores of DNS settings as these settings are not saved in AD. Backup: NETSH DHCP SERVER EXPORT C:\scopes ALL Restore: NETSH DHCP SERVER IMPORT C:\scopes ALL
