CCNA Exploration
Network Fundamentals: Planning and Cabling Networks
Lab 10.6.1 Creating a Small Lab Topology
Lab 10.6.1: Creating a Small Lab Topology
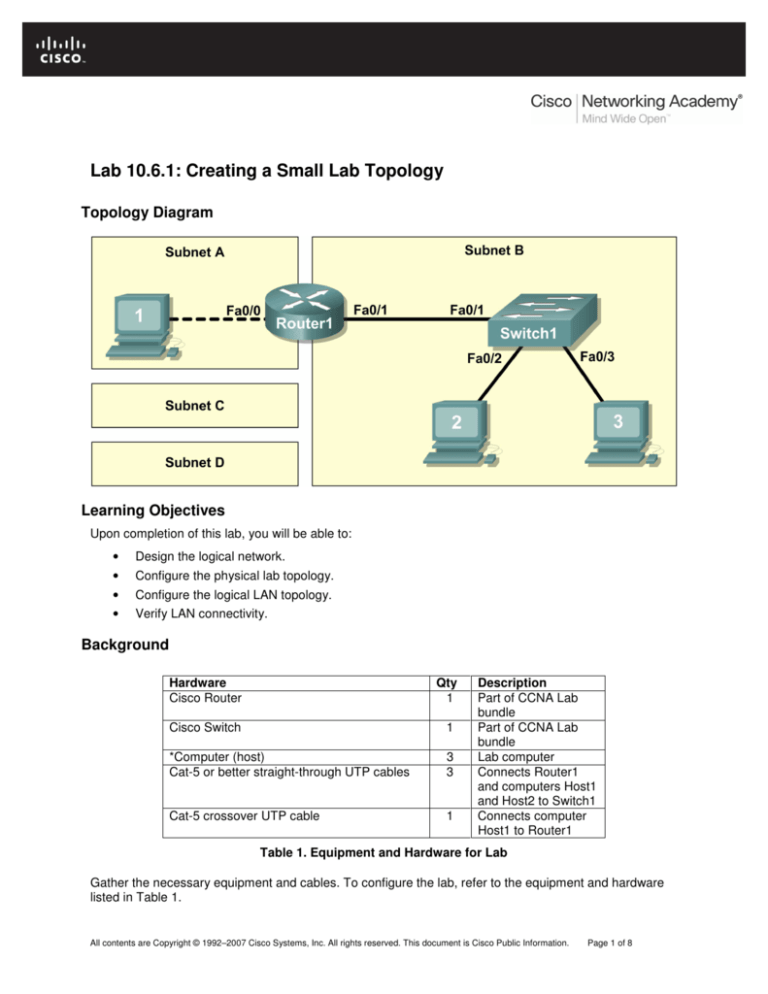
Topology Diagram
Learning Objectives
Upon completion of this lab, you will be able to:
•
Design the logical network.
•
Configure the physical lab topology.
•
Configure the logical LAN topology.
•
Verify LAN connectivity.
Background
Hardware
Cisco Router
Qty
1
Cisco Switch
1
*Computer (host)
Cat-5 or better straight-through UTP cables
3
3
Cat-5 crossover UTP cable
1
Description
Part of CCNA Lab
bundle
Part of CCNA Lab
bundle
Lab computer
Connects Router1
and computers Host1
and Host2 to Switch1
Connects computer
Host1 to Router1
Table 1. Equipment and Hardware for Lab
Gather the necessary equipment and cables. To configure the lab, refer to the equipment and hardware
listed in Table 1.
All contents are Copyright © 1992–2007 Cisco Systems, Inc. All rights reserved. This document is Cisco Public Information.
Page 1 of 8
CCNA Exploration
Network Fundamentals: Planning and Cabling Networks
Lab 10.6.1 Creating a Small Lab Topology
Scenario
In this lab you will create a small network that requires connecting network devices and configuring host
computers for basic network connectivity. SubnetA and SubnetB are subnets that are currently needed.
th
SubnetC and SubnetD are anticipated subnets, not yet connected to the network. The 0 subnet will be
used.
Note: Appendix 1 contains a subnet chart for the last IP address octet.
Task 1: Design the Logical Network.
Given an IP address and mask of 172.20.0.0 / 24 (address / mask), design an IP addressing
scheme that satisfies the following requirements:
Subnet
SubnetA
SubnetB
SubnetC
SubnetD
Number of Hosts
2 maximum
6 maximum
47 maximum
125 maximum
Host computers from each subnet will use the first available IP address in the address block. Router
interfaces will use the last available IP address in the address block.
Step 1: Design SubnetD address block.
Begin the logical network design by satisfying the requirement of SubnetD, which requires the largest
block of IP addresses. Refer to the subnet chart, and pick the first address block that will support
SubnetD.
Fill in the following table with IP address information for SubnetD:
Network
Address
Mask
First Host
Address
Last Host
Address
Broadcast
What is the bit mask? __________________________________________________
Step 2: Design SubnetC address block.
Satisfy the requirement of SubnetC, the next largest IP address block. Refer to the subnet chart, and pick
the next available address block that will support SubnetC.
Fill in the following table with IP address information for SubnetC:
Network
Address
Mask
First Host
Address
Last Host
Address
Broadcast
What is the bit mask? __________________________________________________
Step 3: Design SubnetB address block.
Satisfy the requirement of SubnetB, the next largest IP address block. Refer to the subnet chart, and pick
the next available address block that will support SubnetB.
All contents are Copyright © 1992–2007 Cisco Systems, Inc. All rights reserved. This document is Cisco Public Information.
Page 2 of 8
CCNA Exploration
Network Fundamentals: Planning and Cabling Networks
Lab 10.6.1 Creating a Small Lab Topology
Fill in the following table with IP address information for SubnetB:
Network
Address
Mask
First Host
Address
Last Host
Address
Broadcast
What is the bit mask? ________________________________________________________
Step 4: Design SubnetA address block.
Satisfy the requirement of SubnetA. Refer to the subnet chart, and pick the next available address block
that will support SubnetA.
Fill in the following table with IP address information for SubnetA:
Network
Address
Mask
First Host
Address
Last Host
Address
Broadcast
What is the bit mask? ________________________________________________________
Task 2: Configure the Physical Lab Topology.
Step 1: Physically connect devices.
Figure 1. Cabling the Network
Cable the network devices as shown in Figure 1.
What cable type is needed to connect Host1 to Router1, and why? _____________________________
__________________________________________________________________________________
What cable type is needed to connect Host1, Host2, and Router1 to Switch1, and why? ____________
__________________________________________________________________________________
__________________________________________________________________________________
If not already enabled, turn power on to all devices.
All contents are Copyright © 1992–2007 Cisco Systems, Inc. All rights reserved. This document is Cisco Public Information.
Page 3 of 8
CCNA Exploration
Network Fundamentals: Planning and Cabling Networks
Lab 10.6.1 Creating a Small Lab Topology
Step 2: Visually inspect network connections
After cabling the network devices, take a moment to verify the connections. Attention to detail now will
minimize the time required to troubleshoot network connectivity issues later. Ensure that all switch
connections show green. Any switch connection that does not transition from amber to green should be
investigated. Is the power applied to the connected device? Is the correct cable used? Is the correct cable
good?
What type of cable connects Router1 interface Fa0/0 to Host1? ________________________________
What type of cable connects Router1 interface Fa0/1 to Switch1? ______________________________
What type of cable connects Host2 to Switch1? _____________________________________________
What type of cable connects Host3 to Switch1? _____________________________________________
Is all equipment turned on? __________
Task 3: Configure the Logical Topology.
Step 1: Document logical network settings.
The host computer Gateway IP address is used to send IP packets to other networks. Therefore, the
Gateway address is the IP address assigned to the router interface for that subnet.
From the IP address information recorded in Task 1, write down the IP address information for each
computer:
Host1
IP Address
IP Mask
Gateway Address
Host2
IP Address
IP Mask
Gateway Address
Host3
IP Address
IP Mask
Gateway Address
Step 2: Configure Host1 computer.
On Host1, click Start > Control Panel > Network Connections. Right-click the Local Area Connection
device icon and choose Properties.
On the General tab, select Internet Protocol (TCP/IP), and then click the Properties button.
All contents are Copyright © 1992–2007 Cisco Systems, Inc. All rights reserved. This document is Cisco Public Information.
Page 4 of 8
CCNA Exploration
Network Fundamentals: Planning and Cabling Networks
Lab 10.6.1 Creating a Small Lab Topology
Figure 2. Host1 IP Address and Gateway Settings
Refer to Figure 2 for Host1 IP address and gateway settings. Manually enter the following information,
recorded in Step 1, above:
IP address: Host1 IP address
Subnet mask: Host1 subnet mask
Default gateway: Gateway IP address
When finished, close the Internet Protocols (TCP/IP) Properties window by clicking OK. Close the Local
Area Connection window. Depending on the Windows operating system, the computer may require a
reboot for changes to be effective.
Step 3: Configure Host2 and Host3 computers.
Repeat Step 2 for computers Host2 and Host3, using the IP address information for those computers.
Task 4: Verify Network Connectivity.
Verify with your instructor that Router1 has been configured. Otherwise, connectivity will be broken
between LANs. Switch1 should have a default configuration.
Network connectivity can be verified with the Windows ping command. Open a windows terminal by
clicking Start > Run. Type cmd, and press Enter.
All contents are Copyright © 1992–2007 Cisco Systems, Inc. All rights reserved. This document is Cisco Public Information.
Page 5 of 8
CCNA Exploration
Network Fundamentals: Planning and Cabling Networks
Lab 10.6.1 Creating a Small Lab Topology
Use the following table to methodically verify and record connectivity with each network device. Take
corrective action to establish connectivity if a test fails:
From
To
Host1
Gateway (Router1, Fa0/0)
Host1
Router1, Fa0/1
Host1
Host2
Host1
Host3
Host2
Host3
Host2
Gateway (Router1, Fa0/1)
Host2
Router1, Fa0/0
Host2
Host1
Host3
Host2
Host3
Gateway (Router1, Fa0/1)
Host3
Router1, Fa0/0
Host3
Host1
IP Address
Ping Results
Note any break in connectivity. When troubleshooting connectivity issues, the topology diagram can be
extremely helpful.
In the above scenario, how can a malfunctioning Gateway be detected?
___________________________________________________________________________________
___________________________________________________________________________________
Task 5: Reflection
Review any physical or logical configuration problems encountered during this lab. Be sure that you have
a thorough understanding of the procedures used to verify network connectivity.
This is a particularly important lab. In addition to practicing IP subnetting, you configured host computers
with network addresses and tested them for connectivity.
It is best to practice host computer configuration and verification several times. This will reinforce the skills
you learned in this lab and make you a better network technician.
Task 6: Challenge
Ask your instructor or another student to introduce one or two problems in your network when you aren’t
looking or are out of the lab room. Problems can be either physical (wrong UTP cable) or logical (wrong
IP address or gateway). To fix the problems:
1. Perform a good visual inspection. Look for green link lights on Switch1.
All contents are Copyright © 1992–2007 Cisco Systems, Inc. All rights reserved. This document is Cisco Public Information.
Page 6 of 8
CCNA Exploration
Network Fundamentals: Planning and Cabling Networks
Lab 10.6.1 Creating a Small Lab Topology
2. Use the table provided in Task 3 to identify failed connectivity. List the problems:
_____________________________________________________________________________
_____________________________________________________________________________
_____________________________________________________________________________
_____________________________________________________________________________
_____________________________________________________________________________
3. Write down your proposed solution(s):
_____________________________________________________________________________
_____________________________________________________________________________
_____________________________________________________________________________
_____________________________________________________________________________
_____________________________________________________________________________
4. Test your solution. If the solution fixed the problem, document the solution. If the solution did not
fix the problem, continue troubleshooting.
_____________________________________________________________________________
_____________________________________________________________________________
_____________________________________________________________________________
_____________________________________________________________________________
_____________________________________________________________________________
_____________________________________________________________________________
_____________________________________________________________________________
_____________________________________________________________________________
Task 7: Clean Up
Unless directed otherwise by the instructor, restore host computer network connectivity, and then turn off
power to the host computers.
Carefully remove cables and return them neatly to their storage. Reconnect cables that were
disconnected for this lab.
Remove anything that was brought into the lab, and leave the room ready for the next class.
All contents are Copyright © 1992–2007 Cisco Systems, Inc. All rights reserved. This document is Cisco Public Information.
Page 7 of 8
CCNA Exploration
Network Fundamentals: Planning and Cabling Networks
Lab 10.6.1 Creating a Small Lab Topology
Appendix 1
All contents are Copyright © 1992–2007 Cisco Systems, Inc. All rights reserved. This document is Cisco Public Information.
Page 8 of 8

