Graded Assignment
SCI113A: Earth Science | Unit 6 | Lessons 4 and 5: Laboratory: Weather Map Interpretation
Name:
Date:
Lab Report 6.04: Predicting Weather
Turn in by January 11 for full credit
In this virtual lab, you will be predicting weather for several cities in the U.S.A. Cool! In order
to do this lab, please follow the directions below:
1. Download the Lab 6.04 Report and Student Guide from the Doc Sharing Tab.
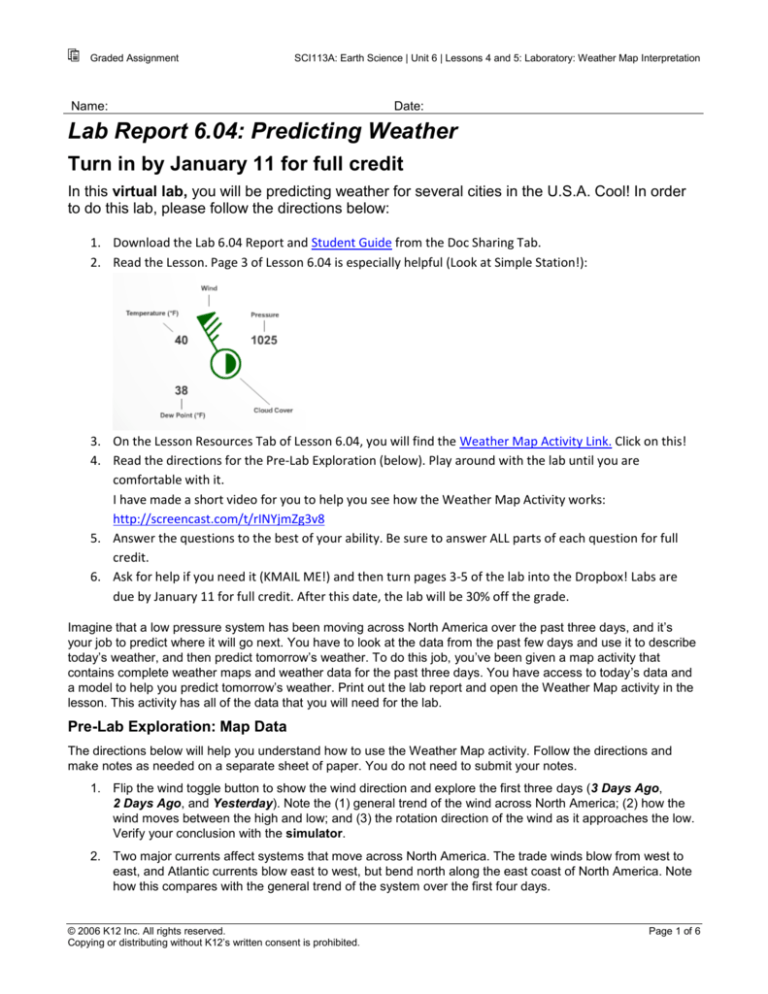
2. Read the Lesson. Page 3 of Lesson 6.04 is especially helpful (Look at Simple Station!):
3. On the Lesson Resources Tab of Lesson 6.04, you will find the Weather Map Activity Link. Click on this!
4. Read the directions for the Pre-Lab Exploration (below). Play around with the lab until you are
comfortable with it.
I have made a short video for you to help you see how the Weather Map Activity works:
http://screencast.com/t/rINYjmZg3v8
5. Answer the questions to the best of your ability. Be sure to answer ALL parts of each question for full
credit.
6. Ask for help if you need it (KMAIL ME!) and then turn pages 3-5 of the lab into the Dropbox! Labs are
due by January 11 for full credit. After this date, the lab will be 30% off the grade.
Imagine that a low pressure system has been moving across North America over the past three days, and it’s
your job to predict where it will go next. You have to look at the data from the past few days and use it to describe
today’s weather, and then predict tomorrow’s weather. To do this job, you’ve been given a map activity that
contains complete weather maps and weather data for the past three days. You have access to today’s data and
a model to help you predict tomorrow’s weather. Print out the lab report and open the Weather Map activity in the
lesson. This activity has all of the data that you will need for the lab.
Pre-Lab Exploration: Map Data
The directions below will help you understand how to use the Weather Map activity. Follow the directions and
make notes as needed on a separate sheet of paper. You do not need to submit your notes.
1. Flip the wind toggle button to show the wind direction and explore the first three days (3 Days Ago,
2 Days Ago, and Yesterday). Note the (1) general trend of the wind across North America; (2) how the
wind moves between the high and low; and (3) the rotation direction of the wind as it approaches the low.
Verify your conclusion with the simulator.
2. Two major currents affect systems that move across North America. The trade winds blow from west to
east, and Atlantic currents blow east to west, but bend north along the east coast of North America. Note
how this compares with the general trend of the system over the first four days.
© 2006 K12 Inc. All rights reserved.
Copying or distributing without K12’s written consent is prohibited.
Page 1 of 6
Graded Assignment
SCI113A: Earth Science | Unit 6 | Lessons 4 and 5: Laboratory: Weather Map Interpretation
3. The position of fronts is an interpretation made by meteorologists. Often, you may find two weather maps
from the same day that show slightly different fronts because the people interpreting the information came
to slightly different conclusions. For the first three days, you can see the fronts, but on day 4 it will be up
to you to figure out the position of the front. Turn on the fronts while toggling the pressure, temperature
and cloud cover layers. Also, look at dew point around the fronts.
4. Air rises and condenses when it encounters a low pressure system. Condensing air forms clouds. Note
how the map reflects cloud formation near low pressure systems.
5. Roll your mouse over the stations to view the details and station names. Dew point and temperature
values are in the rollover button for each station. Take a look at Columbus, Ohio, on the “Yesterday”
screen. The temperature (62 degrees) is on the top left, and dew point is on the bottom left (60 degrees).
They are pretty close to each other and if you click the precipitation button you can see that rain is
nearby. This station also shows 100% cloud cover, wind from the southwest and a low pressure of 980
mb. Find some other areas on the map where the temperature is at or close to the dew point. Note
conditions in areas where the air reaches the dew point.
Pre-Lab Exploration: Exploration
Let’s explore the simulator. The simulator screen is a program based on some rules, but it is not a weather
predictor. Like all simulations, it is useful if you understand the rules that make it work and its limits. For example,
this model does not consider the warming or cooling effect of water or elevation.
This simulator works using three basic rules: (1) Temperature is the same going east to west, but decreases as
you move north. (2) Wind blows from high to low. (3) The closer the high and low, the faster the wind. (4) A
station’s temperature is influenced by the direction the wind is blowing from and the speed of the wind.
The directions below will help you understand how to use the simulator part of the Weather Map activity. Follow
the directions and make notes as needed on a separate sheet of paper. You do not need to submit your notes.
1. Click the simulator button. Drag the “H” symbol (high pressure center) and the “L” symbol (low pressure
center). Watch the wind arrows move. Note that the wind changes both direction and speed based on the
positions. Note that the wind gets faster when the “H” and the “L” are closer together.
2. Turn on the temperature button. Note that station temperature changes. Stations that measure strong
wind blowing from the north are cooler. Stations that measure strong wind blowing from the south are
warmer. In this way, the simulator seems to push and pull temperature values around the map.
3. In the real world, air masses maintain their properties as they travel from place to place. For example, a
high-pressure system that comes from the south will be warmer than a high-pressure system that comes
from the north. In the United States, high pressure systems often come down from Canada and make
cold weather in the southern states. Consider the rules that guide the simulator while dragging the high
down from Canada into the southern United States. Notice, as you move into the south, the simulator
does not show any evidence that it knows where the system came from. The simulation just shows you
how a system might start, but does create air masses with properties that can travel.
4. Practice using the simulator. For example, see how warm you can make the Northeast. Here’s one way.
By creating a low over the northern Midwest (Wyoming) and a high in the Southeast (Georgia), you create
a strong air flow from the south. This type of pattern created some record highs in the Northeast during
November of 2006. See if you can reproduce it with the simulator. See what happens if you reverse the
positions of the high and low.
Date:
© 2006 K12 Inc. All rights reserved.
Copying or distributing without K12’s written consent is prohibited.
Page 2 of 6
Graded Assignment
SCI113A: Earth Science | Unit 6 | Lessons 4 and 5: Laboratory: Weather Map Interpretation
Name:
(5 points)
1. The tables list cities that are affected by the system. Give a weather report for the cities in the
tables. For precipitation, consider the temperature to decide if it will rain or snow.
Score
Check out this video if you need help with this: http://screencast.com/t/rINYjmZg3v8
Answer:
3 Days Ago
City
Cloud Cover
Temperature
Dew Point
Pressure
Precipitation
Cloud Cover
Temperature
Dew Point
Pressure
Precipitation
Cloud Cover
Temperature
Dew Point
Pressure
Precipitation
Denver, CO
Salt Lake City, UT
2 Days Ago
City
Chicago, IL
Denver, CO
Little Rock, AK
Yesterday
City
Chicago, IL
Knoxville, TN
Philadelphia, PA
© 2006 K12 Inc. All rights reserved.
Copying or distributing without K12’s written consent is prohibited.
Page 3 of 6
Graded Assignment
SCI113A: Earth Science | Unit 6 | Lessons 4 and 5: Laboratory: Weather Map Interpretation
(10 points)
2. For “today’s” weather, it’s up to you to decide where the fronts are located and to predict
precipitation based on the station data. First, draw your fronts and precipitation on the
map, then write your forecast and explain how the data supports your forecast.
Score
Answer:
Position of the fronts and precipitation. (If you need more room, you can make an extra copy of the map on
the last page.)
Today’s report for the following cities:
City
Forecast / Explanation
Buffalo, NY
Des Moines, IA
Knoxville, TN
Orlando, FL
Philadelphia, PA
© 2006 K12 Inc. All rights reserved.
Copying or distributing without K12’s written consent is prohibited.
Page 4 of 6
Graded Assignment
SCI113A: Earth Science | Unit 6 | Lessons 4 and 5: Laboratory: Weather Map Interpretation
(10 points)
3. Consider the track of the storm and use the simulator to help predict what the weather will be
like tomorrow. You will need to consider the previous pattern of the storm to get a sense of
the precipitation. Draw the fronts and the pressure centers on the map below. Shade the
region where you think it is raining and label any areas where you think it might snow.
Score
Answer:
Complete your map, and then forecast the conditions for the following cities.
City
Forecast / Explanation
Buffalo, NY
Chicago, IL
Knoxville, TN
Philadelphia, PA
© 2006 K12 Inc. All rights reserved.
Copying or distributing without K12’s written consent is prohibited.
Page 5 of 6
Your Score
___ of 25
Graded Assignment
SCI113A: Earth Science | Unit 6 | Lessons 4 and 5: Laboratory: Weather Map Interpretation
A larger map is below if you need it
© 2006 K12 Inc. All rights reserved.
Copying or distributing without K12’s written consent is prohibited.
Page 6 of 6

