Goniometer WallChart - PDF Version
advertisement
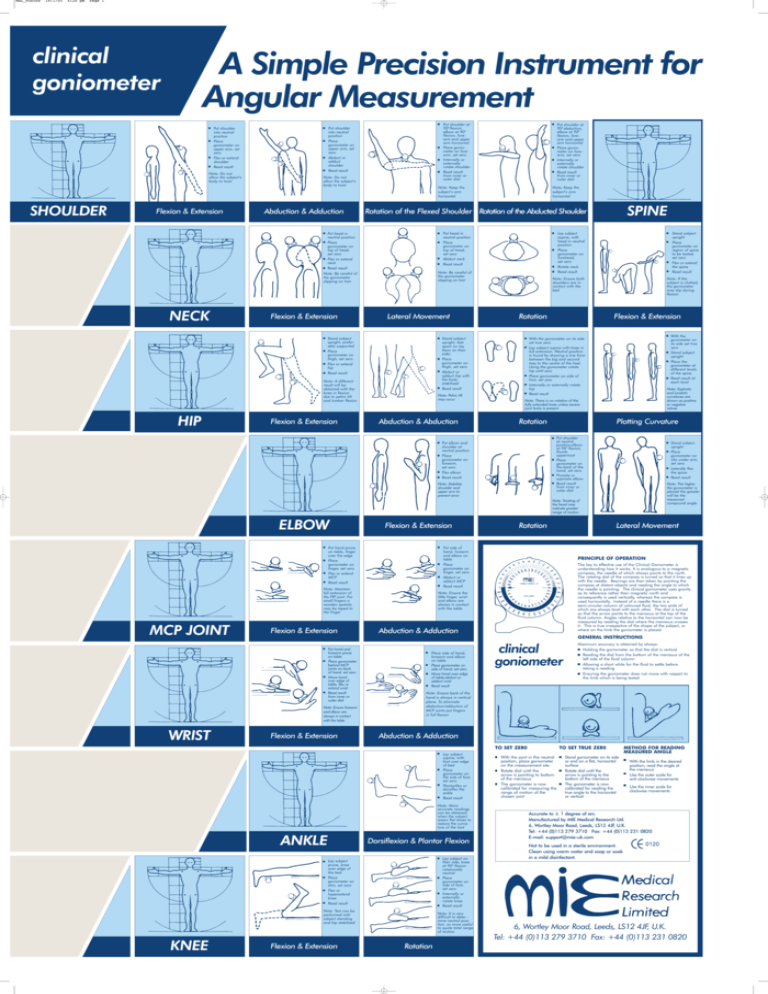
MRL_POSTER 19/1/05 4:26 pm Page 1 clinical goniometer A Simple Precision Instrument for Angular Measurement Note: Do not allow the subject’s body to twist SHOULDER Flexion & Extension Put shoulder at 900 flexion, elbow at 900 flexion, forearm and upper arm horizontal Place goniometer on forearm, set zero Internally or externally rotate shoulder Read result from inner or outer dial Put shoulder into neutral position Place goniometer on upper arm, set zero Abduct or adduct shoulder Read result Put shoulder into neutral position Place goniometer on upper arm, set zero Flex or extend shoulder Read result Note: Do not allow the subject’s body to twist Abduction & Adduction Note: Keep the subject’s arm horizontal Note: Be careful of the goniometer slipping on hair Lateral Movement Stand subject upright, preferably supported Place goniometer on thigh, set zero Flex or extend hip Read result Stand subject upright, feet apart (or lay them on their side) Place goniometer on thigh, set zero Abduct or adduct hip with the body stabilised Read result Note: A different result will be obtained with the knee in flexion due to pelvic tilt and lumbar flexion HIP Flexion & Extension SPINE Lay subject supine, with head in neutral position Place goniometer on forehead, set zero Rotate neck Read result Stand subject upright Place goniometer on region of spine to be tested, set zero Flex or extend the spine Read result Note: Ensure both shoulders are in contact with the bed Note: If the subject is clothed, the goniometer may slip during flexion Put head in neutral position Place goniometer on top of head, set zero Abduct neck Read result Note: Be careful of the goniometer slipping on hair Flexion & Extension Note; Keep the subject’s arm horizontal Rotation of the Flexed Shoulder Rotation of the Abducted Shoulder Put head in neutral position Place goniometer on top of head, set zero Flex or extend neck Read result NECK Put shoulder at 900 abduction, elbow at 900 flexion, forearm and upper arm horizontal Place goniometer on forearm, set zero Internally or externally rotate shoulder Read result from inner or outer dial Note: Pelvic tilt may occur Abduction & Abduction Rotation Flexion & Extension With the goniometer on its side set true zero Stand subject upright Place the goniometer at different levels of the spine Read result at each level With the goniometer on its side set true zero Lay subject supine with knee in full extension. Neutral position is found by drawing a line from between the big and second toes to the centre of the heel. Using the goniometer rotate hip until zero Place goniometer on side of foot, set zero Internally or externally rotate hip Read result Note: Kyphotic and Lordotic curvatures are shown as positive or negative values Note: There is no rotation of the fully extended knee unless severe joint laxity is present Rotation Plotting Curvature Put shoulder at neutral position,elbow at 900 flexion, thumb uppermost Place goniometer on the back of the hand, set zero Pronate or supinate elbow Read result from inner or outer dial Put elbow and shoulder at neutral position Place goniometer on forearm, set zero Flex elbow Read result Note: Stabilise shoulder and upper arm to prevent error Stand subject upright Place goniometer on ribs under arm, set zero Laterally flex the spine Read result Note: The higher the goniometer is placed the greater will be the measured compound angle Note: Twisting of the hand may indicate greater range of motion ELBOW Flexion & Extension Put hand prone on table, finger over the edge Place goniometer on finger, set zero Flex or extend MCP Read result Flexion & Extension PRINCIPLE OF OPERATION The key to effective use of the Clinical Goniometer is understanding how it works. It is analogous to a magnetic compass, the needle of which always points to the north. The rotating dial of the compass is turned so that it lines up with the needle. Bearings are then taken by pointing the compass at distant objects and reading the angle to which the needle is pointing. The clinical goniometer uses gravity as its reference rather than magnetic north and consequently is used vertically, whereas the compass is used horizontally. Instead of a needle there is a semi-circular column of coloured fluid, the two ends of which are always level with each other. The dial is turned so that the arrow points to the meniscus at the top of the fluid column. Angles relative to the horizontal can now be measured by reading the dial where the meniscus crosses it. This is true irrespective of the shape of the subject, or where on the limb the goniometer is placed. Note: Ensure the little finger, wrist and elbow are always in contact with the table Abduction & Adduction GENERAL INSTRUCTIONS Put hand and forearm prone on table Place goniometer behind MCP joints on back of hand, set zero Move hand over edge of table, flex or extend wrist Read result from inner or outer dial Note: Ensure forearm and elbow are always in contact with the table WRIST Flexion & Extension Place side of hand, forearm and elbow on table Place goniometer on side of hand, set zero Move hand over edge of table,abduct or adduct wrist Read result clinical goniometer Abduction & Adduction TOTO SET SET ZER0 ZERO Note: More accurate readings can be obtained when the subject wears flat shoes to reduce the curvature of the foot ANKLE Dorsiflexion & Plantar Flexion Lay subject on their side, knee at 900 flexion rotationally neutral Place goniometer on side of foot, set zero Internally or externally rotate knee Read result Lay subject prone, knee over edge of the bed Place goniometer on shin, set zero Flex or hyperextend knee Read result Note: Test can be performed with subject standing and hip stabilised Flexion & Extension Maximum accuracy is obtained by always: Holding the goniometer so that the dial is vertical Reading the dial from the bottom of the meniscus of the left side of the fluid column Allowing a short while for the fluid to settle before taking a reading Ensuring the goniometer does not move with respect to the limb which is being tested Note: Ensure back of the hand is always in vertical plane. To eliminate abduction/adduction of MCP joints put fingers in full flexion Lay subject supine, with foot over edge of bed Place goniometer on the sole of foot, set zero Plantarflex or dorsiflex the ankle Read result KNEE Lateral Movement Put side of hand, forearm and elbow on table Place goniometer on finger, set zero Abduct or adduct MCP Read result Note: Maintain full extension of the PIP joint. For small fingers a wooden spatula may be taped to the finger MCP JOINT Rotation Note: It is very difficult to determine neutral position, so more useful to quote total range of motion Rotation With the joint in the neutral position, place goniometer on the measurement site Rotate dial until the arrow is pointing to bottom of the meniscus The goniometer is now calibrated for measuring the range of motion of the chosen joint TOTO SET SET TRUE ZERO ZER0 Stand goniometer on its side or end on a flat, horizontal surface Rotate dial until the arrow is pointing to the bottom of the meniscus The goniometer is now calibrated for reading the true angle to the horizontal or vertical METHOD FOR READING MEASURED ANGLE TO SET ZERO With the limb in the desired position, read the angle at the meniscus Use the outer scale for anti-clockwise movements Use the inner scale for clockwise movements Accurate to ± 1 degree of arc. Manufactured by MIE Medical Research Ltd. 6, Wortley Moor Road, Leeds, LS12 4JF, U.K. Tel: +44 (0)113 279 3710 Fax: +44 (0)113 231 0820 E-mail: support@mie-uk.com Not to be used in a sterile environment. Clean using warm water and soap or soak in a mild disinfectant. 6, Wortley Moor Road, Leeds, LS12 4JF, U.K. Tel: +44 (0)113 279 3710 Fax: +44 (0)113 231 0820
