1915 Crew List Transcription Instructions
advertisement
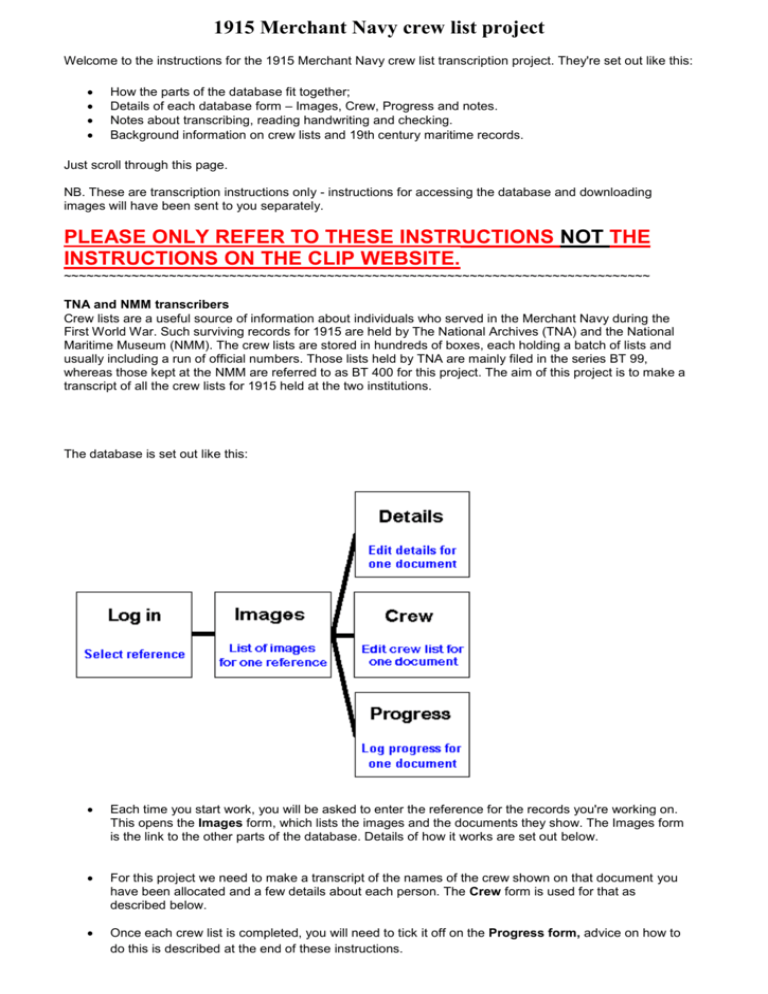
1915 Merchant Navy crew list project Instructions Welcome to the instructions for the 1915 Merchant Navy crew list transcription project. They're set out like this: How the parts of the database fit together; Details of each database form – Images, Crew, Progress and notes. Notes about transcribing, reading handwriting and checking. Background information on crew lists and 19th century maritime records. Just scroll through this page. NB. These are transcription instructions only - instructions for accessing the database and downloading images will have been sent to you separately. PLEASE ONLY REFER TO THESE INSTRUCTIONS NOT THE INSTRUCTIONS ON THE CLIP WEBSITE. ~~~~~~~~~~~~~~~~~~~~~~~~~~~~~~~~~~~~~~~~~~~~~~~~~~~~~~~~~~~~~~~~~~~~~~~~~~~~~~ TNA and NMM transcribers How the parts of the database fit together Crew lists are a useful source of information about individuals who served in the Merchant Navy during the First World War. Such surviving records for 1915 are held by The National Archives (TNA) and the National Maritime Museum (NMM). The crew lists are stored in hundreds of boxes, each holding a batch of lists and usually including a run of official numbers. Those lists held by TNA are mainly filed in the series BT 99, whereas those kept at the NMM are referred to as BT 400 for this project. The aim of this project is to make a transcript of all the crew lists for 1915 held at the two institutions. The database is set out like this: Each time you start work, you will be asked to enter the reference for the records you're working on. This opens the Images form, which lists the images and the documents they show. The Images form is the link to the other parts of the database. Details of how it works are set out below. For this project we need to make a transcript of the names of the crew shown on that document you have been allocated and a few details about each person. The Crew form is used for that as described below. Once each crew list is completed, you will need to tick it off on the Progress form, advice on how to do this is described at the end of these instructions. The Images form This form shows the images for this batch and the basic details of the documents they show. It links to the data entry forms through the icons against each document. The The The icon links to the Details form (PLEASE IGNORE THIS ICON) icon links to the Crew form. icon links to the Progress form. There is another icon on the heading bar, which refers to the whole reference: The icon links to the Notes form. Field details Image and Page The Image and Page are the image name (or bookmark) and order for the images. ON The ON is the ship's Official Number - the unique number which every British registered vessel was given on first registration - it stayed with the ship throughout her life, even if her name was changed. Vessel's name The Vessel's name is the one shown at the top of the crew list form. Type The Type column refers to the type of form used, usually shown at its top left corner. From DMY and To DMY The date on which the voyage began (From DMY) is shown in different places on the various forms - if the date is not clear, we use the date of the first signature on the crew list section. The date on which the voyage ended (To DMY) is also shown in various different places, depending on the form. If there are several dates shown, we use the one that appears to indicate when the vessel reached port and/or the crew were signed off, rather than the date on which the form was submitted, or any date stamp from the Board of Trade etc. For List D and D&07 forms, which covered half a year, we simply use the start and end dates for the half year, even if the document does not cover the full period. We use the same procedure for Eng6 forms, except for those which were used for short voyages of a day or so when a foreign going ship was transferring from one port to another in home waters. In this case, we will use the dates of the voyage. The documents covering a voyage sometimes included other loose papers, such Release or Transmission of Wages forms. We include those with the main document and include any data on them in the transcription for that document. The other fields are used to log transcription progress ~~~~~~~~~~~~~~~~~~~~~~~~~~~~~~~~~~~~~~~~~~~~~~~~~~~~~~~~~~~~~~~~~~~~~ The Details form The Crew form 2 This form shows the crew details from the main body of the crew lists. To add a new entry, type the data into the fields at the top of the list, and then click Add. The icon on the title bar will take you back to the Images form and the previous and next document in the image list. and icons will take you to the On the headings bar are some further icons. The The icon links to the Details form. (PLEASE IGNORE THIS ICON) icon links to the Progress form. If you wish, you can move the entry form to the bottom of the list using the icon will bring it back to the top again. icon on the headings bar. The Against each entry, there are two icons. To edit an entry, click To delete an entry, click There are links below the form to take you to the other forms, back to the Images form or back to the top of this form. Field details Order; The Order is the order of the entry on the crew list. We're entering it mainly to help keep place in long lists and to be able to reproduce the list in the original order. On some lists, this number is shown on each row - if not, simply increase the Order for each record. If there are several pages of crew names, keep increasing the order number - don't start again at 1 for each page. If a row has no entries then leave that row out. If there are several empty rows, again leave them out and transcribe the next listed crew member continuing with the Order numbers in sequence. In some cases, an additional record has been added at the bottom of a page. Keep in sequence, and continue the numbering. Unfortunately, this will mean that for subsequent pages, the numbering on the database won't match those on the crew list. It's inconvenient, but remember that the Order numbers are only there to keep the records in order. The database will reject any letters in the Order field, so entries like '20A' won't work. Please don't put these extra entries at the end of the list. If you miss a row out, you will have to renumber the subsequent ones to be able to get the row in. This can be tedious to do for more than a few rows (moral - keep checking as you go!). Forename and Surname The Forename and Surname columns should be completed as seen, but if the seafarer made their mark, don't include the X. Don't include the full stops in initials - see the extra notes about transcribing below. On some lists, such as Eng1, the seafarer's name appears twice, with the second entry on the far right hand side. Combine both versions to make the most complete transcription. Seafarers often signed on more than once on the same list - for example, if they were promoted. In some cases, the whole crew signed on again, sometimes several times. Transcribe all the entries exactly as they are entered and do not try to compile a single list. Where only a single name is shown, put this in the surname column. If a name appears to have the surname 3 and forename inverted, as is the custom in some countries, email us and we'll advise on a case-by-case basis. PLEASE EXPAND ALL NAMES WHERE POSSIBLE. Age or Date of Birth The seafarer's Age or Date of Birth should be entered as seen - don't try to compute the one from the other. However, be aware that on some lists both ages and dates of birth are shown, and sometimes it's not clear which one is intended, if the '18' or '19' part of a date of birth is missing. For example, '44 or /44 could mean a seafarer born in 1844 or one who was 44. Sometimes the preceding or following entries will give a clue, and if you are certain, you will have to add the missing part of the date of birth. Look out for a crew which appears to be all old men, and includes a 73 year-old 'Boy'! Be wary and, as always, if you're not certain, transcribe as seen. Birthplace Enter the seafarer's Birthplace including any details such as county or country if they are shown. Separate the county or country from a town with a comma, like this:'Newport, Pembrokeshire' or 'Havre, France' even if there is no comma on the list. Don't add the county or country if they're not there - for example, there are several Newports, not all of them coastal, but all possible birthplaces. Look closely for any abbreviations, such as 'NS' or 'NB' next to the place name. PLEASE EXPAND PLACE NAMES WHERE POSSIBLE. Previous Vessel The seafarer's Previous Vessel is entered next, including her official number (only if shown) in the same field with a comma between, like this: NYANZA, 50137. If you find the previous vessel's name hard to read, you can always refer to the CLIP index of vessel names and official numbers here for a hint. NB! In using the CLIP index, remember that ships' names were occasionally changed and ports of registry were changed much more frequently. The data in the CLIP list from the Appropriation Books shows the vessel's name and port when the official number was allocated (mostly at first registration). Later names and ports may not be shown. Remember also that the ship may not have been British registered. Use the CLIP index as a guide only, and transcribe as seen. This entry can also include 'Same', 'This ship', 'Continues'. If so, then enter just that, not the name of the vessel. If there are ditto marks, however, enter the name of the vessel, port and/or year from the row above. These entries can be confusing. The aim is to make a faithful transcription which is as helpful as possible for a user who may only see one row of the complete list. For example, for the vessel 'IOWA', the left hand columns show what is written in the list: the last column shows what you would transcribe for those entries. Row Previous vessel as shown on the list ----> Transcribed as 1 Iowa ----> IOWA 2 Same ----> SAME 3 Ditto ----> SAME 4 Iowa ----> IOWA 5 Ditto ----> IOWA 6 Ditto ----> IOWA 7 Ohio ----> OHIO 8 Same ----> SAME 9 Ditto ----> SAME 10 Ohio ----> OHIO 11 Ditto ----> OHIO 4 12 Continued ----> CONTINUED 13 Ditto ----> CONTINUED You'll see that the 'Same' under the OHIO could refer to her or to the IOWA, so it's safest to put in 'SAME' as we have done, and let the user sort out which one is meant. Please leave out any 'SS', because it make searching harder. However, please DO put in HMS (Her/His Majesty's Ship) like this: 'ORONTES, HMS', as this indicates a Royal Navy vessel, rather than Merchant Navy. Similarly, look out for TS (Training ship) and enter that like this: 'CONWAY, TS'. Do not include any description of the previous vessel, such as 'Tug' or 'Yacht'. If a seafarer was previously on a non-British ship, this is often recorded as 'Amer vsl' or similar: transcribe it as seen. If 'First ship' is shown, or there is a reference to previous occupation, such as 'Working ashore', DO put that in this field. Previous vessel's port, and year Enter the Previous vessel's port, and year, in their own fields, if they are shown alongside the previous vessel name. Note that this is the vessel's port of registration, NOT the port at which the seafarer joined, or where they signed off that vessel. Sometimes the port names are shown above or below the vessel name and it's tricky to work out which ship is referred to - trace down the list of 'previous vessels' to work out which goes with which. Look closely for any abbreviations, such as 'NS' or 'NB' next to the port name. The previous vessel's year is the year shown next to her port, not the dates of signing on or off, which are shown in columns further to the right on documents such as Eng1 and Eng6. If there is no year shown, just leave this field blank. For both the previous vessel port, and year, copy fields down where there are ditto marks, following the same procedure as described for the previous vessel name. Some List D entries show the number of years served in the present ship, rather than the year of leaving the previous vessel. In this case, enter this in the Previous Vessel field, like this 'Same ship for 8 years' or 'Heather Bell for 4 years'. When you enter the data, the fields for the previous vessel will all be displayed together, to save space on the form. Capacity The Capacity field shows the job that the seafarer did on board. These are sometimes quite long-winded descriptions - fill in as much as possible. If the seafarer's ticket number is shown DON’T include this. We've compiled a list of the capacities we've found, which may be helpful (but isn't a complete list). Apprentices are usually shown on a separate part of the form, with their port of indentures shown, as well as (sometimes) their age/DOB and birthplace. Enter their details on the crew form, using the previous vessel fields to record the indenture, like this Example: Order Forename Surname 123 JOSEPH DOB Birthplace Previous vessel BLOGGS 1862 HULL INDENTURED Port Year Capacity GRIMSBY 1878 APPRENTICE This then shows Joseph Bloggs, who was born in 1862 in Hull, and indentured in 1878 in Grimsby. However, Eng 7 fishing lists can add a complication. There were many apprentices and they are often shown with a capacity as well, but without any indenture record. In this case, record their capacity including both items, like this: APPRENTICE 3 HAND or APPRENTICE COOK ~~~~~~~~~~~~~~~~~~~~~~~~~~~~~~~~~~~~~~~~~~~~~~~~~~~~~~~~~~~~~~~~~~~~~~~~~~~~~ 5 This form is used to log progress. PLEASE SEE THE ENTRY ON THE LAST PAGE. To edit the data, type into the fields on the form, and then click Enter. The data will only be changed when you do this. The icon on the title bar will take you back to the Images form and the previous and next document in the image list. and icons will take you to the At the top right of the form there are two icons. icon links to the Details form. (PLEASE IGNORE THIS ICON) icon links to the Crew form. The The There are links below the form to take you to the other forms, or back to the Images form. The Notes form There are two versions of this form: One to make notes that apply to the whole reference, or to several images or documents. The icon for this is on the title bar of the image list form. The other is to make notes for just one document. The icon for this is against the document on the image list, and also on the crew, details and progress forms. Notes form for the whole reference The icon links back to the Images form. Against each note, there are two icons. To edit an entry, click and to delete an entry, click To add a note, make the entry in the Notes field and then click Add. Please use this form for missing or blurred images, gaps in documents etc. You can add as many notes as necessary. 6 Notes form for a single document There are icons to go back to the Images There are also icons to link to the for the same document. Against each note there are edit form, and to move on to the next details(PLEASE IGNORE THIS ICON), and delete or previous crew and document. progress forms icons. To enter a note, simply type it in and click Add. You do not need to add in details of the ship or the document they will be added to the note automatically. Please use this form to indicate any significant event which applies to this particular document, such as a death or sinking - just add brief details, not a full transcription of any record on the document. Please use the notes sparingly and do not include desertions, 'did not join', sickness (unless spectacular) etc - these are common events which we do not record. If there's a problem with a document, several documents or any problem with the function of the database that has to be resolved before you can continue, please email us at crewlists@nationalarchives.gsi.gov.uk Please follow this code when you are transcribing. Transcribe ONLY what you see. Don't add other information that you might have, or guess! Expand abbreviations such as Wm, Thos, Dvn, L'pl, Soton, AB, OS etc The same applies to standard abbreviations such as NS, IOM or IOW (Nova Scotia, Isle of Man and Isle of Wight). If you see SS before a ship’s name DO NOT record this, just record the ship’s name. Do not put in full stops after initials or at the end of abbreviations, even if that is what's on the form. For example W. G. Grace should be entered as W G - with a space between the initials. If you are not sure that what you have transcribed is correct, please do NOT put a question mark next to it. If only part of a word is legible, transcribe the part that is clear, and write three dots in square brackets [...] for the part that cannot be made out. If no part of a word is legible, write three dots in square brackets [...] to stand for the whole word. If there are several illegible words, do this for each word, with a space between [...] [...] [...] If fields are blank, just leave them blank. Don't add a dash, dots or anything else. 7 ~~~~~~~~~~~~~~~~~~~~~~~~~~~~~~~~~~~~~~~~~~~~~~~~~~~~~~~~~~~~~~~~~~~~~ Handwriting Handwriting is often difficult on crew lists, especially where the crew signed their own names. Other lists were compiled from word of mouth, or copied from previous temporary lists. Try to image a seafarer with a strong accent and a hangover, giving details to someone from a different part of the country who is not too interested anyway, and you get the picture. Say the word to yourself, with a thick accent and it may become clear! Where the Master has written log entries it is helpful to compare letters he has written with unknown letters in the crew’s details. Where there are two consecutive lists - for example 'List D' for two half years, the same person may appear on both (as indicated by same age, birthplace etc), and this will give a second chance to read the details. Where these documents provide two alternative readings for a name, we feel it is legitimate to enter one version on one half-year, and the other version on the second. In this way, anyone searching for the name has a better chance of finding their seafarer than if we plump for one of the alternatives. Look out for: What looks like “fs” could be a double s - “ss” The capital letters “I”, “J”, “L”, “S” and even “T” are often confusingly similar small letters "n", "u", and "m" are often confusing “Q” often looks like “2” “This ship” is common in the ‘Ship in which he last served’ column, but look out for “First ship” as well as “same” Logging your progress. Logging your progress throughout your allocation is essential so that we can not only track your progress but we can monitor how the project as a whole is progressing. 1. This is your list of images: When you finish a Crewlist click on the red tick 8 2. This is the page you should then see: Enter Your Log-in e.g: KK Click in this box to enter a “Tick” Click Enter 3. This is what your image list should now look like: (but without the red line!) 9


