Boiling Point Determination: Test-Tube Method
advertisement
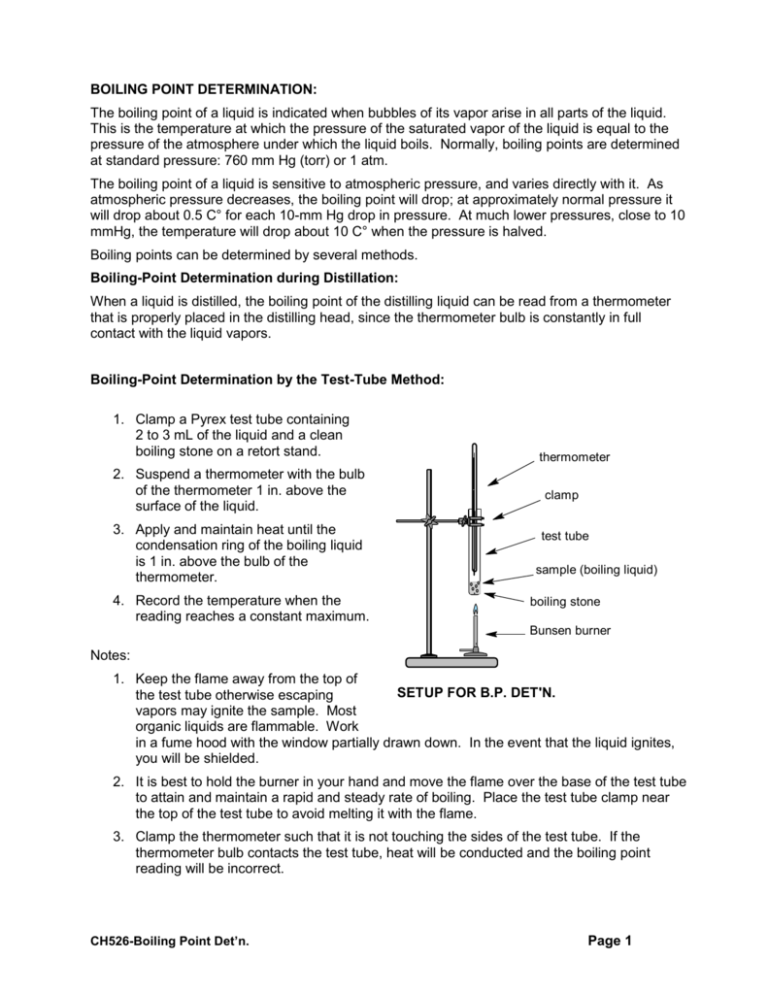
BOILING POINT DETERMINATION: The boiling point of a liquid is indicated when bubbles of its vapor arise in all parts of the liquid. This is the temperature at which the pressure of the saturated vapor of the liquid is equal to the pressure of the atmosphere under which the liquid boils. Normally, boiling points are determined at standard pressure: 760 mm Hg (torr) or 1 atm. The boiling point of a liquid is sensitive to atmospheric pressure, and varies directly with it. As atmospheric pressure decreases, the boiling point will drop; at approximately normal pressure it will drop about 0.5 C° for each 10-mm Hg drop in pressure. At much lower pressures, close to 10 mmHg, the temperature will drop about 10 C° when the pressure is halved. Boiling points can be determined by several methods. Boiling-Point Determination during Distillation: When a liquid is distilled, the boiling point of the distilling liquid can be read from a thermometer that is properly placed in the distilling head, since the thermometer bulb is constantly in full contact with the liquid vapors. Boiling-Point Determination by the Test-Tube Method: 1. Clamp a Pyrex test tube containing 2 to 3 mL of the liquid and a clean boiling stone on a retort stand. 2. Suspend a thermometer with the bulb of the thermometer 1 in. above the surface of the liquid. 3. Apply and maintain heat until the condensation ring of the boiling liquid is 1 in. above the bulb of the thermometer. 4. Record the temperature when the reading reaches a constant maximum. thermometer clamp test tube sample (boiling liquid) boiling stone Bunsen burner Notes: 1. Keep the flame away from the top of SETUP FOR B.P. DET'N. the test tube otherwise escaping vapors may ignite the sample. Most organic liquids are flammable. Work in a fume hood with the window partially drawn down. In the event that the liquid ignites, you will be shielded. 2. It is best to hold the burner in your hand and move the flame over the base of the test tube to attain and maintain a rapid and steady rate of boiling. Place the test tube clamp near the top of the test tube to avoid melting it with the flame. 3. Clamp the thermometer such that it is not touching the sides of the test tube. If the thermometer bulb contacts the test tube, heat will be conducted and the boiling point reading will be incorrect. CH526-Boiling Point Det’n. Page 1 4. Do not seal the tube. This will build up pressure and the “normal” boiling point (at atmospheric pressure) will not be measured. In addition, building up pressure may cause an explosion. 5. Many students do not obtain a rapid and continual rate of condensation on the thermometer bulb, and as a result, most boiling points are measured too low. As a check, immerse your thermometer bulb in the liquid and gently reheat the liquid to its boiling point. Although there is a risk of superheating within the liquid (high bp obtained), there is less risk of reading the boiling point on the low side. Don’t forget to add a clean porous boiling stone to reduce bumping and superheating. 6. Do not recombine the boiled liquid with your unknown. Oxidation may occur on boiling and the entire sample may be contaminated. 7. Measure the temperature corrected barometric pressure (in Rm 402) and use this to calculate the normal boiling point (at 760 mmHg). Use the Rule of Crafts as described in your CH427 lab manual (Exp. 11-Identification of an Unknown Alcohol). Show your calculations in the lab report. 8. Check your thermometer calibration by boiling a liquid of known boiling point, e.g., water. Tables of bp vs. barometric pressure should be referenced (CRC Handbook). Apply this correction to the boiling point determined for the unknown. Show your calculations in your lab report. 9. Refer to the boiling point index of organic compounds in the CRC Handbook of Chemistry and Physics to obtain a list of compounds with boiling point you determined. CH526-Boiling Point Det’n. Page 2
