schematic nm
advertisement

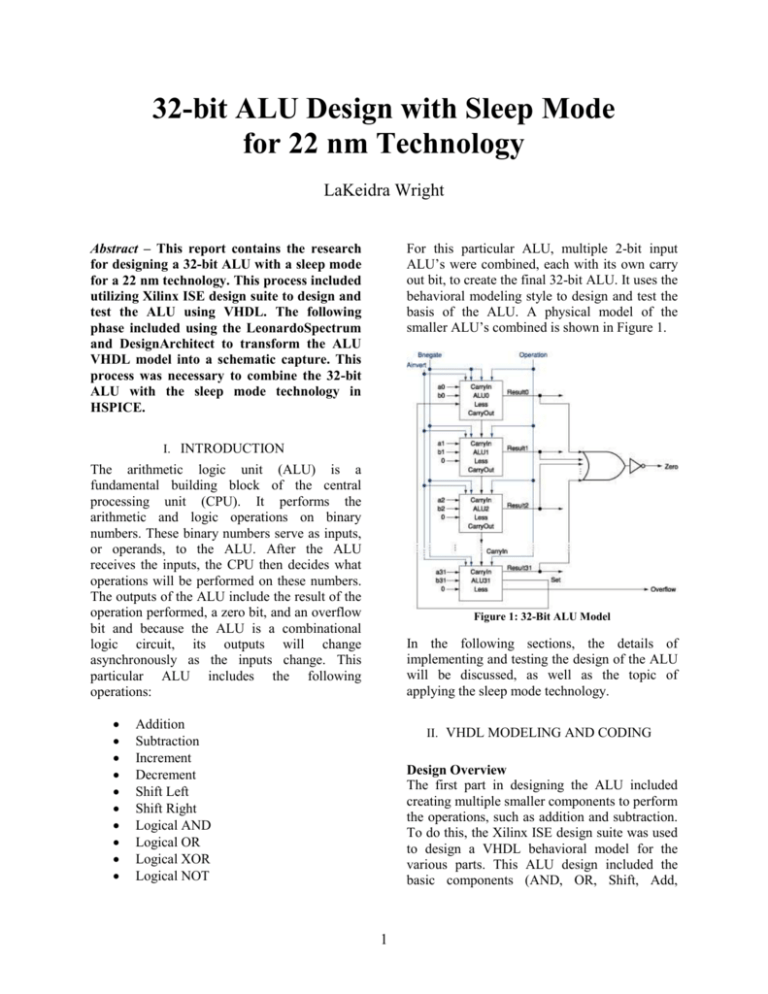
32-bit ALU Design with Sleep Mode for 22 nm Technology LaKeidra Wright Abstract – This report contains the research for designing a 32-bit ALU with a sleep mode for a 22 nm technology. This process included utilizing Xilinx ISE design suite to design and test the ALU using VHDL. The following phase included using the LeonardoSpectrum and DesignArchitect to transform the ALU VHDL model into a schematic capture. This process was necessary to combine the 32-bit ALU with the sleep mode technology in HSPICE. For this particular ALU, multiple 2-bit input ALU’s were combined, each with its own carry out bit, to create the final 32-bit ALU. It uses the behavioral modeling style to design and test the basis of the ALU. A physical model of the smaller ALU’s combined is shown in Figure 1. I. INTRODUCTION The arithmetic logic unit (ALU) is a fundamental building block of the central processing unit (CPU). It performs the arithmetic and logic operations on binary numbers. These binary numbers serve as inputs, or operands, to the ALU. After the ALU receives the inputs, the CPU then decides what operations will be performed on these numbers. The outputs of the ALU include the result of the operation performed, a zero bit, and an overflow bit and because the ALU is a combinational logic circuit, its outputs will change asynchronously as the inputs change. This particular ALU includes the following operations: Figure 1: 32-Bit ALU Model In the following sections, the details of implementing and testing the design of the ALU will be discussed, as well as the topic of applying the sleep mode technology. Addition Subtraction Increment Decrement Shift Left Shift Right Logical AND Logical OR Logical XOR Logical NOT II. VHDL MODELING AND CODING Design Overview The first part in designing the ALU included creating multiple smaller components to perform the operations, such as addition and subtraction. To do this, the Xilinx ISE design suite was used to design a VHDL behavioral model for the various parts. This ALU design included the basic components (AND, OR, Shift, Add, 1 end component; Subtract) that later came together to produce the arithmetic unit, the logic unit, and the shift register. These top 3 components merge to become the overall CPU. A diagram of the smaller components needed to create the ALU is provided in Figure 2. component Shift is Port ( i_a : in STD_LOGIC_VECTOR (31 downto 0); c_in : in STD_LOGIC; s : in STD_LOGIC; result : out STD_LOGIC_VECTOR (32 downto 0)); end component; component mux33_4to1 is Port ( a,b,c,d:in STD_LOGIC_VECTOR(32 downto 0); s: in STD_LOGIC_VECTOR(1 downto 0); y: out STD_LOGIC_VECTOR(32 downto 0)); end component; signal sg_arith :STD_LOGIC_VECTOR(32 downto 0); signal sg_logic :STD_LOGIC_VECTOR(32 downto 0); signal sg_shift :STD_LOGIC_VECTOR(32 downto 0); begin p0:Arithmetic Port map(i_a,i_b,c_in,s(1 downto 0),sg_arith); p1:Logic Port map(i_a,i_b,s(1 downto 0),sg_logic); p2:Shift Port map(i_a,c_in,s(1),sg_shift); p3:mux33_4to1 Port map(sg_arith,sg_logic,sg_shift, "ZZZZZZZZZZZZZZZZZZZZZZZZZZZZZZZZZ",s(3 downto 2),result); end Bhv_alu_32bit; Figure 2: ALU Components Diagram Top Level Model After designing all of the smaller portions of the ALU, they were finally combined to form the top-level model of the ALU. The top-level hierarchical model is shown below. As shown and previously described, the toplevel VHDL model is comprised of 3 major components and a multiplexer. The multiplexer’s purpose is to combine all components into the working ALU, where the select input “s” determines which unit will process the input and how the unit will process the data. Since this is only the top-level behavioral model, the model does not show the actual behavioral models for the logic unit, the arithmetic unit or the shift unit. However, these units consist of various multiplexers and adders and also include the behavioral models for the functionality of logic gates. library IEEE; use IEEE.STD_LOGIC_1164.ALL; use IEEE.STD_LOGIC_ARITH.ALL; use IEEE.STD_LOGIC_UNSIGNED.ALL; entity ALU_32bit is Port ( i_a : in STD_LOGIC_VECTOR (31 downto 0); i_b : in STD_LOGIC_VECTOR (31 downto 0); c_in : in STD_LOGIC; s : in STD_LOGIC_VECTOR (3 downto 0); result : out STD_LOGIC_VECTOR (32 downto 0)); end ALU_32bit; architecture Bhv_alu_32bit of ALU_32bit is component Arithmetic is Port ( i_a : in STD_LOGIC_VECTOR (31 downto 0); i_b : in STD_LOGIC_VECTOR (31 downto 0); c_in : in STD_LOGIC; s : in STD_LOGIC_VECTOR (1 downto 0); result : out STD_LOGIC_VECTOR (32 downto 0)); end component; Simulation Results Before combining all of components, each component was tested independently to confirm the correct functionality. To do this, a simulator was utilized to examine hypothetical outputs based on hypothetical inputs. Simulation results for 2 of the major components, the arithmetic unit and logic unit, are shown in Figure 3 and component Logic is Port ( i_a : in STD_LOGIC_VECTOR (31 downto 0); i_b : in STD_LOGIC_VECTOR (31 downto 0); s : in STD_LOGIC_VECTOR (1 downto 0); result : out STD_LOGIC_VECTOR (32 downto 0)); 2 Figure 4, respectively. The overall ALU simulation can be found in Figure 5. awake to sleep mode would have been similar to the results shown in Figure 8. As shown in Figure 8, the expected leakage power should be lower in the sleep mode and much larger when active. So in theory, an ALU with a sleep mode would decrease the overall leakage power. Figure 3: Arithmetic Unit Simulation Figure 4: Logic Unit Simulation Above, in Figure 4, the AND function is being tested. The inputs here are A= 10111000101111000001000111101110 and B = 00100111001100111000000100100001 and Y = 01100000011100000110111100110000 Figure 6: RTL LeonardoSpectrum Schematic Figure 3: ALU Simulation Figure 5 shows the exact inputs shown in Figure 4. This simulation simply confirms the accuracy and consistency of the ALU after combining all of the working components. III. SLEEP MODE The next step in the process was to use LeondardoSpectrum and DesignArchitect generate a netlist to import into to HSpice. Part of the RTL schematic generated in LeonardoSpecrum is shown in Figure 6. Figure 7: ALU-Sleep Mode Setup The original idea for the setup of the ALU and the sleep mode is shown in Figure 7. Sleep transistors were to be used for the sleep mode. The sleep transistors were connected between the ALU and ground. After setting up the schematic in HSpice, some issues were encountered and the outputs could not be obtained correctly. Results were significantly inconsistent with the expected results. However, the expected outputs for the transition from Figure 8: Expected Sleep Mode Results The calculations that would have been made would include comparisons made between delays with the sleep mode and without. For example, the delay of a gate without a sleep 3 mode would be calculated using the following equation: 𝜏𝑑 = V. REFERNECES [1] Shi, K., Howard, D., “Sleep Transistor Design and Implementation – Simple Concepts Yet Challenges To Be Optimum”, Proceedings of the International Symposium on VLSI Design, Automation and Test, 26-28 April 2006, pp. 1-4. [2] S.Yalamanchali, “Introductory VHDL: From simulation to synthesis”, Prentice Hall, United States, 2002. [3] Douglas L. Perry, VHDL, third edition, McGraw-Hill, pp. 60-63, 238, July 1999. [4] http://www.xilinx.com 𝐶𝐿 𝑉𝐷𝐷 (𝑉𝐷𝐷 − 𝑉𝑡𝐿 )𝛼 While the delay of the gate with a sleep mode would be calculated as follows: 𝜏𝑑 𝑆𝑙𝑒𝑒𝑝 = 𝐶𝐿 𝑉𝐷𝐷 (𝑉𝐷𝐷 − 𝑉𝑥 − 𝑉𝑡𝐿 )𝛼 Using these equations, W/L for 22nm can be found. IV. CONCLUSION This ALU design was successfully created and tested in the VHDL model and transformed to be used in HSpice. All the components of the ALU, before the sleep mode was attempted, responded at it should have. Given additional time, the details regarding the sleep mode could be examined and rectified to obtain the expected accurate results. 4


