lower crossed syndrome
advertisement
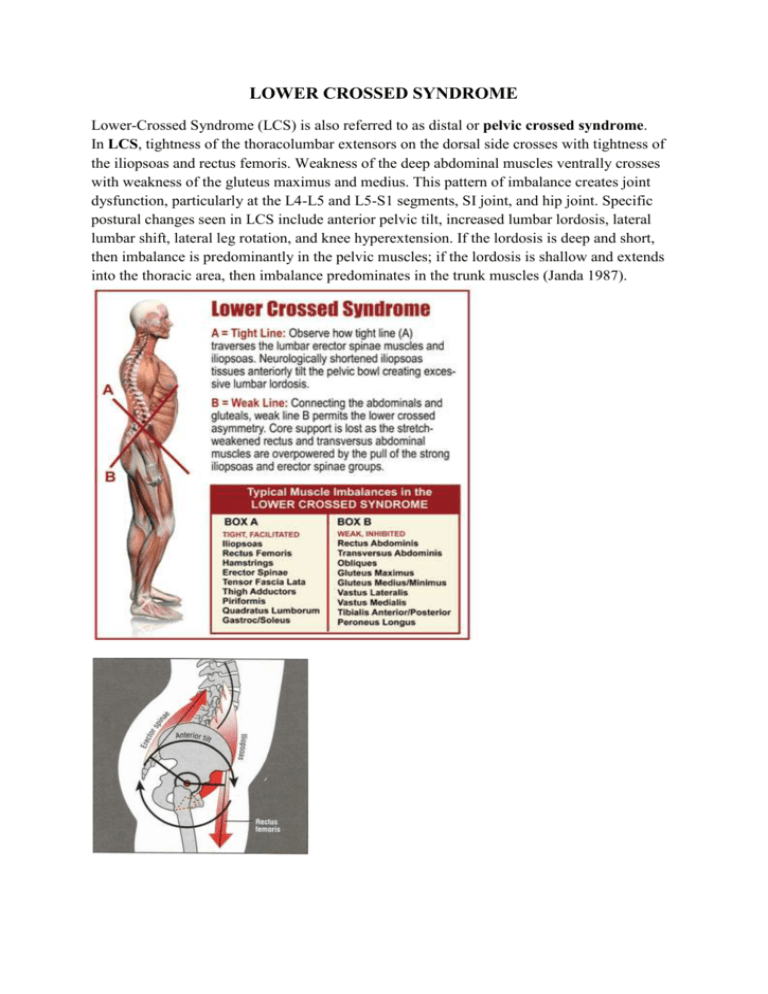
LOWER CROSSED SYNDROME Lower-Crossed Syndrome (LCS) is also referred to as distal or pelvic crossed syndrome. In LCS, tightness of the thoracolumbar extensors on the dorsal side crosses with tightness of the iliopsoas and rectus femoris. Weakness of the deep abdominal muscles ventrally crosses with weakness of the gluteus maximus and medius. This pattern of imbalance creates joint dysfunction, particularly at the L4-L5 and L5-S1 segments, SI joint, and hip joint. Specific postural changes seen in LCS include anterior pelvic tilt, increased lumbar lordosis, lateral lumbar shift, lateral leg rotation, and knee hyperextension. If the lordosis is deep and short, then imbalance is predominantly in the pelvic muscles; if the lordosis is shallow and extends into the thoracic area, then imbalance predominates in the trunk muscles (Janda 1987). Lower Crossed Syndrome has 2 different presentations in patients; one manifested in the lower back (Type B) and the other in the hip (Type A). Janda's LCS Type A Janda's LCS Type B Lower Crossed Syndrome Treatment When treating patients with LCS the shortened muscles must be restored before embarking on training of the weakened muscles. This is based on Sherrington's Law of reciprocal inhibition which states that when one muscle is shortened or tightened its opposite muscle relaxes. Relaxation o pelvis o the hip joint o the lumbar spine Stretching o the flexors of the hip o spinal extensors of the lumbar spine o the rectangular lumbar muscle Strengthening o the deep stabilization system o the abdominal muscles (direct abdominal muscles - the lower part of the strengthening of direct abdominal muscle endurance) o the pelvic o the gluteal muscles (gluteus maximus) Relaxation o pelvis o the hip joint slow circles in the hip joint(use the gravitation influence) o the lumbar spine Stretching o the flexors of the hip One-leg kneeling knee extensor stretch. Drive forward into the stretch, not down! o spinal extensors of the lumbar spine o the rectangular lumbar muscle Hamstrings- The patient lies supine with their leg extended, knee locked, and their low back flat on the tale so the pelvis is level. The examiner places the patients leg with the knee that’s locked onto their shoulder, supporting the knee while flexing the hip to stretch the hamstring. The examiner instructs the patient to contract their quadriceps while they hold for a count of ten. This can be done for 3 to 5 cycles. With each cycle the examiner should be able to increase the stretch on the hamstring. Always do bilaterally. Erector Spinae - The patient lies supine in the fetal position, their knees to their chest with their arms wrapped around their knees. The examiner places their inferior hand under the sacrum pulling down in a scooping motion with the superhand pushing up on the patient’s knees. Action 1 Stretches Gluteal while Action 2 Stretches Erector Spinae) Gluteus Maximus - The patient is supine with one leg flexed at the hip and the knee. The examiner’s inferior hand is under the leg and their superior hand is on top of the leg. This gives the examiner more control of the stretch. The examiner stretches the patient for 10 seconds followed by the 10 seconds of the patient pushing against the examiner. Strengthening We need to get the inactive or inhibited muscles working for us again. We need to activate the gluteus, as well as the abdominals. Exercise for increasing glute activation is the single leg knee to chest hip raise. Holding the knee to the chest while performing a single leg hip raise takes the pelvis out of anterior tilt, and does not allow for tilt, or lumbar extension that can often times compensate for glute activation in a hip raise. SL Knee to Chest Hip Raise - Start Ideally we’d like to start with 5-10 reps each leg with a count pause at the top, then progress to pauses all the way up to ten seconds on each leg. Every rep you should focus on squeezing with the back glute as hard as possible. SL Knee to Chest Hip Raise - Finish Also we need to strengthen the abdominals on the front side. We accomplish this by using ISO holds in the plank position for time. We have several variations of these ISO holds including moving the arms and/or the legs to increase the intensity, and also adding weight to the hips when the athletes have advanced. Generally, the abs need to be strengthened with a neutral pelvic position. We can also start to integrate our activation work into our training. When doing squats, RDL’s, and such always squeezing the glutes through full hip extension at the top. As well, any single leg work such as split squats, lunges, and Bulgarian split squats are great for the glutes. o the deep stabilization system o the abdominal muscles (direct abdominal muscles - the lower part; strengthening of direct abdominal muscle by endurance) o the pelvic o the gluteal muscles Gluteus Maximus - Have the patient stand facing the wall with the tubing around their ankle. Instruct them to have their knee locked in extension or bent at 90 degrees to isolate the gluteus maximus while extending the hip away from the wall. This motion can also be done in the prone position depending on thepatient’s stability. Have the patient contract for 2 seconds, hold for 2 seconds,and release for 2 seconds. Hamstrings - There are three choices to choose from using the thera-band depending upon the patient’s stability. Either seated with their leg extended, standing with one leg straight, or lying prone with their legs extended. Attach the tubing around the ankle having the patient contract their hamstring. The patient should contract for 2 seconds, hold for 2 seconds, and release for 2 seconds. (also exercise ball) Transverse Abdominals - First, have the patient lie on their back with their knees bent. Instruct them to pull their umbilicus in towards their spine and then up without moving their pelvis. Once they can do this repeat the process with the patient sitting up. Finally, have the patient lie prone with a tennis ball under their umbilicus. Have them draw their umbilicus up and in towards the spine attempting to lift their stomach off the tennis ball. Always remind them to do the motion without moving their pelvis. We want to isolate the TVA. Hip Flexors - Have the patient on the hands and knees with tubing around on eankle. Instruct the patient to pull their knee towards their chest. The patient should contract for 2 seconds, hold for 2 seconds, and release for 2 seconds. Erector Spinae - Have the patient lying prone with their hands behind their head extending their back. The patient should contract for 2 seconds, hold for 2 seconds, and release for 2 seconds.
