Daniel Marshall Student No. 362 740 398 Rockwell Hardness Test
advertisement
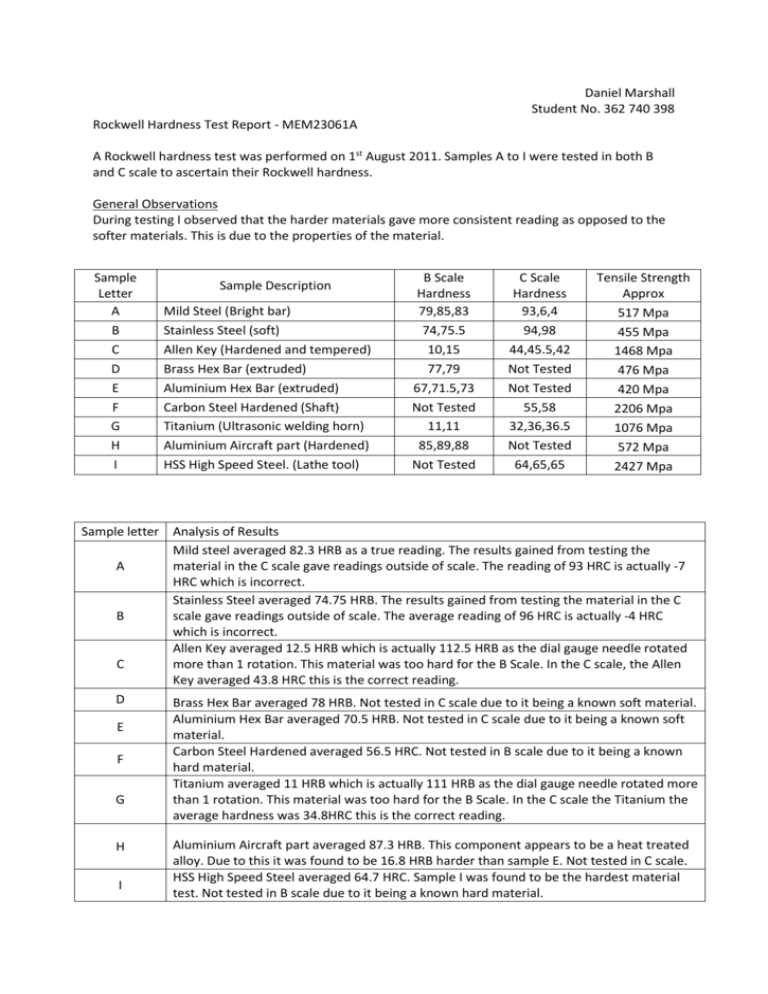
Daniel Marshall Student No. 362 740 398 Rockwell Hardness Test Report - MEM23061A A Rockwell hardness test was performed on 1st August 2011. Samples A to I were tested in both B and C scale to ascertain their Rockwell hardness. General Observations During testing I observed that the harder materials gave more consistent reading as opposed to the softer materials. This is due to the properties of the material. Sample Letter A B C D E F G H I Sample Description Mild Steel (Bright bar) Stainless Steel (soft) Allen Key (Hardened and tempered) Brass Hex Bar (extruded) Aluminium Hex Bar (extruded) Carbon Steel Hardened (Shaft) Titanium (Ultrasonic welding horn) Aluminium Aircraft part (Hardened) HSS High Speed Steel. (Lathe tool) B Scale Hardness 79,85,83 74,75.5 10,15 77,79 67,71.5,73 Not Tested 11,11 85,89,88 Not Tested C Scale Hardness 93,6,4 94,98 44,45.5,42 Not Tested Not Tested 55,58 32,36,36.5 Not Tested 64,65,65 Tensile Strength Approx 517 Mpa 455 Mpa 1468 Mpa 476 Mpa 420 Mpa 2206 Mpa 1076 Mpa 572 Mpa 2427 Mpa Sample letter Analysis of Results Mild steel averaged 82.3 HRB as a true reading. The results gained from testing the A material in the C scale gave readings outside of scale. The reading of 93 HRC is actually -7 HRC which is incorrect. Stainless Steel averaged 74.75 HRB. The results gained from testing the material in the C B scale gave readings outside of scale. The average reading of 96 HRC is actually -4 HRC which is incorrect. Allen Key averaged 12.5 HRB which is actually 112.5 HRB as the dial gauge needle rotated C more than 1 rotation. This material was too hard for the B Scale. In the C scale, the Allen Key averaged 43.8 HRC this is the correct reading. D Brass Hex Bar averaged 78 HRB. Not tested in C scale due to it being a known soft material. Aluminium Hex Bar averaged 70.5 HRB. Not tested in C scale due to it being a known soft E material. Carbon Steel Hardened averaged 56.5 HRC. Not tested in B scale due to it being a known F hard material. Titanium averaged 11 HRB which is actually 111 HRB as the dial gauge needle rotated more G than 1 rotation. This material was too hard for the B Scale. In the C scale the Titanium the average hardness was 34.8HRC this is the correct reading. H I Aluminium Aircraft part averaged 87.3 HRB. This component appears to be a heat treated alloy. Due to this it was found to be 16.8 HRB harder than sample E. Not tested in C scale. HSS High Speed Steel averaged 64.7 HRC. Sample I was found to be the hardest material test. Not tested in B scale due to it being a known hard material. Rockwell Leverage System The Rockwell Hardness tester works by using a pre-determined mass to generate a specified force, this force is applied to the power lever. The power lever works like a fulcrum increasing the leverage which increases the force that is applied to the indenter. Depending on the scale selected the predetermined mass generates the equivalent force of 60 kg, 100kg or 150kg on the indenter. The major load is released or applied by rotating the release handle. This handle lifts the load pushing the power lever up, so that there is no load in the lever. When the handle is released the load lowers onto the lever. To ensure that the load is applied slowly as the load is released it is dampened by the dashpot. The dashpot is an oil filled dampener which takes the shock out of the loading. Care must be taken when using the Rockwell Hardness Tester that only a 10kg pre-load is applied to the piece being tested. If care is not taken the power lever can become damaged. Report 1. Write a short report on the Rockwell results. Each component must have at least 3 tests, include the part name. The standard way to write Rockwell hardness of 45 on the C scale would be 45 HRC. 2. Using the BRINELL test, an approximate relationship between the hardness and the tensile strength (of steel) is, TS(Mpa)=3.55*HB (HB=<175) else 3.38*HB (HB>175) where HB is the Brinnell Hardness of the material, as measured with a standard indenter and a 3000 kgf load. For Rockwell it is not so simple. 3. Explain how the leverage system works with the aid of a diagram (sketch).
